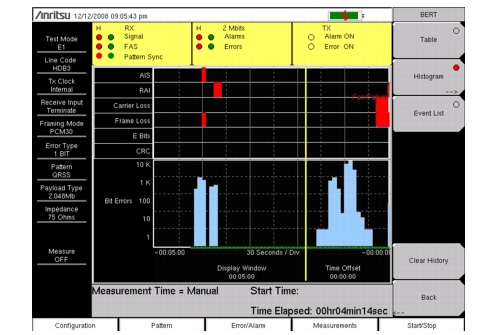
The zoom in and zoom out features can be used to change the resolution of the data in the histogram display at the cursor location. When the cursor passes the 10% and 90% time points of the histogram display, the time window starts scrolling back in time or ahead in time. If you need to see a detailed view of a fault occurrence, then you can use the zoom in function to change the resolution to as small as 5 seconds per division. Maximum window size is 72 hours (6 hours/div). When more than 72 hours of data are collected, the last 72 hours are shown.
Window Size
The window size adjusts the length of time that is shown on the histogram screen. More data may be stored than is shown. This parameter allows you to zoom in or zoom out to see either more time on the screen or more resolution. The minimum (1 minute) window size and maximum (3 days) window size values are based upon the data resolution that is selected with the zoom in and zoom out features.
Time Units
If Relative is selected (underlined), then the histogram axis is labeled with time since the start of the measurement record. If Absolute is selected, then the histogram axis is labeled with absolute times based upon the system clock.
Rx Signal Measurement Procedure
1. Press the Measurements main menu key to activate the Measurements menu.
2. Press the Rx Signal submenu key to activate the Rx Signal menu.
To Insert Errors/Alarms
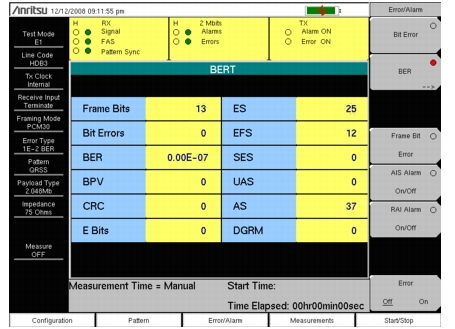
1. Press the Error/Alarm main menu key to activate the Error/Alarm menu.
2. Press the Bit Error (1–1000 Burst), BER, or Frame Bit Error submenu key, as applicable to the measurement.
Note
If Bit Error is pressed, then press the Bit Error key again to select a burst number between 1 and 1000.
If BER is pressed, then press BER again and select the bit error rate to be 1E‑2, 1E‑3, 1E‑4, 1E‑5, 1E‑6, or 1E‑7.
If Frame Bit Error is pressed, then press Frame Bit Error again and select a burst number between 1 and 1000.
3. Press the AIS Alarm or RAI Alarm submenu key. These two submenu keys toggle between ON and OFF. The alarm status is displayed in the measurement status bar.
Event List
Event List
The Event List updates errors, signal loss, frame loss, and alarms every second. Alarms are: AIS ON, AIS OFF, RAI ON, and RAI OFF. The data is displayed as a log list. The display will list up to 1000 errored seconds.