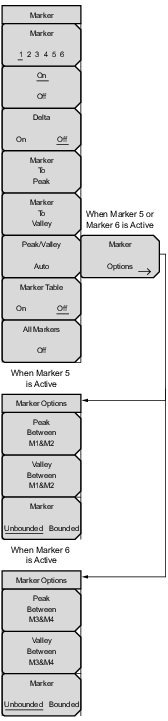
Marker Press the marker key the select M1 to M6 on the touch screen to choose the active marker. The underlined marker number is the active marker. On/Off Turns the selected marker underlined in the Marker key On or Off. Delta Turns on a delta marker. Marker to Peak This submenu key places the currently active marker on the highest signal amplitude currently displayed on screen. Marker to Valley This soft key places the currently active marker on the lowest signal amplitude currently displayed on screen. Peak/Valley Auto (Markers 1 through 4 Active) Automatically set Marker 1 to peak and Marker 2 to valley. Note: Not available in DTF measurements. Marker Options (Marker 5 or 6 Active) Displays the Marker Options submenu. Marker 5 Active Peak Between M1&M2: Place Marker 5 at the peak between Marker 1 and Marker 2. Valley Between M1&M2: Place Marker 5 at the valley between Marker 1 and Marker 2. Marker Unbounded Bounded: Bound Marker 5 with Marker 1 and Marker 2. Used in conjunction with Bounded Limit Lines (see Limit Menu). Marker 6 Active Peak Between M3&M4: Place Marker 6 at the peak between Marker 3 and Marker 4. Valley Between M3&M4: Place Marker 6 at the valley between Marker 3 and Marker 4. Marker Unbounded Bounded: Bound Marker 6 with Marker 3 and Marker 4. Used in conjunction with Bounded Limit Lines (see Limit Menu). Marker Table Causes a table to be displayed below the sweep window. The table is automatically sized to display all markers that are turned on. In addition to the marker frequency and amplitude, the table also shows delta frequencies and amplitude deltas for all markers that have deltas entered for them. All Markers Off Turns off all markers. |