Press the Shift key and then Limit (6) key to display the Limit menu. The instrument supports both single limit and multi-segment limit lines. The multi-segment limit lines can have as many as 40 segments across the entire frequency or distance span. Limit lines can be used for visual reference, or for pass/fail criteria using the limit alarm. Limit alarm failures are reported whenever a signal is above the upper limit line or below the lower limit line. Limit lines are stored with setups and can be recalled at a later time.
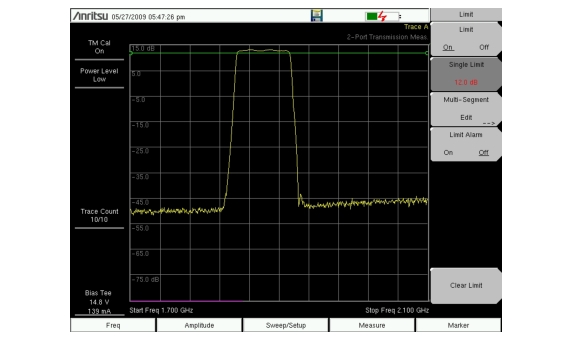
Single Limit Line
1. Press Shift and then Limit (6) to enter the Limit menu.
2. Press the Limit On/Off key to turn on the Limit.
3. Press Single Limit and then use the numeric keypad, Up/Down arrow keys, or the rotary knob followed to change the limit value, then press Enter.
4. Press the Limit Alarm key to turn on or off the Limit Alarm.
Single Limit Line
Adjusting the Volume of Limit Alarm
1. Press Shift and then System (8).
2. Select the System Options submenu.
3. Press the Volume key.
4. Use the Up/Down arrow keys, rotary knob, or enter a value between 1 and 9 to adjust the volume.
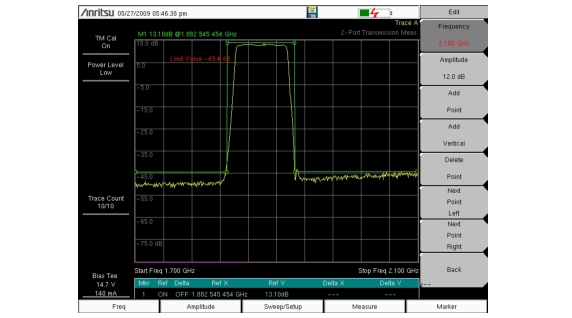
Segmented Limit Lines
Segmented Limit Line
The following procedure creates a segmented limit line for 2-port measurements. Limits are set to:
• –45 dB between 1700 MHz and 1820 MHz
• 14 dB between 1820 and 1925 MHz, and
• –45 dB between 1925 and 2100 MHz.
The frequency is set from 1700 MHz to 2100 MHz.
1. Press Shift and then Limit (6) to enter the Limit menu.
2. Press the Multi-Segment Edit submenu key.
3. The default limit line has two points. In this example the 3 segments require 6 points. Press the Add Point key four times to add four more points.
4. Press Next Point Left until the highlighted red point is the first point to the left. Press Amplitude and enter –45 dB, press Enter.
5. Press Next Point Right and set the Amplitude to –45 dB for the second point from the left. Press Frequency and enter 1820 MHz for the point.
6. Press Next Point Right and set the Amplitude to 0.0 dB for the third point from the left. Press Frequency and enter 1820 MHz.
7. Press Next Point Right and set the Amplitude to 0.0 dB for the fourth point from the left. Press Frequency and enter 1925 MHz.
8. Press Next Point Right and set the Amplitude to –45 dB for the fifth point from the left. Press Frequency and enter 1925 MHz.
9. Press Next Point Right and set the Amplitude to –45 dB for the sixth point from the left. Press Frequency and enter 2100 MHz.