|
1.
|
Press the Measurement main menu key. The Measurements menu is listed.
|
|
2.
|
Begin testing by pressing the PIM Test submenu key, Measure will be underlined. Two high-power test signals are transmitted from the PIM Master Test Port to the DUT. PIM distortion is returned through the PIM Master to the Anritsu handheld instrument. The results are displayed on screen in either spectrum view or bar graph. The RF-On light on the PIM Master front panel illuminates during the PIM test. Test duration is specified under the Setup main menu.
|
|
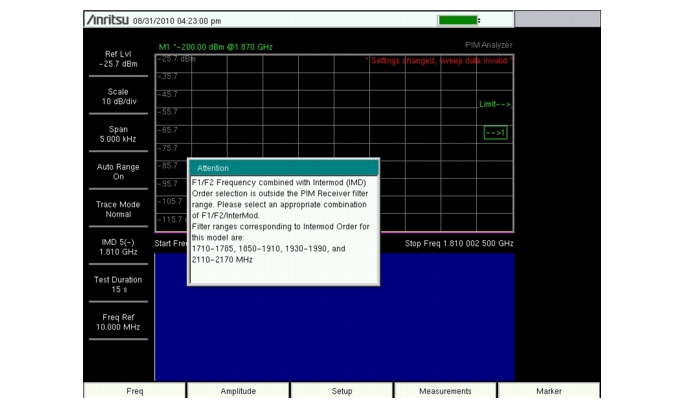
Attempting to make a PIM measurement where the intermod product is out of the filter range of the instrument will display the error message shown in Figure: “IM Range Error”.
Note on the left side of the figure where IMD 5(-) is at 1,810 MHz and outside of the listed filter ranges.
Change either the frequency values for F1 and F2 or change the IMD order (3rd, 5th, or 7th) under the Frequency main menu so the IM product of F1 and F2 is in the frequency filter bands of the instrument.
Press Esc to clear the message.
|
 |
|
3.
|
Save the current measurement by pressing the Save Measurement submenu key. The Save Measurement dialog opens.
|
|
4.
|
Type a name for the measurement to be saved and press Enter. Refer to the Anritsu handheld instrument User Guide for additional information.
|
Use this submenu key to check for external transmitted signals that may affect the PIM receiver with no PIM RF output enabled. Press the Measure Noise Floor submenu key. If an external signal is present try changing F1 or F2 carrier frequencies to place the 3rd order product at a frequency that is not affected by off air signals. Any signal that is present should be investigated.