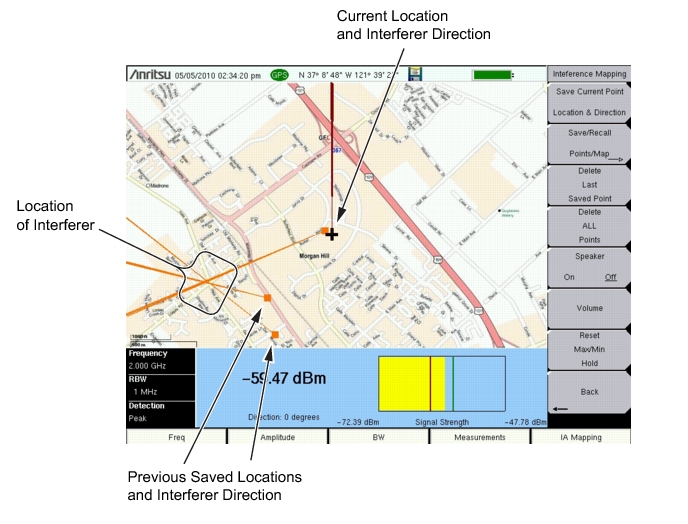
Interference Mapping assists in quickly identifying the location of an interfering signal using a directional antenna and a GeoEmbedded map created using Anritsu Map Master software.
The Map Master program creates special maps compatible with the Anritsu Site Masters/Spectrum Masters/Cell Masters. The software imports maps from any map provider and creates files with or without GPS information. The files will have a .map extension. Anritsu Map Master is shipped with the instrument on a CD and is also available from the Anritsu web site (www.anritsu.com).
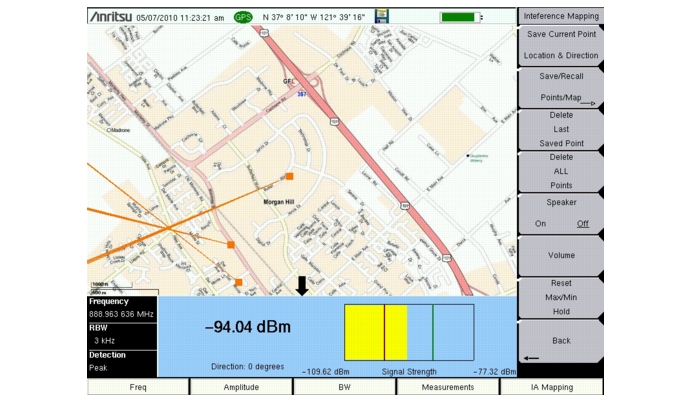
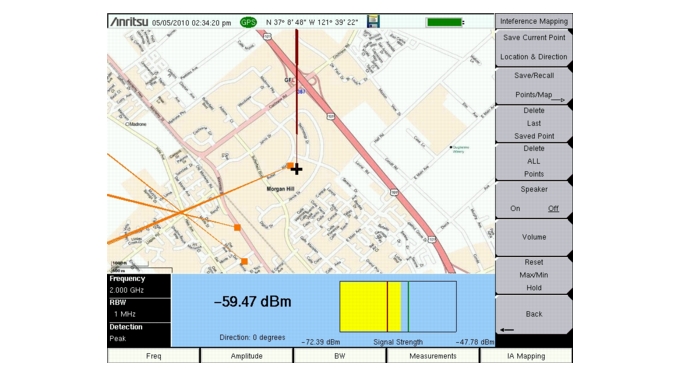
With a valid GPS signal, the instrument will identify the current location on the displayed map with a cross. Saved locations are displayed with an orange square. Using a directional antenna, the direction of the interfering signal can be determined and recorded. With two or more lines, you can see where the lines intersect and estimate the location of interferer.
 |
|
•
|
Anritsu Map Master allows you to capture maps of any location and create Anritsu Map Files. These Anritsu Map Files are used for Interference Mapping (Option 25) and Coverage Mapping (Option 431).
Install the software from the CD that came with the instrument or download and install Anritsu Map Master from the Anritsu web site (www.anritsu.com).
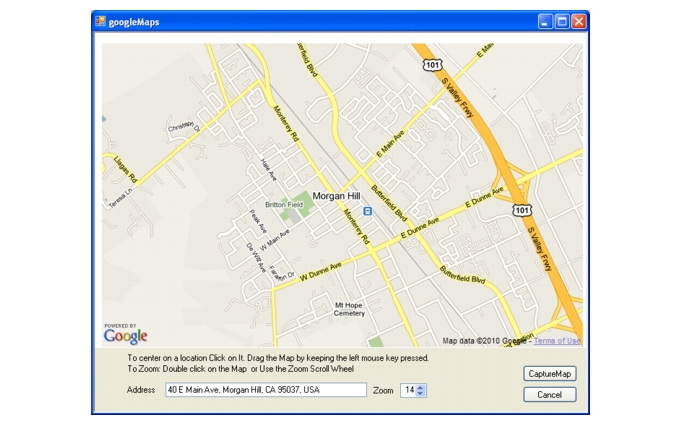
Map Master is an program that allows you to create a map from any map provider such as Google Earth, Map Point, Yahoo Maps, openstreetmap, and others. There are two options for creating maps using Map Master. Method 1, using a bitmapped image, is describe below. Method 2, entering an address in Map Master, is described“Method 2: Typing in an address in Map Master and capturing the map with GPS data.”.
Method 1: Open a JPEG, GIF, TIFF, or PNG file and adding GPS data.
|
1.
|
Capture a bitmapped image of a map from a map provider and save in one of the file formats mentioned above.
|
|
4.
|
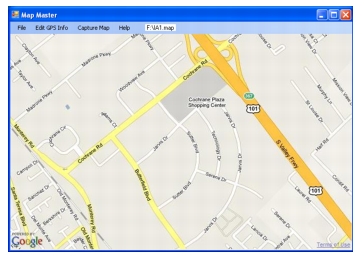
A dialog box will confirm that the file has been converted to a Anritsu Map Master (.map) file with the same file name.
|
|
6.
|
 |
|
9.
|
If you only have GPS information in the Degree-Minute-Second (DMS) format, use the following relationship to convert to Decimal Degrees (DD):
 |
|
10.
|
In the File pull-down menu, select Save or Save As to save the file to a USB flash drive. The file will be needed in the next section, “Instrument Settings”.
|
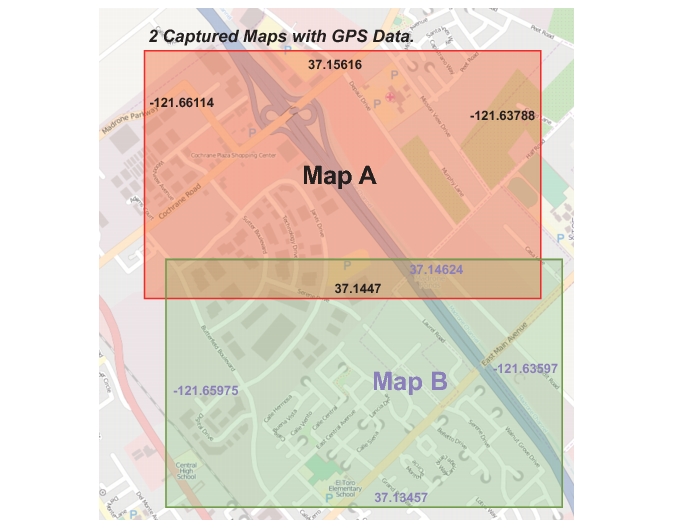
Figure: “Overlapping Captured Maps with Border GPS Data” is an example of two overlapping maps from a mapping service with GPS data for the border of each map.
 |
Method 2: Typing in an address in Map Master and capturing the map with GPS data.
|
4.
|
 |
|
6.
|
In the File pull-down menu, select Save or Save As to save the file to a USB flash drive. The file will be needed in the next section, “Instrument Settings”.
|
|
9.
|
|
10.
|
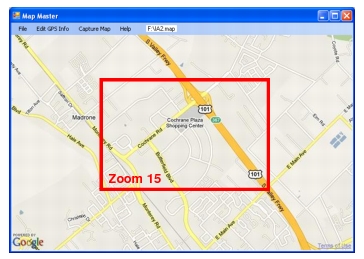
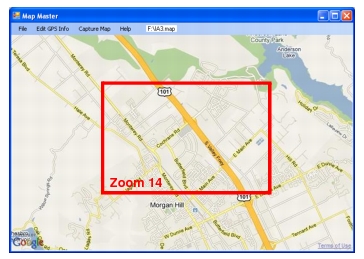
Creating and saving .map files of the same address at several zoom levels will be helpful in the field when your location is off the current view or the vectors cross outside of the current map displayed on the instrument. Table: “Map Coverage at Different Zoom Levels” lists the map area at several zoom levels. Notice from the examples that zooming in a level with Anritsu Map Master reduces the map dimensions by half while zooming out a level doubles the map dimensions.
|
|
1 mile x 1.5 miles
(1.5 square miles) |
 |
|
|
2 miles x 3 miles
(6 square miles) |
 |
|
|
4 miles x 6 miles
(24 square miles) |
 |
|
2.
|
Open up the Interference Analyzer by pressing the Menu key and selecting the Interference Analyzer icon or press Shift then Mode (9), highlight Interference Analysis and press Enter.
|
|
3.
|
Press the Measurements main menu key then press the Interference Mapping submenu key twice to display the Interference Mapping menu.
|
|
4.
|
|
a.
|
|
b.
|
Press the GPS submenu key.
|
|
d.
|
Turn on GPS. On should be underlined in the GPS submenu key.
|
|
e.
|
Press GPS info and verify that the information from three or more satellites is captured. Press Esc to close the info box.
|
It may take several minutes for the GPS receiver to track at least three satellites. When it does the GPS icon at the top of the screen will turn green. Refer to the User Guide for your instrument for additional information about GPS.
The instrument allows you to recall a .map file (created with Anritsu Map Master). With a valid GPS signal the current location will be displayed on the map or an arrow will show the direction of the current location if it is outside the map coverage area.
Connect the USB flash drive that has the map file or files created in “Anritsu Map Master” to the instrument.
|
1.
|
Press the IA Mapping main menu key at the bottom of the screen.
|
|
2.
|
Press the Save/Recall Points/Map submenu key.
|
|
3.
|
Press Recall a Map and select the appropriate map from the USB flash drive.
|
|
4.
|
Use the arrow keys to scroll down to the desired map and press Enter to select.
|
|
5.
|
The new map file will be displayed and the current location (if within the GPS boundaries of the displayed map) is shown as a cross.
|
|
6.
|
If the current location is outside the map boundaries, a dark red arrow will indicate the direction of the current location in relation to the displayed map.
|
|
1. Press the Refresh Directories key.
2. If the drive is still not visible, remove and then reconnect the USB flash drive. 3. Reformat the USB flash drive and copy the map files to the reformatted drive. |
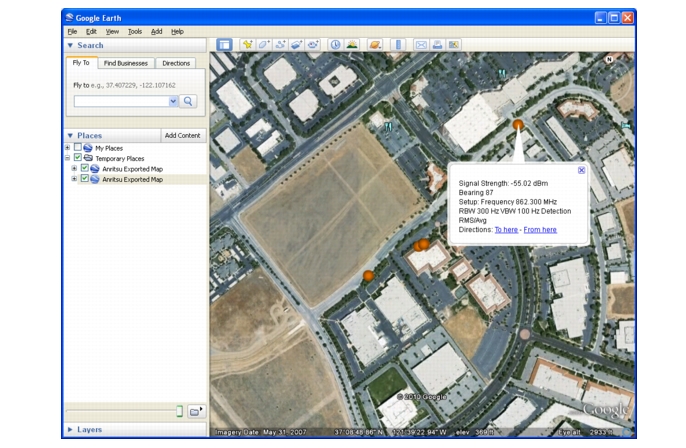
With a valid GPS signal, the instrument is able to make interference mapping measurements even when an Anritsu Map Master file of the current location is not available. Location, signal strength, and bearing information will be saved in a (.kml) file. Details of each time the Current Point Location & Direction submenu key was pressed can be viewed at a later time on the instrument or in Google Earth. Refer to “Mapping Save/Recall Menu” for additional information on recalling saved maps and .kml data.
|
When using the default grid the coverage area for Interference Mapping is fixed at 10 miles by 10 miles. The location will be centered on the default map. If you go to the east by 15 miles, then there will be an arrow indicating where you went off the map. You can at this point load a new Default Grid and the current location will be at the center of the display.
|
|
1.
|
Press the IA Mapping main menu key at the bottom of the screen.
|
|
2.
|
Press the Save/Recall Points/Map submenu key.
|
|
3.
|
Press the Recall Default Grid submenu key.
|
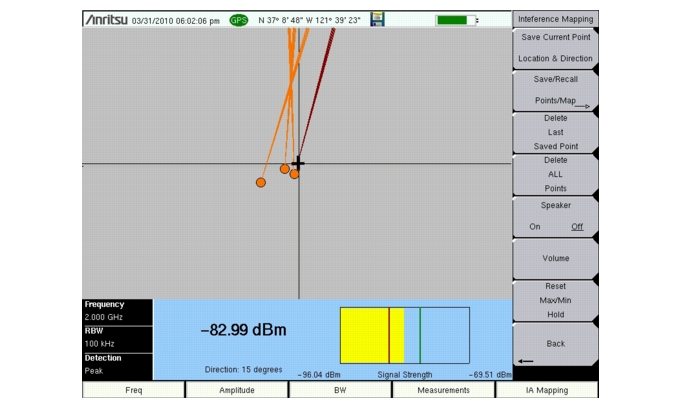 |
Once you have the GPS signal, directional antenna, and the GeoEmbedded map or the default grid map loaded on instrument, you can start locating interfering signals. The cross shows the current location on the screen.
|
1.
|
|
2.
|
Press the Freq main menu key and enter the frequency of the interfering signal using the Center Freq submenu key.
|
|
3.
|
Connect the directional antenna to the RF In port.
|
|
4.
|
|
5.
|
Press the Interference Mapping submenu key again to open the Interference Mapping menu. Use the directional antenna to locate the bearing of the strongest signal. Rotate the knob until the red line on the display is aligned with the direction of the interfering signal. Press the Save Current Point Location & Direction submenu key to save the location and direction.
|
|
6.
|
Move to the next location and repeat step 5. You now have two lines on the screen and an idea of where the interfering signal is located.
|
|
7.
|
 |
|
A compass may be helpful to determine the bearing of the strongest Antenna signal. Use the rotary knob on the instrument to match the direction (shown at the bottom of the display) of the vector on the screen to the compass bearing of the strongest signal before pressing the Save Current Point Location & Direction submenu key.
|
Press Save/Recall Points/Map then Save KML Points. At the Save menu, press Enter. The following information is saved for the points and vectors currently displayed on the screen:
|
•
|
The .kml file can be opened and viewed with Google Earth (http://earth.google.com/) and also recalled and viewed on the Instrument. Refer to “Mapping Save/Recall Menu” for additional information.
 |
|
All files will be stored in the default save location. To change the default location, Press Shift then File (7) to enter File menu. Press Save then press Change Save Location. Create a new folder or use the rotary knob or Up/Down arrows to highlight the desired location then press Set Location to make this the new default location for saving files.
|
|
After Google Earth is opened, user instructions and several types of help are available from the Help pull-down menu.
Saved .kml files can not be viewed directly from the instrument using Google Earth, the files need to be first copied to a USB memory stick.
|
Press Save/Recall Points/Map then Save Tab Delimited Points. At the Save menu, press Enter. A tab delimited text file (.mtd) will be saved to the current location for the points and vectors currently displayed on the screen.
Press Save/Recall Points/Map then Save Jpg. At the Save menu, press Enter. A .jpg file of the current screen will be saved.
 |