The typical procedure for a differential noise figure measurement is listed below.
1. It is assumed that the user has already acquired non-compressed DUT gain data and has it available in an SnP file.
2. A composite receiver calibration must be performed in advance of entering noise figure (and the receiver calibration saved) or it can be performed while within the noise figure application. This procedure assumes a receiver calibration was performed in advance. Refer to the VectorStar MS464xB Measurement and Calibration Guide – 10410-00318 for more information about a noise figure measurement composite receiver.
Change the Instrument Mode to Noise Figure
3. On the APPLICATION menu, select the Noise Figure button.
• A notice dialog box advises about saving the current instrument setup so it can be recalled at a later time.
• When Continue is selected, the instrument changes application modes to Noise Figure.
• The instrument resets the default settings for noise figure trace condition to a single trace and Noise Figure (LogMag) response.
4. On the NF SETUP menu, set DUT Configuration to 4 Port.
• The DIFF. NF SETUP (Differential Noise Figure Setup) menu appears.
5. On the DIFF. NF SETUP menu, select Noise Figure Configuration.
• The NF CONFIG (Noise Figure Configuration) menu appears.
Set the Noise Figure Measurement Configuration
6. On the NF CONFIG menu, select the configuration parameters for the noise figure measurement:
• Frequency Start
• Frequency Stop
• Number of Sweep Points
• CW ON/OFF
• CW Frequency
• Number of RMS Points
• Intermediate Frequency Bandwidth
Get the DUT S-Parameter Data
7. Go back and get the DUT S-Parameter data.
8. Return to the NF SETUP menu by selecting the back icon at the bottom of the menu.
• The NF SETUP menu appears.
9. On the NF SETUP menu, select Get DUT S-Param Data.
• The DUT S-PARAM DATA dialog box appears.
• Navigate to the stored data and open the file.
Get the Receiver Calibration Data
10. Go back and recall the Receiver Calibration file.
11. On the DIFF. NF SETUP menu, select Receiver Cal | Recall VNA B2 Cal.
• The RECEIVER CALIBRATIONREMINDER dialog box appears.
• Click Continue and navigate to the stored data and open the file.
Perform the Noise Calibration
12. Insert the DUT with the cold source on input.
13. Return to DIFF. NF SETUP menu, select NOISE CAL and then select PERFORM VNA Bx CAL
14. The trace display shows Log magnitude noise figure versus frequency.
Exiting the Noise Figure Application
15. When all noise figure measurements are complete, on the APPLICATION menu, select the Transmission/Reflection button.
• A notice dialog box advises about saving the current instrument setup so it can be recalled at a later time.
• When Continue is selected, the instrument changes application modes to Transmission/Reflection and the Noise Figure Setup button becomes unavailable.
• The instrument resets the factory as-shipped default settings for transmission/reflection which are four traces as:
• S11 response on a Smith Chart trace display
• S12 response on dual LogMag + Phase trace display
• S21 response on dual LogMag + Phase trace display
• S22 response on a Smith Chart trace display
16. If a prior preset was in effect, it can be recalled using the RECALL SETUP dialog box located at MENU BAR | File | Recall Setup | RECALL SETUP dialog box.
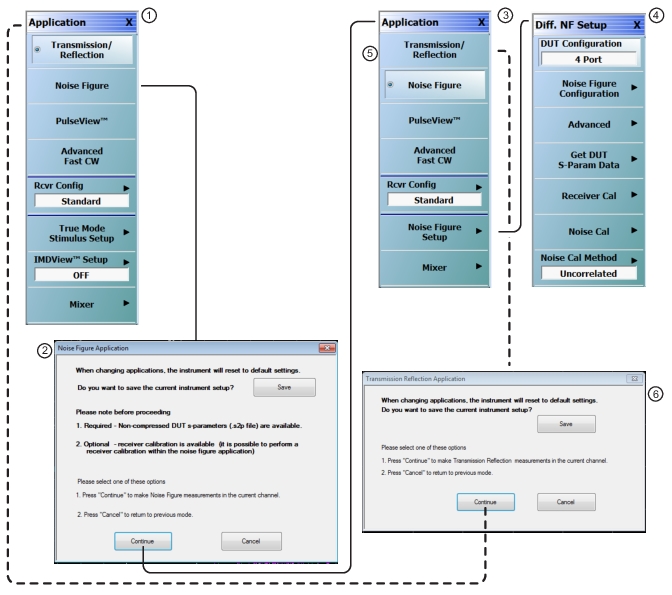
Primary Application Menus and Differential Noise Figure Dialogs and Menus
The primary menu and dialog set for noise figure measurement on the APPLICATION menu, the NF SETUP menu, and the related dialog boxes is shown below. After clearing the entry NOISE FIGURE APPLICATION dialog box, the NF SETUP menu appears. When changing from Noise Figure to another application, a similar exit dialog box appears, and when cleared, resolves into the APPLICATION menu in new application mode.
APPLICATION Menu and DNF SETUP Menu and Dialog Set
1. APPLICATION Menu –Typical APPLICATION menu variant with Option 48 equipped on VNA.
2. NOISE FIGURE APPLICATION Mode Change Dialog Box – Provides options for canceling or saving setup and proceeding by selecting Continue.
3. APPLICATION Menu – Noise Figure mode selected.
4. DIFF. NF SETUP Menu – After APPLICATION menu Noise Figure Setup button is selected and 4-port DUT Configuration is selected.
5. To exit Differential Noise Figure Mode, select another application on the top of the APPLICATION menu.
6. New Application Dialog Box.
Changing to Differential Noise Figure Mode
When the APPLICATION menu is set to a non-Differential Noise Figure application mode and Noise Figure mode is selected, the NOISE FIGURE APPLICATION dialog box appears. The dialog provides opportunities to:
• Cancel out of the change to Noise Figure application mode, and remain in the current application mode.
• Save the current instrument setup as an Active Channel Setup and Calibration CHX file and then either Cancel (above) or proceed (below).
• Continue into Noise Figure application mode.
Changing From Noise Figure Mode to Another ApplicationMode
Similarly, when the APPLICATION menu is set to Noise Figure application mode, and another application mode is selected, the new application dialog box appears. The dialog provides the opportunities to:
• Save the current instrument setup as an Active Channel Setup and Calibration CHX file and then either Cancel (above) or proceed (below).
• Cancel out of the change to the new application mode and remain in Noise Figure application mode.