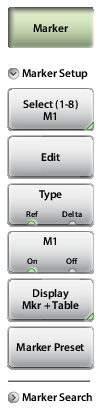
Marker Setup Select (1-8) M# Press this key to open a submenu of 8 potential markers, then select a marker number, M1 through M8 to turn it on (if currently off) and make it active. Alternatively, you can make a marker active, that is, select it for editing, by tapping the vertical marker line on your tablet. Edit Press this key and use the virtual keypad to enter the marker frequency in the edit box, then press one of the unit keys (GHz, MHz, kHz, Hz) to apply the entered value and close the edit box. To exit without making a change, press Esc to cancel the entry, and Esc again to close the edit box. Type Sets the current active marker as a reference (standard) marker or a delta marker to Marker 1. Marker 1 is always the reference marker. M# (On Off) Toggles the display of the currently active marker on and off. When off, the location of the marker is stored. The active marker number is shown on the Select (1-8) M# key. Display (Mkr + Table, Mkr Only, Off) Press to open display options. Mkr+Table: Displays both the markers that are on and the marker table. Mkr Only: Displays markers that are on and hides the marker table. Off: Hides all markers and the marker table. Marker Preset Turns off all markers except for Marker 1. Sets the location (frequency value) of Marker 1 to the middle of the sweep. |