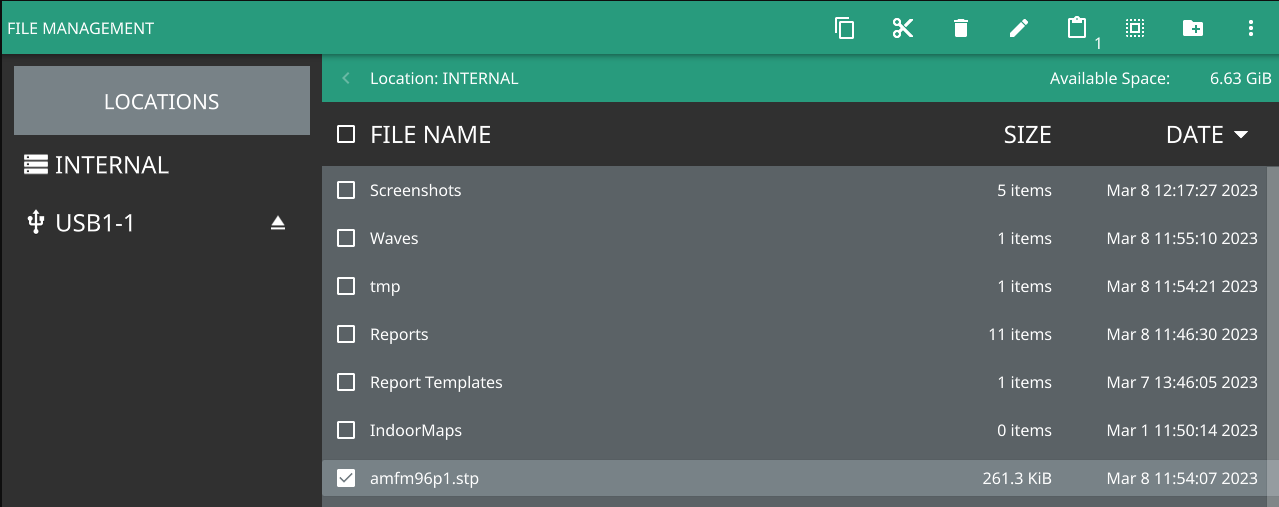
Site Master™ MS2085A/MS2089A User Guide : Instrument Overview : FILES (File Management)
 
FILES (File Management)
1. Access the System menu (3-line icon in the upper left corner).
2. Select FILES to access the instrument file management menu.
Files Menu
File Locations
Displays the available memory locations. Select the location that you want to access and the available files will be displayed on the right side. You can touch the column headers to change the sort order.
File Management Operations
All file operations are selected via the following icons:
File Management Icons  
3-Dots
Use the 3-dots menu to refresh the displayed folder contents or to close the file management menus.
New Folder
Use the New Folder icon to create a new directory in the current memory location. When pressed, the virtual keyboard is displayed, allowing you to enter a new directory name.
Select
The Select icon enables checkboxes next to your folder and file names. You can then select multiple files to move, copy, or delete.
Clipboard
The Clipboard icon displays the number of items that you have selected and copied to the clipboard. Use this icon to paste the copied items to the destination folder.
Edit
Use the Edit icon to change file or folder names. Select the item you wish to edit, then press Edit to display the virtual keyboard and edit the item’s name.
Delete
Use the Delete icon to remove files or folders from memory. Select the item you wish to delete, then press Delete to remove the item.
Caution: The item will be permanently deleted and cannot be recovered.
Cut
Use the Cut icon to move files or folders. Select the items you wish to move, then press Cut to store the items on the clipboard. Navigate to the new location and press the Clipboard icon to paste the items. The moved items are deleted from the source location.
Copy
Use the Copy icon to select files and folders to copy to a new location. Select the items you wish to copy, then press Copy to store the items on the clipboard. Navigate to the new location and press the Clipboard icon to paste the items. Copies of the items remain in the source location.
USB Eject
Use the USB Eject icon to properly dismount the USB memory device before removing it from the instrument port. Failing to properly eject the device could cause data corruption.
Previewing Screenshots
While in File Manager, you can preview screenshots on the instrument display simply by touching the screenshot file name. While the preview is displayed, you can use the controls to:
Cycle forward and backward through each screenshot in the directory.
Rename the file by selecting RENAME, then use the keypad to enter a new filename.
Delete the file by selecting DELETE and then confirming your choice.
Copy the file by selecting COPY, then press CLOSE to close the preview dialog and navigate to the desired location, then touch the Paste icon at the top of the File Manager.
 
Screenshot Preview
Previewing PDF Reports
While in File Manager, you can preview PDF reports on the instrument display simply by selecting the PDF file saved to REPORTS folder. While the preview is displayed, you can use the controls to:
Cycle forward and backward through each PDF report in the directory.
Rename the file by selecting RENAME, then use the keypad to enter a new filename.
Delete the file by selecting DELETE and then confirming your choice.
Copy the file, then close the preview dialog and navigate to the desired location, then select the Paste icon at the top of the File Manager.
 
PDF Preview
FTP Access
An FTP server has been included in the instrument to allow direct access to files stored on the instrument (or on a USB drive connected to the instrument) from a remote computer. To access the FTP server:
1. Connect the instrument to a network.
2. Use an FTP client of choice (such as Windows Explorer or File Explorer) and enter “ftp://” and the IP address of the instrument as the host. For example: ftp://172.155.1.2
3. Enter the user name: ftp
4. Enter the password: serial number of the instrument
The serial number can be obtained from the System Information menu or through SCPI using the "*IDN?" command.