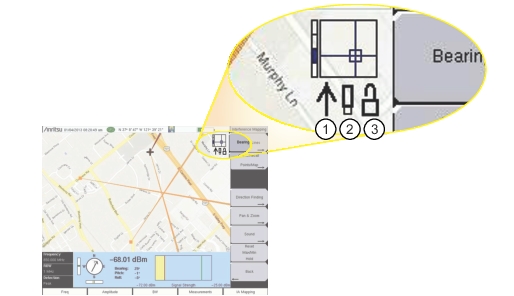
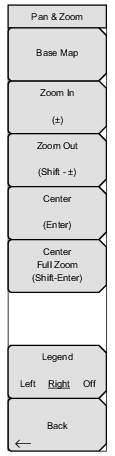
 | The coverage mapping Pan & Zoom function is currently available only on the LMR Master S412E. Base Map Press this submenu key to view the full map. Zoom In (±) Press this submenu key to zoom in one map panel at a time. The (+/-) key on the front panel keypad performs the same action, unless a parameter setting is currently selected for modification. Zoom Out (Shift - ±) Press this submenu key to zoom out one map panel at a time. Pressing the Shift and (+/-) keys once performs the same action, unless a parameter setting is currently selected for modification. Center (Enter) Press this submenu key to center the panel in which the instrument is located. The Enter key performs the same action, unless a parameter setting is currently selected for modification. Center Full Zoom (Shift - Enter) Brings the map panel where the instrument is currently located into the display. Pressing the Shift and Enter keys performs the same action, unless a parameter setting is currently selected for modification. Note that the current location may not be exactly centered on the display. Legend Left Right Off Press this submenu key to turn off or to display a legend at the top left or top right corner of the AZM map. The legend consists of a vertical zoom level bar, a square representing the current GPS location and base map, and three status icons (see Figure: Map Legend Status Indicators). The zoom level indicator shows the number of levels of zoom in the AZM map, with the current level displayed as a dark segment on the vertical bar. Higher levels of zoom are toward the top of the indicator bar. The default square with crosshairs represents a map panel with the lowest zoom. The crosshairs are at the center of that panel. As the zoom level increases, a boundary of a panel is displayed around the crosshairs. The higher the zoom level, the smaller the square around the crosshairs. When panning the map (using the instrument’s arrow keys), the crosshairs and map panel boundary display your relative location in the total mapped area. When the lock is ‘locked’ (by pressing Enter), the map is in auto-centering mode and will update continually to keep your current position centered while you move with the instrument. If you pan (using the arrow keys), the map is taken out of auto-centering mode, or unlocked, because you have intentionally shifted the map area away from your current location. When unlocked, the map will not follow if you walk or drive around with the instrument. After panning, press the Enter key to re-center your GPS location on the map and lock auto-centering mode. Back Returns to the Coverage Mapping Menu. |