Digital Television Signal Analyzer Measurement Guide : ISDB‑T SFN Analyzer : Frequency/Level Menu (Channel Map = None)
 
Frequency/Level Menu (Channel Map = None)
Key Sequence: Frequency/Level
This menu is displayed when Channel Map is set to None.
Frequency Menu
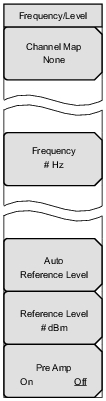
Channel Map
Press this submenu key to open the Channel Map list box. Choose from UHF, UHF (Brazil), or None.
If UHF or UHF (Brazil) is selected, then the Channel submenu key is also displayed. If None is selected, then the Channel submenu key is not displayed, but the Frequency submenu key is also displayed.
Channel
If UHF is selected, then this submenu key is displayed. Press this submenu key to open the Channel Editor dialog box to select a UHF channel within the range of 13 to 62 that is displayed in the window. If UHF (Brazil) is chosen, then the channel range is 14 to 69.
Frequency
If None is selected as the Channel Map parameter, then the Frequency submenu key is displayed in the menu. Press this submenu key to open the Frequency Editor dialog box to manually select a frequency within a specified range that is displayed in the window. The Units menu displays the following units: GHz, MHz, kHz, and Hz.
Auto Reference Level
Press this submenu key to automatically set the reference level to an optimum value. This reference level indicates the signal level that is being measured by the instrument. For more information, refer to section Auto Reference Level.
Reference Level
Press this submenu key to open the Reference Level Editor dialog box and set a signal reference value within the specified range that is displayed in the window. If the Pre Amp submenu key is On, then the reference level range is from – 10 dBm to – 50 dBm in 10 dB increments. If the Pre Amp submenu key is Off, then the reference level range is from – 25 dBm to + 20 dBm in 5 dB increments.
Pre Amp
On Off
Press this submenu key to toggle the Pre Amp On and Off. The current state is underlined on the submenu key. When the preamplifier is switched On, the reference level is automatically set to – 30 dBm. When the preamplifier is switched Off, the reference level is automatically set to – 25 dBm. Refer to Table: Relationship between Reference Level and Input Attenuator for the relationship between Reference Level and Input Attenuator.
 
Warning: The upper limit level, up to which the instrument is not damaged, depends on the preamplifier state. Refer to the Warning message.
Warning
The upper limit level, up to which the instrument is not damaged, depends on the preamplifier state.
Preamplifier On: – 10 dBm
Preamplifier Off: + 20 dBm
Switching the preamplifier On, while applying greater than – 10 dBm with preamplifier Off, may damage the internal electronic circuit. Pay attention to the input level when switching the preamplifier On or Off while applying a signal.
Auto Reference Level
The reference level range for input to the instrument is determined by the reference level setting. Immediately after a signal is applied to the instrument, the input attenuator is automatically set according to the reference level. The relationship between the reference level and the input attenuator is fixed. Table: Relationship between Reference Level and Input Attenuator shows the relationship between the reference level and the input attenuator for each measurement item. Raising the reference level increases attenuation of the input attenuator, enabling the user to handle a high input level. Note that the noise floor rises in proportion to the attenuation of the input attenuator.
When applying a signal to the instrument, provide a signal level that does not exceed the reference level value. If the signal level exceeds the reference level, then raise the reference level. For example, if the signal level is 0.5 dBm with preamplifier off, then set the reference level to 5 dBm, not to 0 dBm.
If an interfering wave other than the intended signal exists, and if the power within the frequency range of approximately 100 kHz to 7.1 GHz is 15 dB or more higher than the measurement signal level, then set the reference level to take the large signal into account.
Pre Amp, Reference Level, and Input Attenuator
Relationship between Reference Level and Input Attenuator
Preamplifier
Reference Level (dBm)
Input Attenuator (dB)
Off
20
45
Off
15
40
Off
10
35
Off
5
30
Off
0
25
Off
– 5
20
Off
– 10
15
Off
– 15
10
Off
– 20
5
Off
– 25
0
On
– 10
40
On
– 20
30
On
– 30
20
On
– 40
10
On
– 50
0