 |
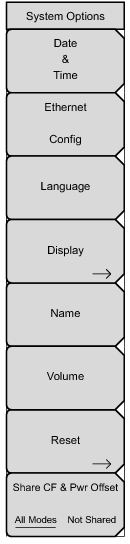
Press this submenu key to display a dialog box for setting the current date and time. Use the submenu keys or the Left/Right arrow keys to select the field to be modified. Use the keypad, the Up/Down arrow keys, or the rotary knob to select the date and time. Press Enter to accept the changes, or press the Esc key to return to normal operation without changing anything.
Press this submenu key to display the Ethernet submenu and to open the Ethernet Editor dialog box to set the IP address of the instrument. For details, refer to section “Ethernet Configuration” in “LAN and DHCP”.
Press this submenu key to open a list box and select a built‑in language for the Spectrum Master displays. The languages that are currently available are: English, French, German, Spanish, Japanese, Chinese, Korean, and Italian. In addition, a custom language may be selected if it has been defined by using Master Software Tools and loaded into the Spectrum Master. Two custom languages may be loaded into the instrument via Master Software Tools. If a mode does not have language translations available, then English is the default language. Press Enter to accept the change, or press the Esc key to return to normal operation without changes.
Note: A Factory Default reset (Esc + On) will overwrite any custom settings within the Spectrum Master and will require that you reload the custom language files via Master Software Tools.
The Display submenu key opens the “Display Settings Menu” allowing brightness control and the selection of the default color display, black & white display, night vision display, or a high contrast display.
Press this submenu key to open a dialog box to name the instrument. The Spectrum Master can be named by using the text entry controls as described in section “Text Entry”. Press Enter to save the name.
Press this submenu key to set the speaker volume. The current volume setting is displayed on the screen. Use the keypad, the Up/Down arrow keys, or the rotary knob to change the volume, and press the Enter key to accept the change.
Select All Modes to have the current center frequency setting and power offset setting carried over when changing measurement modes. Not applicable to measurements which do not have a center frequency setting or measurements where the current center frequency setting is outside the range of the new measurement.
|