Anritsu easyMap Tools allows you to capture maps of any location and to create Anritsu Map Files. These Anritsu Map Files are used for Coverage Mapping. The Help button in easyMap Tools provides details for the use of the application.
Download and install Anritsu easyMap Tools from the Anritsu Web site (www.anritsu.com).
Terminology:
AZM – Anritsu Zoomable Map, the format of a map file with pan and zoom capabilities for on‑instrument maps.
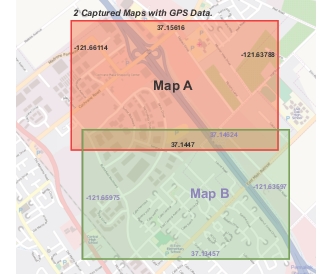
Coverage Map – This defines the bounds of the AZM file. Everything contained within this map shows up in the AZM file.
Detail Map – This defines the maximum image detail that is recorded in the AZM file. Ensure that desirable street names are visible here.
Red Highlight Area – This highlighted segment of the Coverage Map represents the area that is currently covered by the Detail Map.
Example Procedure:
1. Start easyMap Tools.
2. Select your Map Type, if the current one does not meet your needs.
3. The Coverage Map is displayed on the left side, and the Detail Map is displayed on the right side.
4. Enter an address (that you want the coverage map to center upon) into the Address bar, then click “Go” or press the Enter key.
a. This can be a partial address, such as “Morgan Hill, CA” or “95037”.
b. This can be a full street address, such as “490 Jarvis Drive, Morgan Hill, CA.
5. Adjust the Coverage Map by panning and zooming until the Coverage Map covers everything that needs to be in the AZM file.
6. Pan around the Detail Map to confirm that the lowest level of detail is sufficient. For example, ensure that the necessary street names are shown.
a. If the map is not detailed enough, zoom into the Detail Map until the desired level of detail is reached (maximum zoom level is 3 without API keys).
b. Maps with more detail take longer to download and also take up more disc space.
c. The estimates size of the map file is displayed above the Detail Map, adjacent to the Save Map button.
d. If the Coverage Map is covering too much, it can be zoomed in to reduce total map size.
e. Consider making multiple maps (if necessary), especially if the intended region has a significantly different shape than the Coverage Map (such as a long highway drive test).
7. Confirm that your easyMap settings meet your needs:
Set Map Format – This determines which type of map file is created. Only AZM files can contain multiple map tiles.
Set Color Filter – This allows the resulting AZM file to match various alternative instrument user interface color schemes.
This does not affect the appearance of the Coverage Map or the Detail Map, but the changes show up when viewing the resulting AZM file.
Register API keys – API keys (Google or MapQuest) must be registered for maps larger than approximately 5 MB estimated size (this allows for 3 zoom levels in your AZM file).
Note
MapQuest keys are generally easier to set up than Google Keys.
The easyMap Help file has links to help pages for registering your own API Key.
Configure Web Proxy – This is necessary only for users who must connect to their work network via Web Proxy.
8. Save your map (File > Save Map, with current settings).
9. When the map has finished downloading, open it (File > Open Map).
When the map has finished downloading, it can be copied to your instrument via USB flash drive.
Creating an Outdoor Map File with easyMap Tools
The easyMap Tools program allows you to create a map from map providers Google and MapQuest. Google Maps offer Road, Terrain, Satellite, and Hybrid maps. MapQuest offers OpenStreetMaps.
Two methods can be used to create outdoor maps by using easyMap Tools:
Method 1: Opening a JPEG, GIF, TIFF, or PNG file and adding GPS data.
1. Capture a bitmapped image of a map from a map provider and save it in one of the available file formats.
The image size should be close to 640 pixels by 420 pixels (approximately a 1.6:1 ratio).
2. Launch the Anritsu easyMap Tools application.
3. In the File pull‑down menu, select Open Image File... and choose the image file to be converted to a map.
4. Set up the map as desired, including adding Latitude and Longitude parameters, and then save the map.
5. If you have GPS information only in the Degree‑Minute‑Second (DMS) format, then use the following relationship to convert to Decimal Degrees (DD):
Note
Remember to enter location information for the borders of the map, not your current location.
easyMap Tools can open and modify GPS data in existing.map files.
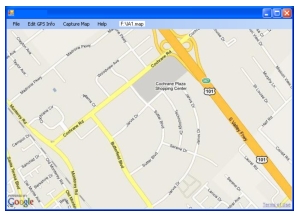
Method 2: Typing in an address in easyMap Tools and capturing a Google map with GPS data.
1. Launch the Anritsu easyMap Tools application.
2. Enter a street address in the address field.
3. Set up the map as desired, and then save the map.
Note
A USB flash drive is required to transfer maps to the instrument.
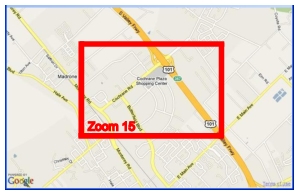
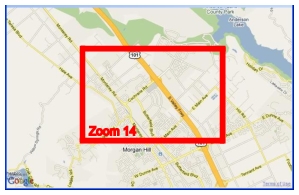
Creating and saving .map files of the same address at several zoom levels can be helpful in the field when your location is off the current view, or when the vectors cross outside of the current map that is displayed on the instrument. Table: Map Coverage at Different Zoom Levels (1 of 2) lists the map area at several zoom levels. Notice from the examples that zooming in a level with Anritsu easyMap Tools reduces the map dimensions by half, and zooming out a level doubles the map dimensions.
Map Coverage at Different Zoom Levels (1 of 2)
Zoom Level
Map Dimensions
Sample Map
15
1 mile x 1.5 miles (1.5 square miles)
14
2 miles x 3 miles (6 square miles)
13
4 miles x 6 miles (24 square miles)
Creating an Indoor Map File with easyMap Tools
1. Capture a bitmapped image of the floor plan that is desired for indoor mapping. Save the image in one of the compatible file formats (JPEG, GIF, TIFF, or PNG). The image size must be close to 640 pixels x 420 pixels (approximately a 1.6:1 ratio) in order to display well on your handheld instrument.
2. Launch the Anritsu easyMap Tools application.
3. In the File pull‑down menu, select Open Image File... and then select your indoor mapping image file.
Note
A USB flash drive is required to transfer maps to the instrument.
4. Set up the map as desired, and then save the map.
 :
: