After completing the setups for Coverage Mapping and measurements, you are ready to make measurements.
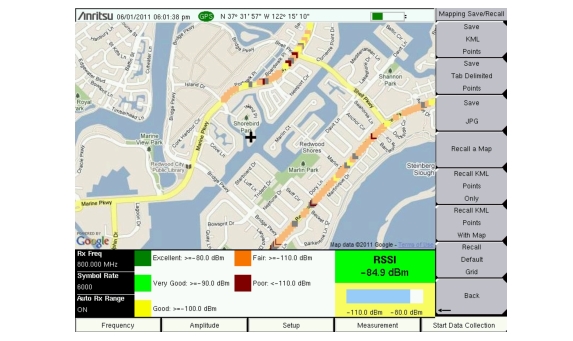
1. Press the Start Data Collection main menu key. Data will be collected at the time or distance interval based on the setting in Point Distance/Time Setup Menu. The color of the squares indicates the power level based on the chosen measurement and its threshold level setup.
2. Press the Stop Data Collection main menu key to end the measurement process. Save the collected data as a .kml file, a tab‑delimited text file (.mtd), or a JPEG file. Refer to Save the Coverage Mapping Information.
Note
Two options are available for interior coverage mapping because the instrument does not have location or distance information available without GPS.
Option 1: Set the Repeat Type to Time and walk the perimeter of the coverage area. Press the touchscreen at each turn, and the instrument interpolates collected data points based on the Repeat Time setting.
Option 2: Set the Repeat Type to Distance and walk the coverage area. Press the touchscreen at any time that signal power data points are required.
The saved .kml file in either option will not have GPS data, but it will plot on a 640 x 420 grid with measurement data for each captured point.
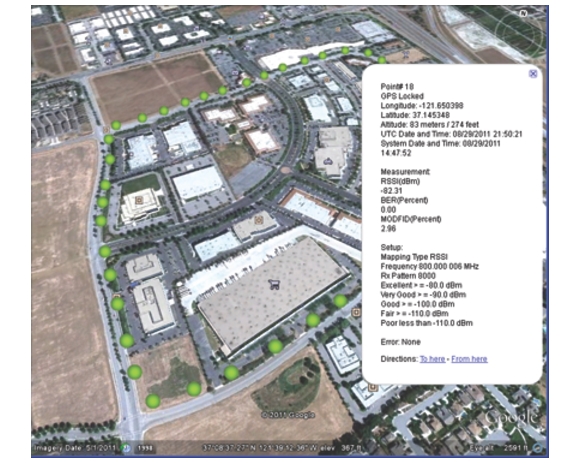
Press Save/Recall Points/Map then Save KML Points. In the Save dialog, change the file name and file type (KML 2D or KML 3D) as appropriate, then press Enter. The following information is saved for the points that are currently displayed on the screen:
• Location and time based on GPS information
• Measurements: BER, RSSI, Mod Fid (or RSSI, BER, and EVM in TETRA mode)
2. Click Download Google Earth and follow the on‑screen instructions.
3. After download, install Google Earth on your computer.
4. Double‑click the saved .kml file to view the measurements with Google Earth.
After Google Earth is opened, user instructions and several types of help are available from the Help pull‑down menu.
Saved .kml files cannot be viewed directly from the instrument using Google Earth. The files need first to be copied to a USB memory stick.
Coverage Mapping KML File in Google Earth
Save Tab Delimited Points
Press Save/Recall Points/Map then Save Tab Delimited Points. At the Save menu, press Enter. A tab delimited text file (.mtd) is saved in the default save location for the coverage mapping data that are currently displayed on the screen.
Note
All files are stored in the default save location. To change the default location, Press Shift then File (7) to enter File menu. Press Save, then press Change Save Location. Create a new folder or change the current location on the USB flash drive (or in the instrument storage memory). Press Set Location to make this the new default location for saving files.
Save JPG
Press Save/Recall Points/Map then Save JPG. At the Save menu, press Enter. A .jpg file of the current screen is saved.
Time Interval Coverage Mapping Saved as a .jpg File