Option 24, IQ Waveform Capture, captures the raw data for the set center frequency and for the duration of the set capture length. This section includes instructions for setting up the instrument, capturing a waveform, and saving it to the instrument, or using the MATLAB script to read the captured waveform and to save it to a PC.
For remote setup and waveform capture, please refer to the Programming Manual for your instrument. It includes SCPI commands for instrument remote control, waveform set up and capture, and two sample scripts: MATLAB and C++. The MATLAB script is used to read a WCAP file from the instrument and unpack the data into a MATLAB array. The C++ sample program uses the SCPI commands to initiate a capture and save it directly to the PC.
Waveform Capture Setup
1. Press the Shift key and then the Measure (4) key on the instrument to open the Measure menu.
2. Press the IQ Waveform Capture submenu key (which is displayed only if Option 24 is installed on your instrument) to open the IQ Waveform Capture menu.
3. Press the Capture Length submenu key to set the length of time that data is taken.
4. Press the Capture Mode submenu key and select either Single or Continuous. Selecting Single performs one capture when Start Capture is pressed. When Continuous is selected, multiple waveform captures (that are the time length set in Capture Length) are taken until the Start Capture button is pressed to end the waveform capture process.
5. Press the Sample Rate submenu key to set the desired capture rate. Bandwidths are also displayed for each sample rate. Select the desired sample rate in the Select Capture Sample Rate list box (Figure: IQ Capture Sample Rate) with the arrow keys or rotary knob and press Enter.
IQ Capture Sample Rate
6. Press the Triggering submenu key to open the Capture Triggering menu. Set the Source, Slope and Delay parameters. Press Back to return to the IQ Waveform Capture menu.
7. Press the File Name & Location submenu key to open the Save menu. Set up the folder where the saved captured data are placed by pressing the Capture Location submenu key. Set up a captured waveform filename using the File Name (Prefix) submenu key. Refer to IQ Capture Save Menu for additional information on Capture Location and File Name (Prefix).
8. Press the Frequency/Amplitude submenu key to set up the frequency parameters of the waveform to be captured. The Freq/Amp menu opens. Set the frequency, span, reference level and scale for the y‑axis, and attenuation settings for the waveform capture.
Note
When setting the Span, set it slightly larger than the captured bandwidth. This allows you to see what you are capturing within the display. A good value to start with is 125% of the captured bandwidth. Setting the Span this way does not affect the bandwidth of the captured signal.
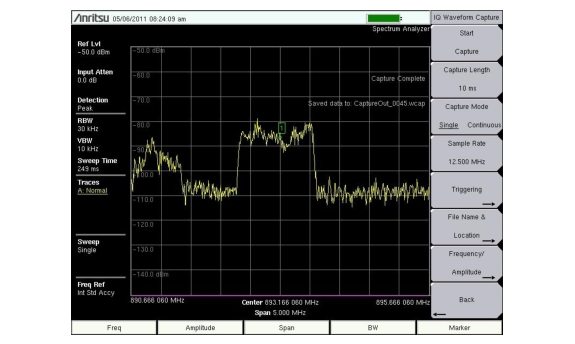
Capturing a Waveform
Press the Start Capture submenu key. If Capture Mode was set to Single, a single waveform capture is taken. If Continuous is selected, waveform capturing ends when the Stop Capture (initial state Start Capture) button is pressed. When Stop Capture is pressed, the current capture cycle completes and then IQ capture ends. The captured waveform is named and stored in the file location set by File Name (Prefix) and Capture Location.