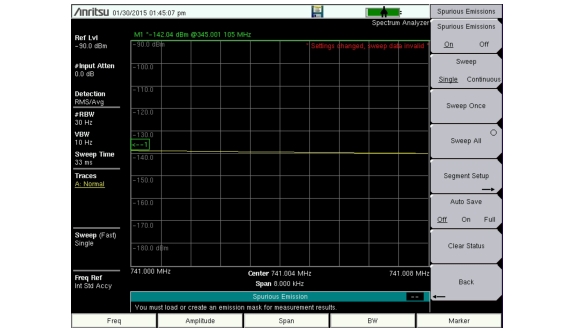
The Spectrum Analyzer measures spurious emissions from a base station using the Spurious Emissions (Out-of-Band) Mask feature. Creating a spurious emission mask allows you to test signals against wireless communications standards. A mask with up to 32 segments must be created before starting the measurements.
Creating a New Spurious Emission Mask
1. Press the Shift key followed by the Measure (4) key. Then press the Masks and C/I submenu key followed by the Spurious Emissions (Out-of-Band) key.
3. Press the Freq main menu key followed by the Start Freq submenu key and enter a value for the beginning point of a segment.
4. Press the Stop Freq submenu key and enter a value for the end point of the segment.
5. Optionally, you can adjust the RBW, VBW, reference level, and reference level offset. However, you cannot change the sweep mode or any of the following amplitude settings for individual segments in the mask:
• Preamp On/Off
• Auto Attenuator On/Off
• Attenuator Level (the attenuator adjusts automatically if Auto Attenuator is currently On)
6. Return to the Spurious Emissions submenu by pressing the touch screen shortcut in the upper right corner of the display, where the words Spectrum Analyzer are located.
You can also select the Spurious Emissions submenu by pressing the Shift key followed by the Measure (4) key, then pressing the Masks and C/I submenu key followed by the Spurious Emissions (Out-of-Band) key.
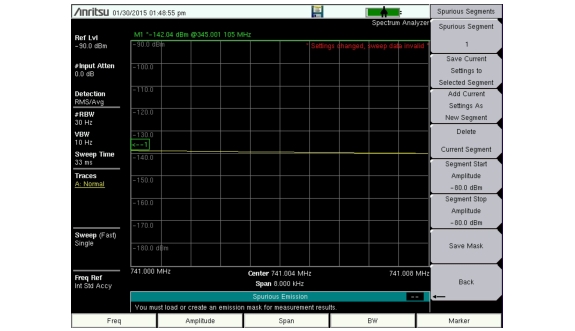
9. Press Segment Start Amplitude and enter the desired pass/fail limit amplitude for the first point of the segment.
10. Press Segment Stop Amplitude and enter the desired pass/fail limit amplitude for the last point of the segment.
Spurious Segments Screen
11. Press Save Current Settings to Selected Segment.
12. Repeat Step 3 through Step 11 as necessary to create more segments.
13. Press Save Mask and enter the mask name in the Filename entry field. If needed, select Spurious Emission Mask from the Filetype pull-down menu. Press Enter.
1. Press the Shift key followed by the File (7) key.
2. Press Recall.
3. Scroll through the list of files and select the desired spurious emission mask (file extension .spe).
4. Press Enter to load the selected mask into the Spurious Emission measurement.
Modifying an Existing Mask
To edit segments in an existing mask:
1. Load the desired emission mask.
2. Press Segment Setup to display the Spurious Segments submenu.
3. Press the Spurious Segment submenu key and select the segment number to edit, which is highlighted in red.
4. Press the Freq main menu key followed by the Start Freq submenu key and enter a value for the beginning point of a segment.
5. Press the Stop Freq submenu key and enter a value for the end point of the segment.
6. Return to the Spurious Emissions submenu by pressing the touch screen shortcut in the upper right corner of the display, where the words Spectrum Analyzer are located.
You can also select the Spurious Emissions submenu by pressing the Shift key followed by the Measure (4) key, then pressing the Masks and C/I submenu key followed by the Spurious Emissions (Out-of-Band) key.
7. Press Segment Setup.
8. Press Segment Start Amplitude and enter the desired amplitude for the first point of the segment.
9. Press Segment Stop Amplitude and enter the desired amplitude for the last point of the segment.
10. Press Save Current Settings to Selected Segment.
11. Repeat Step 3 through Step 10 as necessary to edit more segments.
12. Press Save Mask and enter the mask name in the Filename entry field. Use the existing mask name if you wish to overwrite the file. If needed, select Spurious Emission Mask from the Filetype pull-down menu. Press Enter.
To add segments to an existing mask:
1. Load the desired emission mask.
2. Press Segment Setup to display the Spurious Segments submenu.
3. Use the current segment number shown on the Spurious Segment submenu key or enter the number of the segment to be used as a template for the new segment.
4. Press Add Current Settings As New Segment.
5. Press the Freq main menu key followed by the Start Freq submenu key and enter a value for the beginning point of a segment.
6. Press the Stop Freq submenu key and enter a value for the end point of the segment.
7. Return to the Spurious Emissions submenu by pressing the touch screen shortcut in the upper right corner of the display, where the words Spectrum Analyzer are located.
You can also select the Spurious Emissions submenu by pressing the Shift key followed by the Measure (4) key, then pressing the Masks and C/I submenu key followed by the Spurious Emissions (Out-of-Band) key.
8. Press Segment Setup.
9. Press Segment Start Amplitude and enter the desired amplitude for the first point of the segment.
10. Press Segment Stop Amplitude and enter the desired amplitude for the last point of the segment.
11. Press Save Current Settings to Selected Segment.
12. Repeat Step 4 through Step 11 as necessary to add more segments.
13. Press Save Mask and enter the mask name in the Filename entry field. Use the existing mask name if you wish to overwrite the file. If needed, select Spurious Emission Mask from the Filetype pull-down menu. Press Enter.
Spurious Emissions (Out-of-Band) Measurements
Three types of measurements are available once you have created an emission mask. You can choose to sweep the full mask once or continuously, or sweep an individual mask segment. You can also select to save or not save the measurement results.
Sweeping All Segments Once
1. Press the Sweep submenu key and select Single.
2. Press the Auto Save submenu key and select Off, On, or Full. Refer to Auto Save Modes.
1. Press the Auto Save submenu key and select Off, On, or Full. Refer to Auto Save Modes.
2. Press the Sweep submenu key and select Continuous to start the measurements.
3. Press Sweep again to select Single and stop the measurements.
Sweeping an Individual Segment
1. Press the Sweep submenu key and select Single.
2. Press the Auto Save key and select Off, On, or Full. Refer to Auto Save Modes.
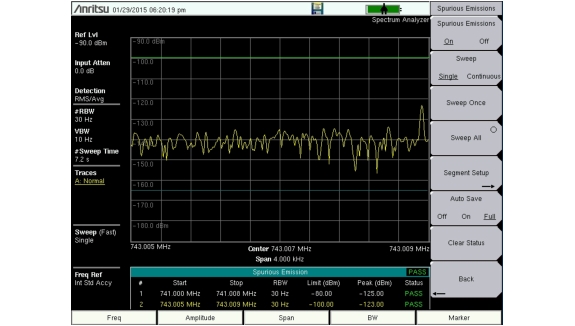
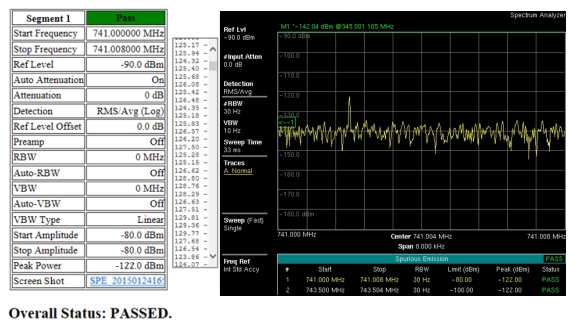
3. Press Sweep Once to initiate one measurement sweep of the currently selected segment, which is highlighted in yellow in the Spurious Emission table. See Figure: Spurious Emission Measurements.
Auto Save Modes
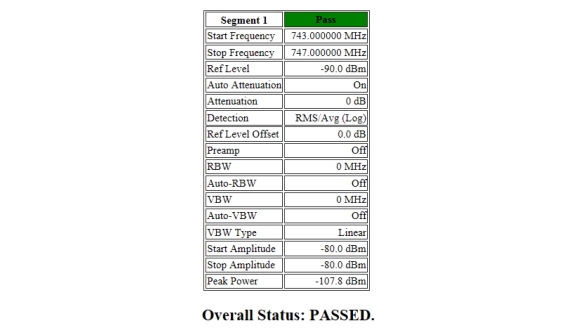
Measurements can be saved automatically by pressing the Auto Save submenu key and selecting either On or Full. The On setting saves an HTML file that contains a table for each segment measured. A status block in the table displays Pass or Fail for the individual segment. The Overall Status at the end of the file indicates whether the spurious emission mask passed or failed. See Figure: Spurious Emission Mask Segment Data - Auto Save On.
Spurious Emission Mask Segment Data - Auto Save On
The Auto Save Full selection generates a scroll list that displays the amplitude of each frequency point measured for the segment. A JPG image of the segment is displayed in the HTML file. The image is also saved as a separate JPG file, which is listed at the bottom of the segment table and labeled Screen Shot. See Figure: Spurious Emission Mask Segment Data - Auto Save Full.
Spurious Emission Mask Segment Data - Auto Save Full