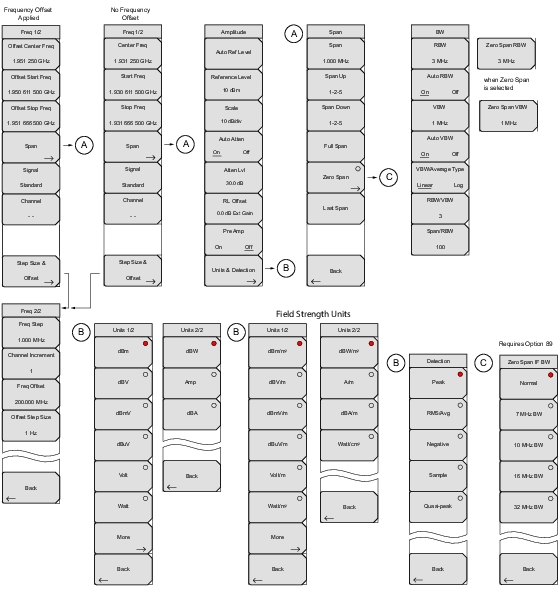
Figure: Main Menu Keys through Figure: System Menu, Application Options Submenu Keys show the maps of the Spectrum Analyzer menus. The following sections describe Spectrum Analyzer main menus and associated submenus. The submenus are listed in the order they appear on the display from top to bottom under each main menu. Menu maps typically display all possible submenu keys, although some keys are displayed on the instruments only under special circumstances (refer to menu descriptions).
Main menu keys are used to display the highest‑level menus. The Marker menu is shown on the next page.
Main Menu Keys
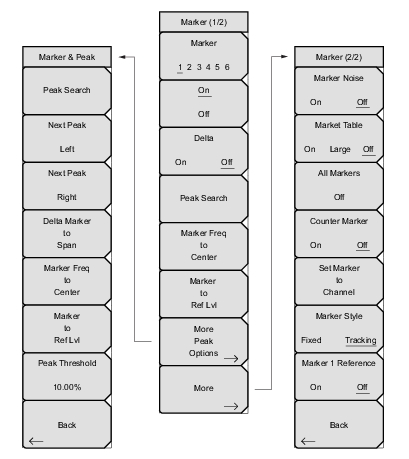
Marker Menu
Marker Submenu Keys
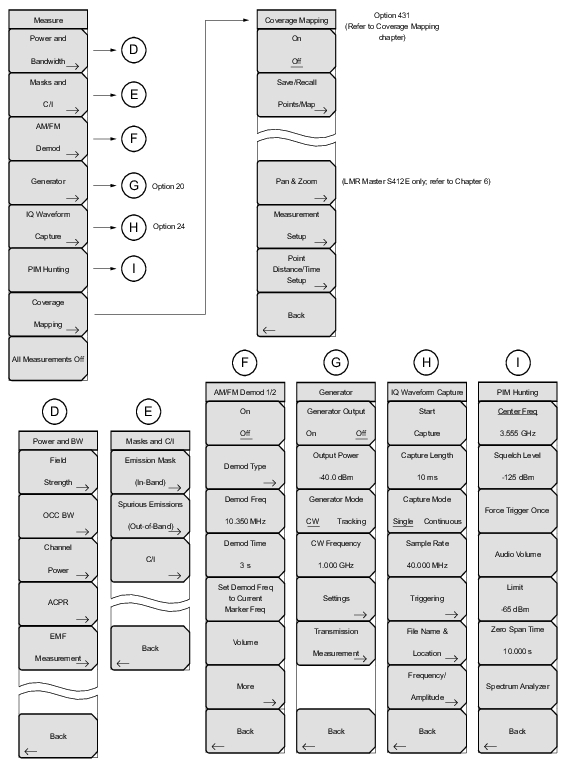
Measure Menu (1 of 5)
Measure Submenu Keys — Measure
Measure Menu (2 of 5)
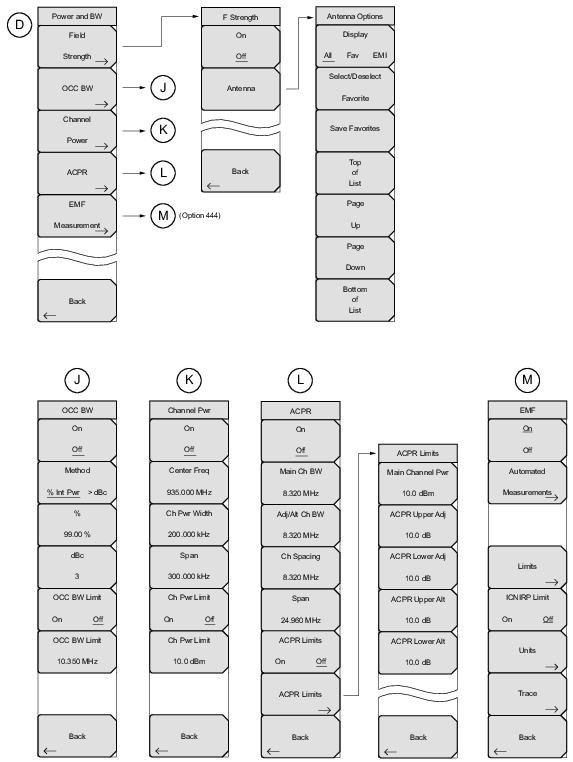
Measure Submenu Keys — Power and Bandwidth
Measure Menu (3 of 5)
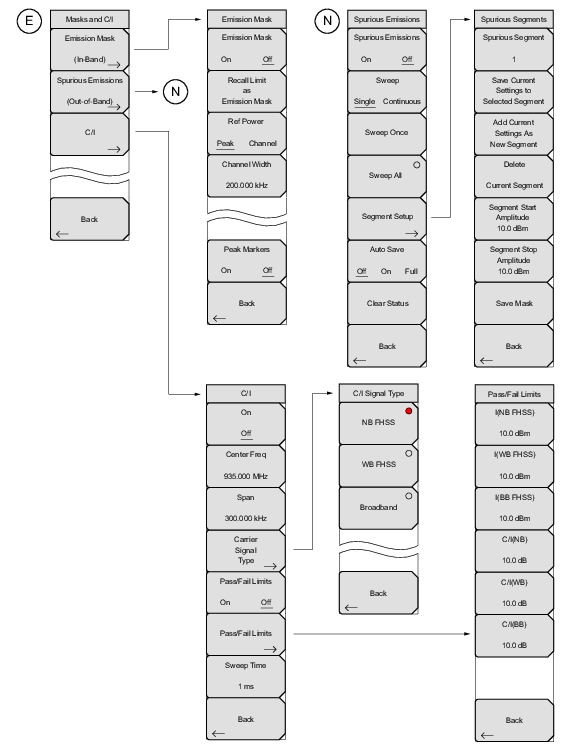
Measure Submenu Keys — Masks and C/I
Measure Menu (4 of 5)
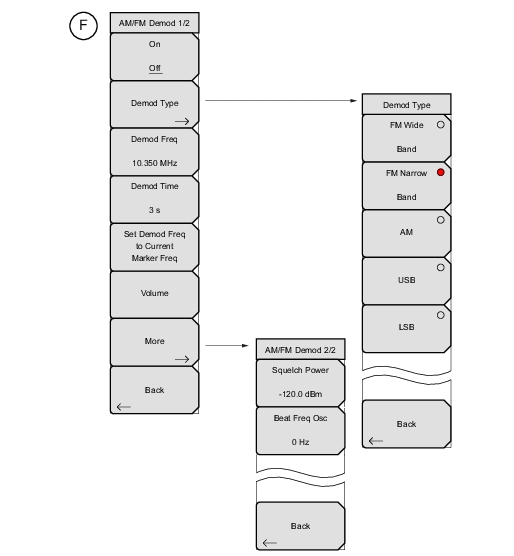
AM/FM Demod Menus
Measure Menu (5 of 5)
IQ Waveform Capture Submenu Keys (Option 24)
Sweep Menu
Sweep Submenu Keys
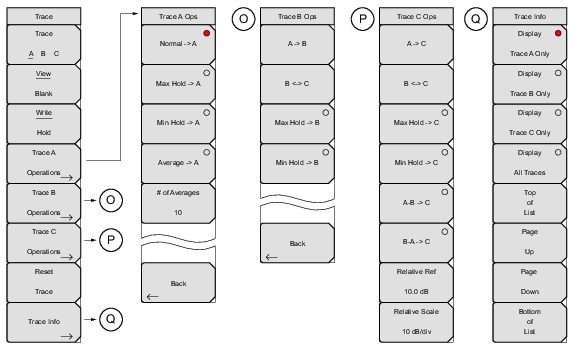
Trace Menus
Trace Submenu Keys
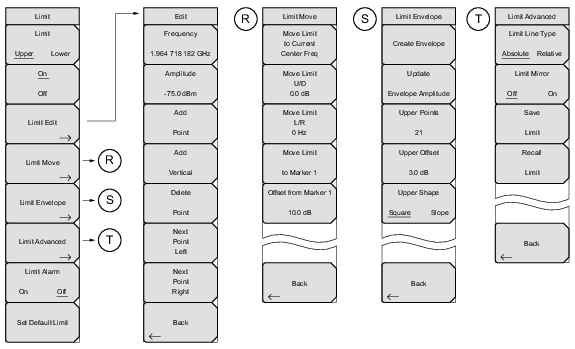
Limit Menus
Limit Submenu Keys
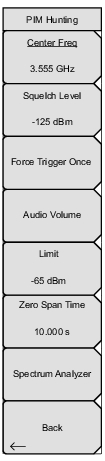
PIM Hunting
Introduction
PIM hunting is an essential measurement technique for contractors and operators who have confirmed that a transmitter site is experiencing PIM and who need to locate and mitigate the sources. An Anritsu PIM Master™ MW82119B generates test tones and “lights up” the PIM sources. The user searches for the precise locations of the PIM sources with the PIM probe attached to an Anritsu spectrum analyzer. This search requires very fast response to changes in the signal level detected by the PIM probe, along with the ability to set and change limit lines quickly. The PIM Hunting menu in the spectrum analyzer provides everything you need in a single menu and the response time is optimized for signal detection.
Starting PIM Hunting
To start PIM Hunting mode:
1. Put the instrument in Spectrum Analyzer mode.
2. Press the Shift button then press the 4 (Measure) key to enter the measurement control menu.
3. Press the PIM Hunting button on the Measure menu.
Center Freq: Set to the center frequency of the IM products from PIM Master.
Squelch Level: Set this to the same value as video trigger setting; it is the green dotted line on the screen (keep below limit line).
Force Trigger Once: Reset a trace, especially if the trace is not sweeping.
Audio Volume: Sets the volume of the variable tone over a 30 dB range.
Limit: Set limit line of the PIM product being hunted (it is the solid yellow line on screen).
Zero Span Time: Set the time scale for PIM hunting to the number of IM pulses the user wants to see.
Spectrum Analyzer: Returns to the Measurement menu of the Spectrum Analyzer application.
Back: Returns to the Measurement menu of the Spectrum Analyzer application.
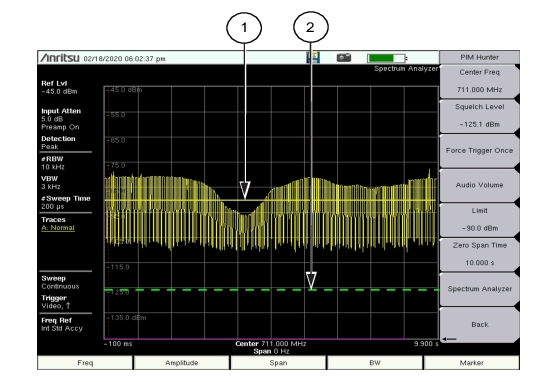
Measurement Results
PIM Display
1.
The PIM Limit Line
2.
The Squelch Level Line
A user is alerted to the location of a PIM source by a tone and by a graph.
Procedure
1. Set the center frequency. Use the IM3 (product under test) value shown on the PIM Master as your center frequency. Make sure to go to a different button so as not to accidentally change the Center Frequency. Remember that this is a Zero Span measurement and any change to the center frequency affects the measurement.
2. Set the limit line level. This level is usually set (see specific method of procedure (MOP) for required settings) from a few dB to as much as 10 dB lower than the measured PIM vs. Time value (because that is the PIM measurement used for PIM hunting). Pass/Fail criteria may ultimately be set by the Swept PIM measurement on the PIM Master, but PIM vs. Time is the measurement used for PIM hunting.
3. Set the squelchlevel. This level is set below the Limit Line level, at least 10 dB or lower.
4. Set the zero span time. This lets the user see the IM pulses (battery-powered PIM analyzers use pulsed F1 & F2 CW signals for power efficiency). This can be set to the user’s preference for PIM Hunting. The screen shot in Figure: PIM Display has a 10-second Zero Span Time and shows multiple pulsed IM signals.
5. Set the force trigger once. Use this setting to see the level (dBm) to which the signal falls; it needs to be above the Squelch Line in order for it to move. You can adjust the Squelch Level accordingly.
6. Set the audio volume to a comfortable level so that you hear it clearly and do not need to look at the screen when PIM hunting.
7. After setting up your measurement, use the DTP (Distance-to-PIM) value from the PIM Master as a starting distance from the antenna to start looking for the PIM source. Use a handheld spectrum analyzer and a PIM Hunter probe with the appropriate uplink filter connected to the spectrum analyzer via an RF cable (N connectors).
Caution
Practice safety when PIM hunting, especially on elevated platforms (e.g., roofs or towers) or in cluttered environments and be aware of your surroundings.
8. With the configured PIM Hunting setup, move the probe antenna around (e.g., roof top or tower) and listen to the audio tone. The audio tone starts with a low pitch (when not near the PIM source) and increases to a higher pitch as the antenna gets nearer to the PIM source) to determine were the PIM sources are.
9. Move the probe around until the tone gets very high, then go beyond that point to see if it stays high or goes down in pitch to locate the exact source. Validate the source by placing a mitigating device over the source, such as a temporary PIM blanket, to see if the PIM level decreases on the PIM Master (sometimes there are multiple PIM sources around the same value, so the PIM measurement may remain in the same range). After that PIM source is found and mitigated, move on to the next and repeat until the PIM measurement value is at the required level per the MOP or customer requirement.