Setting Up Limit Lines
Press the Shift key then the Limit (6 ) key on the numeric keypad to display the Limit menu.
Simple Limit Line
Spectrum Analyzer and Interference Analysis Modes
1. Shift key and then the Limit (6 ) key.
2. Limit (Upper / Lower) submenu key to select the desired limit line, Upper or Lower.
3. On Off submenu key so that On is underlined.
4. Limit Move submenu key to display the Limit Move menu. Press the Move Limit submenu key to change the dBm level of the limit line.
5. Back submenu key to return to the Limit menu.
6. Set Default Limit submenu key to redraw the limit line in view.
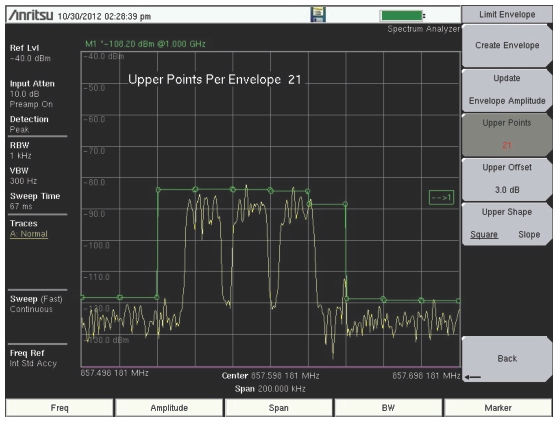
Limit Line Envelope
Spectrum Analyzer and Interference Analysis Modes
Using Limit Envelope:
1. Shift key and then the Limit (6 ) key.
2. Limit (Upper / Lower) submenu key to select the desired limit line, Upper or Lower.
3. Limit Envelope submenu key to display the Limit Envelope menu.
4. Create Envelope submenu key to create an envelope around the measurement.
5. Upper Points or Lower Points submenu key to change the number of segments in the envelope.
6. Upper Shape or Lower Shape submenu key to toggle between square and sloped limit envelope.
7.
Complex Limit Lines
Spectrum Analyzer and Interference Analysis Modes
Figure: Complex Limit Line Example shows an example of a complex limit line.
When building some complex limit lines, you can create either the right or left half of the limit line and then build the remainder by pressing the
Limit Advanced submenu key and then pressing the
Limit Mirror submenu key. The complete set of Limit menus is described in the Spectrum Analyzer Measurement Guide (refer to
Related Documents ).
1-800-ANRITSU
10450-00038, Rev. E

