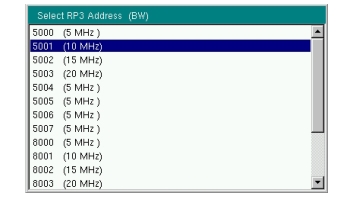
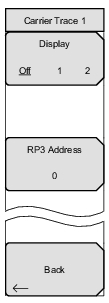
 | Each of the four possible carrier traces has its own configuration menu. Display Press this key to select which display, 1 or 2, will show the current trace. Off turns off the trace. RP3 Address Press this key to display the most recent list of active RP3 addresses. Figure: Select RP3 Address shows an example. Use the touch screen, rotary knob, or arrow keys to highlight an address in the list, then press Enter to select. If the LTE bandwidth associated with the selected RP3 address does not match that of the currently active display (1 or 2), a warning message appears, stating that the display’s LTE bandwidth will be changed to match the RP3 bandwidth. Press OK or Enter to proceed. If you press RP3 Address and the list is currently empty, a message will display, prompting you to press Start OBSAI under the Measurements menu to obtain valid address entries. Alternatively, the instrument will automatically detect available RP3 addresses when a valid OBSAI link is plugged in. Back Returns to the Carrier Trace Config Menu. |