Spectrum Analyzer Measurement Guide : Spectrum Analyzer : Marker Menu
 
Marker Menu
Key Sequence: Marker
Press the Marker main menu key to open the Marker menu. The instrument is equipped with six markers. Any or all markers can be employed simultaneously.
SPA Marker (1/2) Menu
 
 
Marker
Press to select which marker (1, 2, 3, 4, 5, 6) is active using the touch screen. The active marker is underlined.
On/Off
Turns the selected marker underlined in the Marker submenu key On or Off.
Delta On/Off
Turns on a delta marker and prompts for a delta offset frequency, either positive or negative from the frequency of the currently active marker.
Peak Search
This key places the currently active marker on the highest signal amplitude currently displayed on screen.
Marker Freq to Center
Moves the frequency noted by the active marker to the center frequency position and center of the display.
Marker to Ref Level
Causes the amplitude of the currently active marker to become the reference level, which is the top horizontal line of the display.
More Peak Options
Brings up a secondary menu of submenu keys for more peak searching options. See the More Peak Options (Marker & Peak) Menu.
More
Opens a submenu of additional Marker options. See the Marker 2/2 Menu.
More Peak Options (Marker & Peak) Menu
Key Sequence: Marker > More Peak Options
SPA Marker & Peak Menu
 
Peak Search
Places the currently active marker on the highest amplitude signal currently on screen.
Next Peak Left
From the current position of the active marker, the instrument searches to the left (toward lower frequencies) for a peak signal that rises above the peak threshold setting and places the active marker on that signal. If no such peak is found, the marker is placed at the left end of the trace. Peak Threshold is described below.
Next Peak Right
From the current position of the active marker, the instrument searches to the right (toward higher frequencies) for a peak signal that rises above the peak threshold setting and places the active marker on that signal. If no such peak is found, the marker is placed at the right end of the trace. Peak Threshold is described below.
Delta Marker to Span
Sets the total span width to the value of the delta marker. If the delta marker is zero, the span is set to zero span. If the delta marker value is set to less than 10 Hz, then instrument sets the span to 10 Hz. If no delta marker is turned on, no change is made.
Marker Freq to Center
Sets the center frequency to the frequency of the currently active marker.
Marker to Ref Lvl
Sets the reference level (top graticule line) to the amplitude of the currently active marker.
Peak Threshold
Sets the percentage of the current display that a signal must rise before it is considered a peak. For example, 10% is one division of the ten division graticule.
Back
Returns to the Marker Menu.
Marker 2/2 Menu
Key Sequence: Marker > More
SPA Marker (2/2) Menu
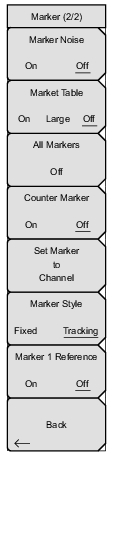
Marker Noise On/Off
Turns the markers into noise markers with units of dBm/Hz. When this option is selected, the detection method is automatically changed to RMS and the displayed value is compensated for the noise bandwidth of resolution bandwidth filter.
Marker Table On/Large/Off
Causes a table to be displayed below the sweep window. The table is automatically sized to display all markers that are turned on. In addition to the marker frequency and amplitude, the table also shows delta frequencies and amplitude deltas for all markers that have deltas entered for them. If Large is selected, a large screen display opens underneath the graph that displays both frequency and amplitude for the active marker in large type.
All Markers Off
Turns off all markers.
Counter Marker On/Off
Sets the frequency counter mode for the active marker. Marker frequency values are normally limited in resolution to individual display pixels. Each pixel may represent multiple frequencies. In the frequency counter mode, in the region of the counter marker, higher resolution digital signal processing is used to determine the frequency. Using Counter Marker in association with Marker to Peak results in the frequency of the signal peak to a much higher displayed resolution. Note that frequency accuracy is affected by the RBW setting and sweep times may be longer when using counter marker because of the additional signal processing.
Set Marker To Channel
If a signal standard has been selected, pressing this key brings up a dialog box to select a channel. Select a channel number for the current signal standard, and the instrument sets the active marker to the center frequency of the channel.
If no signal standard has been selected, a message “No standard selected. Press Enter or Escape to Continue.” is displayed. Press either button to leave the settings as they were before the key was pressed.
Marker Style
This key changes the behavior of the reference markers. If Fixed is selected, reference markers stay at the amplitude they were at when the associated delta marker was turned on. If Tracking is selected, the amplitude of the reference marker changes as the signal amplitude is changed. Note that the reference marker tracks the amplitude, not the frequency of a signal.
Marker 1 Reference
Selects whether Marker 1 is the reference for all six delta markers, or whether each of the six reference markers has an associated delta marker. When Marker 1 Reference is On, markers 2 through 6 are always Off, but each Delta marker 2 through 6 can be toggled On or Off.
Back
Returns to the Marker Menu.