The instrument logs data automatically based on either time or distance interval. If there is no map available when making the measurements, it is still possible to save all the data to a KML file and then later combine the data file with a map.
Coverage Mapping is possible both outdoors (GPS signal required) and indoors (no GPS signal). For more accurate position data for indoor measurements, use a stylus such as the Anritsu 2000-1691-R.
• Outdoor Mapping: The instrument logs data automatically based on either time or distance interval. If there is no map available when making the measurements, it is still possible to save all the data to a KML file and then combine the data with a map. You may also recall a map after taking the data without having to save and recall it.
Note
Outdoor coverage mapping requires Option 31 or an Anritsu analyzer having the GPS receiver as a standard accessory component.
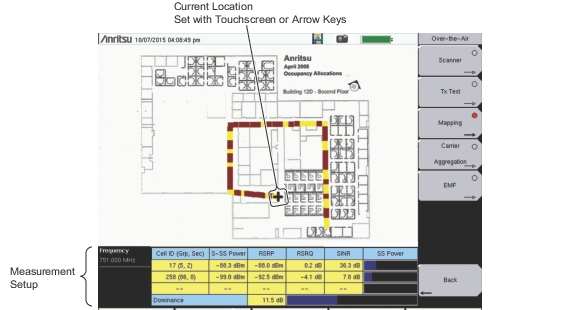
• Indoor Mapping: Using a start‑walk‑stop approach, the instrument provides in‑building coverage mapping by overlaying data directly onto the downloaded map (which may be a drawing of a building). Data is captured when you tap the touchscreen. The instrument places points linearly between taps if Time interval is used for capturing data and there is more than one measurement. When the Repeat Type is Distance, new measurements are placed at the next tap point.
Outdoor Coverage
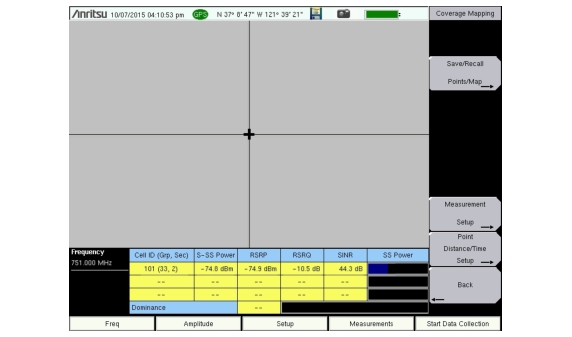
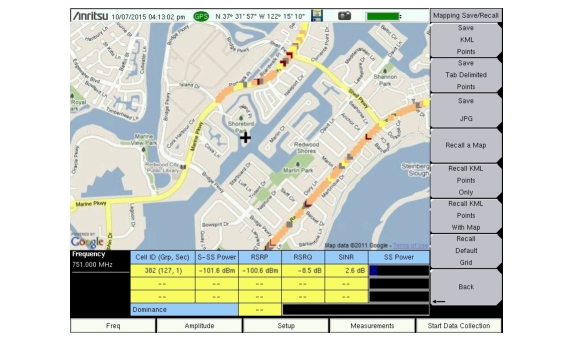
With a valid GPS signal, the instrument identifies the current location on the displayed GeoEmbedded map with a plus sign. Previously saved locations display as colored squares. Using GPS, latitude, longitude, and altitude data is automatically saved for each location.
Outdoor Coverage Mapping (GPS On)
Indoor Coverage
With GPS turned off and a non‑GeoEmbedded map file, the user indicates the current position (+) with the touchscreen. On instruments that do not have a touchscreen, use the arrow keys. Previously saved locations are displayed as colored squares.
Anritsu easyMap Tools allows you to capture maps of any location and create Anritsu Map Files. These maps are viewed on the Anritsu instrument during coverage mapping. There are two Anritsu Map File formats:
• legacy .map map files
• .azm map files, which are displayed in full zoom-out view (pan-and-zoom is currently not supported in Coverage Mapping)
Download easyMap Tools from the Anritsu website (www.anritsu.com). Additional information about easyMap Tools is available in the software Help.
Outdoor Map
Type an address in easyMap Tools and capture the map with GPS data.
Indoor Map
In easyMap Tools, open a bitmapped image (JPEG, GIF, TIFF, or PNG) of the floor plan for indoor mapping. You can also use a downloaded map and make it an indoor map. This method works well if you can get a good aerial view of a building.
The image size should be close to 666 pixels x 420 pixels (~1.6:1 ratio).
Note
A USB flash drive is required to transfer maps to the instrument.
Instrument Settings
Setup
1. Create the appropriate map with Anritsu easyMap Tools. Refer to Anritsu easyMap Tools and the software Help. Outdoor mapping requires a GeoEmbedded map or the default grid.
2. Open up Coverage Mapping by pressing the Measurements main menu button followed by the Over‑the‑Air submenu key and then pressing the Mapping submenu key.
d. Turn on GPS. On should be underlined in the GPS submenu key.
e. Press the GPS Voltage submenu key to select the appropriate voltage for the antenna being used. Refer to the instrument Technical Data Sheet for voltage specifications of supported GPS antennas.
f. Press GPS info and verify that the information from four or more satellites is captured. Press Esc to close the info box.
It may take several minutes for the GPS receiver to track at least four satellites. When it does, the GPS icon at the top of the screen turns green. Refer to your instrument User Guide for additional information on GPS.
Recall a Map
The instrument allows you to recall a .map file or .azm file created with easyMap Tools. With a valid GPS signal, the current location will be displayed on an outdoor map or an arrow will show the direction of the current location if it is outside the map coverage area. With an indoor map, position the plus sign at the current location by using the touchscreen or by using the arrow keys and then pressing Enter.
Connect the USB flash drive that has the map file or files created in Anritsu easyMap Tools to the instrument.
1. Press the Mapping submenu key in the Over‑the‑Air submenu.
2. Press the Save/Recall Points/Map submenu key.
3. Press Recall a Map and select the appropriate map from the USB flash drive.
4. Use the arrow keys to scroll down to the desired map and press Enter to select.
5. The new map file will be displayed and the current location (if within the GPS boundaries of the displayed map) is shown as a plus sign with outdoor mapping.
6. If the current location is outside the map boundaries, an arrow indicates the direction of the current location in relation to the displayed map.
If you do not see the USB drive in the Recall menu:
1. Press the Refresh Directories submenu key.
2. If the drive is still not visible, exit the menu, then remove and reconnect the USB drive.
3. Press Recall a Map again.
4. If the drive is still not visible, reformat the USB flash drive in FAT32 format, then copy the map files to the reformatted drive.
Recall the Default Grid
The instrument can make coverage mapping measurements even when an Anritsu easyMap Tools file of the current indoor or outdoor location is not available. In such cases, use the default grid map, save the KML points, and recall them at a later time with a map. You may also recall a map after taking the data without having to save and recall it. Alternatively, you can save the KML points and view them in Google Earth or Google Maps, or you can save the points in mtd (mapping tab delimited) format, and use another tool for analysis, such as Microsoft Excel. Refer to Mapping Save/Recall Menu for additional information on recalling saved maps and .kml data.
Note
When using the default grid, the coverage area for outdoor mapping is fixed at 10 x 10 miles. For indoor coverage mapping, the grid size is the indoor map file dimensions (666 pixels by 420 pixels). If GPS is on and locked, the center point of the default grid is the current location.
1. Select the Mapping submenu key.
2. Press the Save/Recall Points/Map submenu key.
3. Press the Recall Default Grid submenu key.
LTE Coverage Mapping with the Default Grid
Measurement Setup
1. Press the Measurements main menu key.
2. Press the Over‑the‑Air submenu key.
3. Press the Mapping submenu key to activate the Coverage Mapping display. Press the Mapping key again to display the Coverage Mapping menu.
4. Press the MeasurementSetup submenu key to open the Measurement Setup menu to select which measurement is mapped and to set the threshold values for S‑SS, RSRP, RSRQ and SINR.
5. Press the Measurement submenu key to open the Mapping Parameter menu.
a. Select the signal parameter to be mapped and displayed in bar graph form by selecting one of the parameter buttons and then pressing Back. All four measurements are saved for each data point, independent of which one is chosen for mapping on the instrument screen. For example, if RSRP is selected for mapping, the resulting .kml file will also include S‑SS, RSRQ and SINR values.
b. Set the thresholds for S‑SS, RSRP, RSRQ or SINR by pressing the respective Thresholds button. After pressing a threshold button, set the threshold levels for Excellent, Very Good, Good, Fair and Poor. Then press the Back button.
6. Set up the interval type and interval parameters. Press the Point Distance/Time Setup submenu button to open the Points Distance/Time menu. If Time is selected for Repeat Type, then set the time period by pressing the Repeat Time submenu key. If Distance is selected for Repeat Type, then set the Repeat Distance and Distance Units. If necessary, delete any previously stored points by pressing the Delete ALL Points button.
Note
All files will be stored in the default save location. To change the default location, Press Shift then File (7) to enter File menu. Press Save then Change Save Location. Create a new folder or change the current location on the USB flash drive or in the instrument’s storage memory. Press Set Location to make this the new default location for saving files.
7. Press Back to return to the Over‑the‑Air menu.
Measurement Mapping
After completing the setups for Coverage Mapping and measurements, you are ready to make measurements.
1. Press the Start Data Collection main menu key. Data will be collected at the time or distance interval based on the setting in Point Distance/Time Setup Menu. The color of the squares indicates the power level based on the chosen measurement and its threshold level setup.
2. Press the Stop Data Collection main menu key to end the measurement process. Save the collected data as a .kml file, a tab‑delimited text file (.mtd) or a .jpg file. Refer to Save the Coverage Mapping Information.
Save the Coverage Mapping Information
1. Press the Measurements main menu key.
2. Press the Over-the-Air submenu key, then Mapping.
All files will be stored in the default save location. To change the default location:
1. Press Shift, then File (7) to access the File menu.
2. Press Save.
3. Press Change Save Location.
4. Select an existing folder or press the Create Folder submenu key to create a new folder in the instrument’s internal memory or on a USB drive.
5. Press Set Location to make the selected folder the new default location for saving files.
Save KML Points
In the Coverage Mapping submenu, press Save/Recall Points/Map, then Save KML Points. In the Save dialog, change the file name as appropriate, then press Enter. The following information is saved for the points currently displayed on the screen:
• Location and time based on GPS information
• Cell, Group and Sector ID
• Center Frequency
• Measured signals: S‑SS, RSRP, RSRQ and SINR
The .kml file can be recalled and viewed on the instrument. Refer to Mapping Save/Recall Menu for information on recalling a map.
The .kml file can also be opened and viewed using Google Earth and a network connection.
Note
Installing Google Earth
If you don’t have Google Earth installed on your computer:
2. Click Download Google Earth and follow the on‑screen instructions.
3. After installation and Google Earth is opened, user instructions and several types of help are available from the Help pull‑down menu.
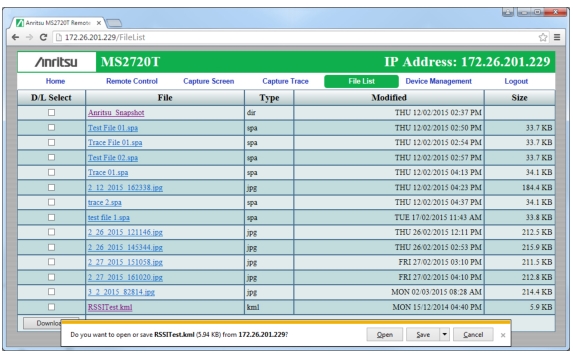
1. Connect your computer or mobile device to the instrument via the Web Remote Control server. To do this, enter the instrument IP address in the address bar of your HTML-5 compatible Web browser. Anritsu strongly recommends using Google Chrome, as other browsers do not fully support HTML-5.
You can look up your instrument IP address by pressing Shift, then System (8), followed by Status. If your instrument has not been set up with an IP address, press System Options, then Ethernet Config to access the Ethernet Editor dialog.
3. Click the map file name in the File column. Alternatively, you can select the checkbox next to the .kml file name, then click the Download button.
4. Click Open or Save in the pop-up dialog.
Web Remote Control Window - File List Tab
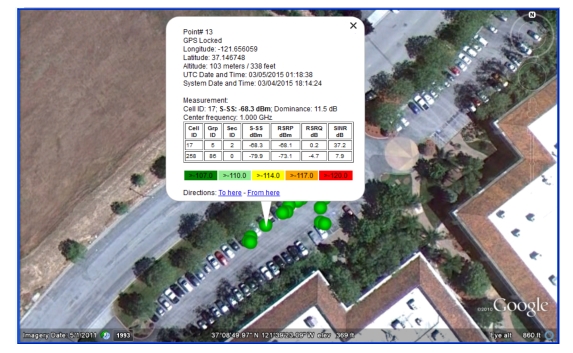
Opening the .kml file automatically launches Google Earth if the application is not currently open. Figure: Sample Coverage Mapping KML File in Google Earth illustrates a sample coverage mapping .kml file viewed in Google Earth. You can also view the file with Google Maps, provided you have the appropriate plug-in for your browser.
Sample Coverage Mapping KML File in Google Earth
Save Tab Delimited Points
In the Coverage Mapping submenu, press Save/Recall Points/Map, then Save Tab Delimited Points. In the Save dialog, change the file name as appropriate, then press Enter. A tab delimited text file (.mtd) of the coverage mapping data currently displayed on the screen will be saved to the default location.
Save JPG
In the Coverage Mapping submenu, press Save/Recall Points/Map, then Save JPG. In the Save dialog, change the file name as appropriate, then press Enter. A .jpg file of the current screen is saved to the default location.