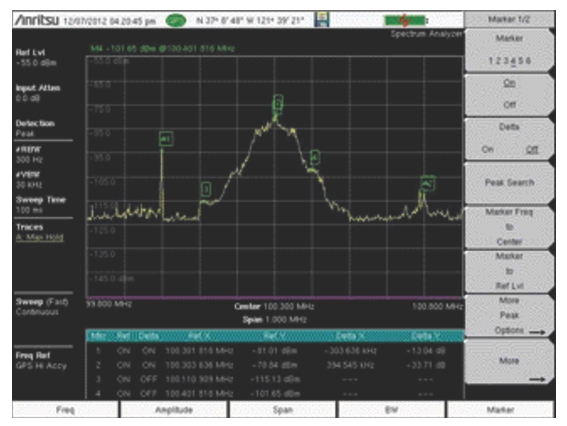
Press the Marker main menu key to display the Marker menu. See Figure: Markers with Table. Touch a marker number or the Marker button to activate that marker. After a marker is active, other submenu keys can be used to place the marker. Refer to the Measurement Guides in Measurement Guides for more details.
1. Press the Marker submenu key. Press the desired marker number. The selected marker number is displayed in the sweep window and is also underlined on the Marker submenu key.
2. Press the On Off submenu key (if necessary) so that On is underlined. The selected marker is displayed in red, ready to be moved.
3. Use the rotary knob, an Arrow key, or the touch screen to place the marker on the desired frequency.
Note that when a marker is active, you can drag your finger across the sweep window horizontally (at any level) to move the marker. Also, when a marker is active and the Marker menu is displayed, you can type a frequency to place the active marker at a point of interest.
4. Press the Peak Search submenu key to move the active marker to the highest signal amplitude that is currently displayed on screen. For additional marker movements, press the More Peak Options submenu key. Refer to the Spectrum Analyzer Measurement Guide for more details.
5. Repeat Step 1 and Step 2 to activate and move multiple markers.
Selecting, Activating, and Placing a Delta Marker:
When a delta marker is On, its position data is relative to its reference marker. For example, Delta Marker 3 displays x‑axis and y‑axis data relative to Marker 3. This reference relationship differs when using the Marker 1 Reference submenu key as describedMarker 1 Reference.
1. Press the Marker submenu key and then select a marker in the list box.
2. Press the Delta On Off submenu key so that On is underlined. The selected marker is displayed in red, ready to be moved.
3. Use the rotary knob, Arrow keys, touch screen, or the numeric keypad to place the delta marker on the desired offset frequency from the associated reference marker.
4. Repeat Step 1 and Step 2 to activate and move multiple delta markers.
Viewing Marker Data in a Table Format
1. Press the More submenu key.
2. Press the Marker Table submenu key so that On is underlined. All marker data and delta marker data are displayed in a table under the measurement graph. If Marker Table is set to Large, then the table has room for only the x‑axis and y‑axis data for one marker, which is the active marker. Select another marker to view its values in the large table.
Markers with Table
Marker Table Set to Large
To change the marker that is displayed in the large marker table, make another marker active by selecting it in the Marker Selection box.
If you want to make a delta marker active without changing its location, first select its reference marker. The Delta submenu key will have On underlined, indicating that the delta maker is in use. Press the Delta key once. The delta marker will remain On, its position will not change, it will become the active marker, and its x‑axis and y‑axis data will then be displayed in the large Marker Table.
Marker 1 Reference
The Marker 1 Reference submenu key is in the Marker (2/2) menu. When turned On, this feature sets Reference Marker 1 to On, and turns On all six delta markers in positions relative to Marker 1. These six positions are spaced evenly across the current measurement span.
This feature is useful for examining measurement events such as spurs, harmonics, and phase noise.