Press the Shift key, then the File (7) key on the numeric keypad to display the File menu.
Note
When navigating through the File menu, press the Esc key to return to the previous menu or submenu. Any changes not yet applied (by pressing Enter) are canceled.
File Types
Under the Save, Recall, Copy, and Delete menus, press the Change Type or the File Type submenu key to open the Select File Type list box, where you can select the desired file type.
Available file types depend on the current instrument mode. The Select File Type list box may contain the following entries:
• Measurement, *.vna, *.spa, *.pm, *.ia, *.cs, *.edg, *.wcd, *.tds, *.lte, *.tdlte, *.cdma, *.evdo, *.wmxd, *.wmxe, *.pim (Measurement files contain all of the information in the setup files and the measurement data. File extensions are determined by the current measurement mode and selected file type.)
• JPEG, *.jpg (Image file is a screen capture of the current measurement display.)
• Limit Lines, *.lim (The Limit line file contains limit line data details.)
• Mapping Tab Delimited, *.mtd
• KML 2D, *.kml
• KML 3D, *.kml
You can also use the touch screen to open the drop down list for the Filetype entry box, as shown in Figure: Save Dialog Box.
Save Files
The submenu keys that are available for file management may vary with instrument options and measurement modes. Refer to File Menu.
Save Measurement As
The Save Measurement As submenu key provides a one-touch method of saving the current measurement data. The name of the file that will be saved is displayed on the submenu key. The numerical suffix increments by 1 following the Save. For example, if the last measurement was saved with the file name ACPR, the Save Measurement As shows the default file name for the next measurement to be saved as ACPR_1, then ACPR_2, and so on. To save using a different file name than the default, press the Save Measurement key or the Save key instead of Save Measurement As.
Save Measurement
To save the current measurement data, use the Save Measurement As submenu key described above or, to apply a different file name or save location than the default, press the Save Measurement submenu key or the Save key. In the Save dialog, you can enter the file name and select the type of data to save. Refer to Save Dialog Box.
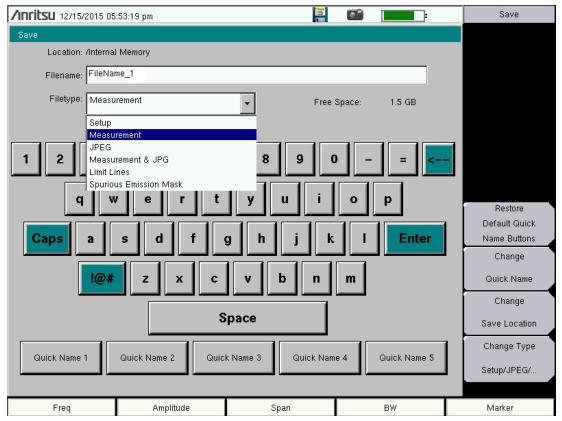
Save
The Save submenu key has the same function as Save Measurement. It opens the Save dialog box and menu illustrated in Figure: Save Dialog Box.
Save Dialog Box
Save Dialog Box
In the Save dialog, use the touch screen keyboard to enter the name of the file to save. See Figure: Save Dialog Box. Optionally, you can use the Quick Name keys to insert preset text strings into the file name. Refer to Quick Name Keys.
To select the type of data to save, either press the Filetype selection box to display the drop down list of available file types, or press the Change Type submenu key. Selectable file types vary with the measurement mode. Use the Up/Down arrow keys to highlight the desired file type, then press Enter to select.
Press Enter again to save the file. File name extensions are automatically assigned based on the file type and measurement mode. Refer to File Types.
Quick Name Keys
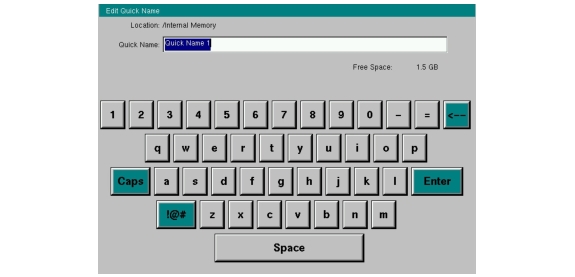
Quick Name keys in the Save dialog provide optional building blocks for entering file names. They function as keyboard shortcuts, allowing you to enter predefined, frequently used file names or parts of file names. To enter or change a Quick Name, press the Change Quick Name submenu key in the Save menu, then select the item to edit (see Figure: Select Quick Name List Box) and press Enter on the numeric keypad. In the Edit Quick Name dialog, use the touch screen keyboard to enter a new Quick Name. See Figure: Edit Quick Name Dialog Box. Press Enter again and the new name will be displayed on the key, in the Save dialog.
Select Quick Name List Box
Edit Quick Name Dialog Box
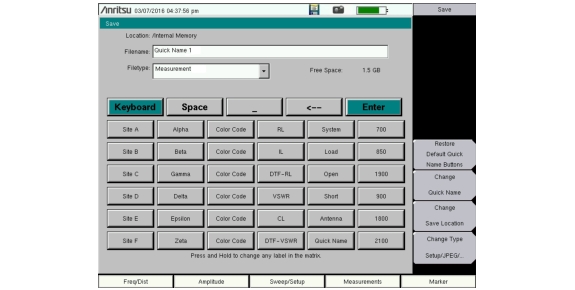
Quick Name Matrix
The Quick Name Matrix key is present in the Save dialog only in the Cable and Antenna Analyzer measurement mode. See Figure: Save Dialog Box (Cable and Antenna Analyzer Mode). Similarly to the Quick Name keys, the matrix gives field personnel a shortcut method to enter file names in compliance with carrier requirements, which may include file naming conventions related to site number, sector information, color coding, measurement type, termination device, or frequency information. See Figure: Quick Name Matrix.
Save Dialog Box (Cable and Antenna Analyzer Mode)
Quick Name Matrix
Follow these steps to define and use shortcut keys in the Quick Name Matrix. If all matrix keys are already defined, proceed directly to Step 4.
2. Use the touch screen keyboard to enter a new key label, then press Enter.
3. Repeat the steps above to define more Quick Name Matrix keys, until done.
4. Press the matrix key with the appropriate label to enter the desired text string at the insertion point, in the Filename entry box. Press the Esc key to undo. You can use the Space and Underscore keys to insert separators in the file name.
5. Repeat Step 4 as needed until the file name is complete.
Note that the Keyboard key (see Figure: Quick Name Matrix) closes the Quick Name Matrix screen and returns to the Save dialog. The next steps can be performed from either screen.
6. Select the file type to save, either from the drop down list or by using the Change Type submenu key.
7. Optionally, press the Change Save Location submenu key to select a different save location.
8. Press Enter to save the file.
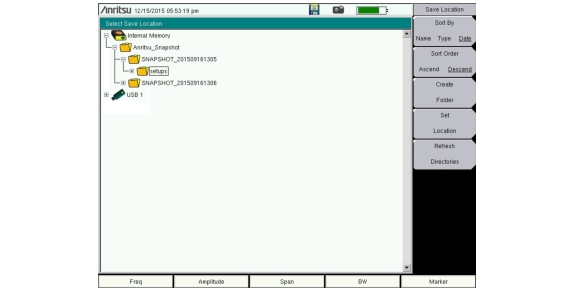
Change Save Location
You can save files to internal memory or to an external USB flash drive. To change the destination location of the saved file, press the Change Save Location submenu key under the Save menu. Figure: Save Location Screen illustrates the directory structure of the instrument’s internal memory and external USB drive or drives, if connected. Only folders are listed, not files.
Save Location Screen
Use the touch screen, the Up/Down arrow keys, or the rotary knob to select a folder from the list. To expand a folder and view its subfolders, press Enter or the Right arrow key. Press Enter again or the Left arrow key to collapse the folder. To create a new folder, press the Create Folder submenu key.
After selecting the folder, press the Set Location key to store the save location. Refer to Save Location Menu for a description of the submenu keys.
Save On Event
This menu is not available in all modes of operation. The menu is used to automatically save measurement data to the current save location after a selected event type. Refer to Save On... Menu.
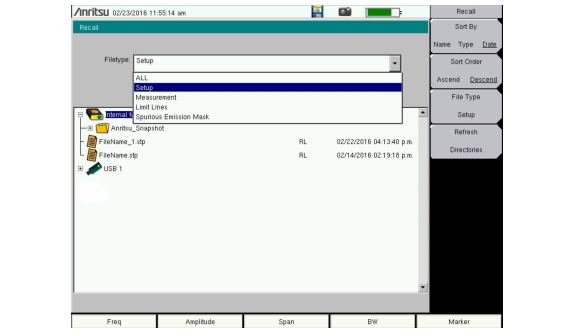
Recall Files
Press the Recall Measurement key or the Recall key under the File menu to recall a previously saved file from internal memory or an external USB drive, if connected. The files listed in the Recall dialog box depend on the file type selected. See Figure: Recall Dialog Box. JPEG image files cannot be recalled.
Recall Dialog Box
The submenu keys let you change the file types and sort order of the displayed file list. Refer to Recall Menu.
The Filetype drop down list has the same function as the File Type submenu key. Selectable file types vary with the measurement mode. Use the touch screen, rotary knob, or the Up/Down arrow keys to select the file you wish to recall, then press Enter.
From the Recall dialog box, you can create a shortcut to a setup file and place the shortcut icon on the instrument’s Menu screen. Refer to User-Created Shortcuts.