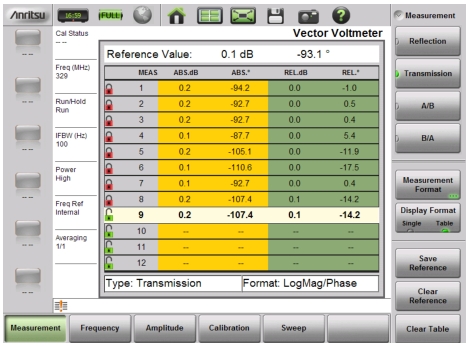
Begin the measurements and save a reference (if needed). The measurement results are displayed in the top row of the table. Press the Enter key to save a measurement and move to the next row of the table.
In the example shown in Figure: Table Display Format, multiple tuning stubs are being measured and compared to a reference stub. Tolerance was specified as < ± 0.1 dB and < ± 2° compared to the reference. From the results you can see that stub numbers 4, 5, 6, and 8 fail the tolerance, but numbers 1,2,3 and 7 pass.
Table Display Format
You can make a new row become the active row. Use the touchscreen to tap a lock icon, or use the arrow keys or the rotary knob to highlight a row, then press Enter.
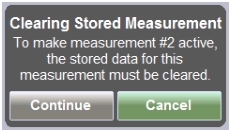
When you press Enter on a saved row, a message is displayed (see Figure: Message – Clearing Stored Measurement). In order to make the measurement row active, the stored data must be cleared. Press the Continue button or the Cancel button.
Message – Clearing Stored Measurement
When you have saved 12 measurements (the table rows are all used), if you press Enter again, you are asked if you want to clear the active measurement and remeasure. If you highlight any saved row and press Enter, you are asked if you want to clear the measurement and make that row active.
When the Display Format is set to Table, an additional submenu key (Clear Table) is displayed at the bottom of the list to allow you to clear the entire table. A message is displayed asking you to confirm your choice. When the table is cleared, the active measurement returns to row 1. The saved reference remains as the reference value.
You can continue to make measurements with the same saved reference until you press the Clear Reference key.
Note
Clearing the reference while using the Table Display Format will immediately clear all of the relative measurement values that have been stored within the table. The stored measurements are not affected.
As soon as you save another reference value, all of the relative measurement values are recalculated for stored measurements.
Pressing Save Reference when a reference value is already saved, overwrites the saved reference with the new (current) value.
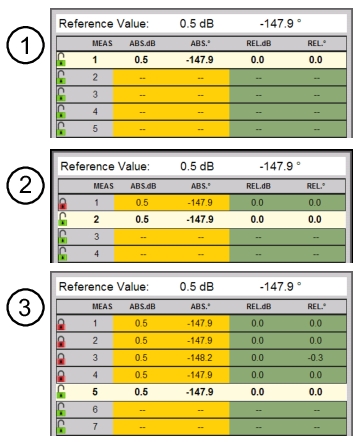
In the example shown in Figure: Working with Table Display Format – 1 of 3, measurement starts from the default active Row 1. When you press Enter to lock in the measurement data for that row, the Green unlock icon changes to a Red lock icon to indicate that the data in that row have been locked. The next available row (Row 2) then becomes active with live data. Pressing Enter on Row 2 locks the data, and the next available row (Row 3) then becomes active. This repeats until the table has been completely filled. If you skip back to a previously filled row and press Enter, then the pop‑up message that is shown in Step 5 appears. Pressing Continue clears the data for that row, and the row becomes active with live data. After the live data are locked into that row, the next unused row in the table (if any remain) will become live, and the standard sequence returns.
The following procedure describes working with the features of Table Display Format.
Working with Table Display Format – 1 of 3
1.
Row 1 is active and highlighted.
2.
Press Enter. Row 1 is saved (lock icon becomes red). Row 2 becomes active and highlighted.
3.
Press Enter for Row 2, then for Row 3, then for Row 4. Rows 1 through 4 have stored measurements (icons show locked). Row 5 is active and highlighted. Note that the measured values are identical except for Row 3.
Working with Table Display Format – 2 of 3
4.
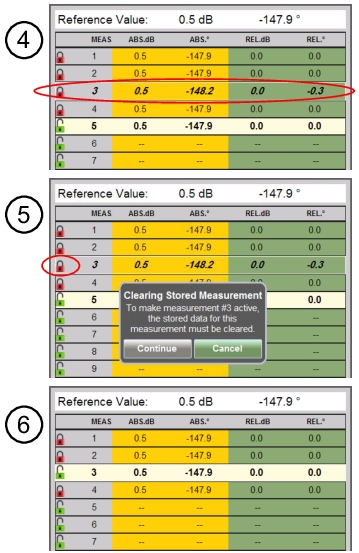
Use arrow keys or rotary knob to highlight Row 3 (until the numerals are bold and slanted). Row 5 remains active.
5.
Press Enter or tap the lock icon for Row 3. Then tap Continue to make Row 3 active. Note that previously saved data are overwritten with the current live data, as shown in Step 6.
6.
Row 3 is active and highlighted. The data that were in Row 5 prior to making Row 3 active are not saved because it was not locked in. After new data are locked in Row 3 by pressing the Enter button, the active measurement drops down to the next available row in the table. In this case Row 5 becomes active again. See Step 7.
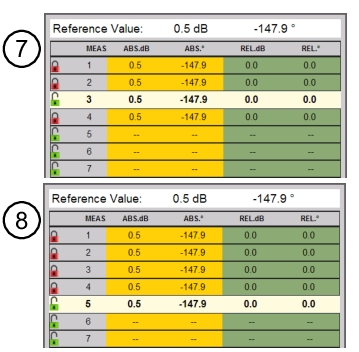
Working with Table Display Format – 3 of 3
7.
In the example of Step 6, the Enter key was pressed to save the data in Row 3. This is a view of the table just before pressing Enter.
8.
Press Enter to save the measurement in Row 3 and to make Row 5 active. Note that measurement data in Row 3 were stored, and all measurements are now identical.
When you press Enter, a lower unused row (if available) becomes active. When you press Enter, and the lower unused rows are saved, a higher unused row becomes active.
The lock icon is red if measurement data are saved for that row.
Tapping the green lock icon of the active measurement stores that measurement, which is the same result as pressing Enter.
Tapping the green or red lock icon of any inactive row produces the same result as highlighting that row and pressing Enter. If the lock icon was green, then the row becomes active immediately. If the lock icon was red, then the confirmation dialog box is displayed, and you must press Continue to unlock the row and overwrite its data.