Two trace modes are available to optimize performance. They are based on the type of measurement being conducted. The instrument settings summary displays the Trace Mode setting. (See the PIM Master User Guide 10580-00400 for more information on other Front Panel Display areas.)
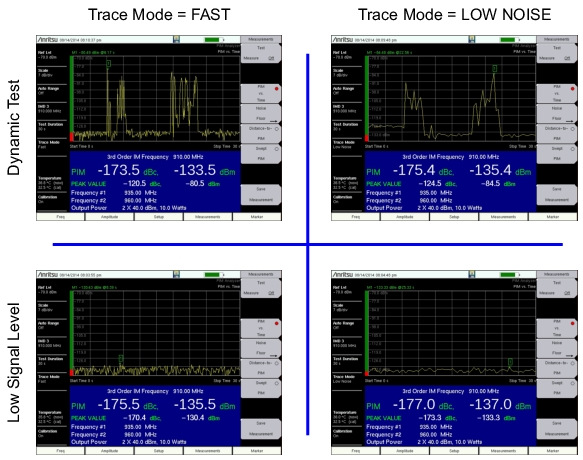
Fast mode is available for dynamic PIM testing, in which maximum responsiveness is desired. New data points are reported to the user approximately eight times per second to provide rapid feedback during dynamic impacts.
Low Noise mode is available to increase accuracy for low signal level measurements. This mode increases the number of samples collected by a factor of five for each reported data point. Noise variation is distributed over a larger number of samples, which results in reduced peak‑to‑peak variation for low signal level measurements.
Fast and Low Noise Trace Modes
Use Setup>Trace Mode to change this setting.
PIM vs. Time Measurement Setup
Before performing a PIM vs. Time measurement, the PIM Master must be calibrated (refer to section Calibrating the PIM Analyzer).
1. Turn on the PIM Master.
2. Connect the DUT to the test port connector of the PIM Master.
Warning
Confirm that connections are secure and properly torqued. The PIM test port emits high-power RF signals which can cause bodily injury. Anritsu recommends using a torque wrench for this connection. The torque wrench is included in the PIM accessory kit (refer to your Technical Data Sheet for part numbers).
This device (DUT) may be the main feeder cable from the tower or a simple jumper cable. The DUT must be connected to a Load device, such as a low PIM Load or an Antenna.
Caution
Do not use a Site Master precision load as the Load device for PIM tests because they are not designed to handle the power of the PIM Master and will become damaged immediately.