Site Masterâ„¢ S331P : Classic Mode Operation : Marker Menu
 
Marker Menu
Key Sequence: Marker
Marker Menu (1 of 2)
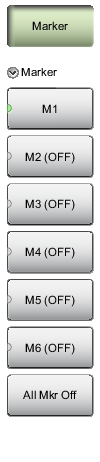
Marker
After pressing the Marker button, Marker 1 (M1) is automatically turned on and appears at the last used location. If there is no last used location (after a preset, for example), Marker 1 will appear in the center of the measurement screen.
M1
Press to display the Marker 1 menu (Figure: Marker Menu (2 of 2)), which gives access to marker parameter settings.
The key label displays the marker number only (M1 for example) when the marker is on, and displays M1 (OFF) when the marker is not in use. The green half circle indicates that the marker is currently selected.
Submenu keys M2 through M6 behave in the same manner as M1.


All Mkr Off
Press this key to turn OFF all markers.
 
Key Sequence: Marker > M1
Marker Menu (2 of 2)
Marker
M1 (On Off)
Press this key to turn OFF the selected marker (M1 to M6).
Edit
Press this key to enter a marker value.
Type (Ref Delta)
Press this key to toggle the marker type between Reference and Delta. This key is displayed for markers M2 through M4 only. Marker M1 is a reference marker only.
Marker to Peak
Press this key to set a marker (M1 to M4 only) on the highest signal amplitude in the displayed trace.
Marker to Valley
Press this key to set a marker (M1 to M4 only) on the lowest signal amplitude in the displayed trace.
Back
Press this key to return to the Marker menu.
Markers 5 and 6 can perform a special Marker search to find the Peak or Valley between two other markers. When Marker 5 is Active
 
Peak Between M1 & M2: Places Marker 5 on the highest signal amplitude between Marker 1 and Marker 2.
Valley Between M1 & M2: Places Marker 5 on the lowest signal amplitude between Marker 1 and Marker 2.
When Marker 6 is Active
 
Peak Between M3 & M4: Places Marker 6 on the highest signal amplitude between Marker 3 and Marker 4.
Valley Between M3 & M4: Places Marker 6 on the lowest signal amplitude between Marker 3 and Marker 4.