You can manually calibrate the S331P or use the ReadyCal factory calibration for quick measurements. The instrument automatically applies the default ReadyCal to all Cable and Antenna Analyzer measurement types except Transmission, when the User Cal setting is turned off or the Transmission (Ext Sensor) calibration method is used.
The instrument needs to be manually re-calibrated if a test port cable is used and has been replaced, or when changing frequency in Standard Cal (not in Flex Cal).
To manually calibrate the S331P:
1. Press the Freq/Dist main menu key and adjust the Start and Stop Frequency values if needed.
If the active Cal Type is Standard and User Cal is on, a warning message is displayed informing you that User Cal will be turned off. You can use Flex Cal to allow frequency changes with User Cal on.
Refer to the S331P Technical Data Sheet (part number 11410-00964) for a list of supported calibration components, adapters, and power sensors.
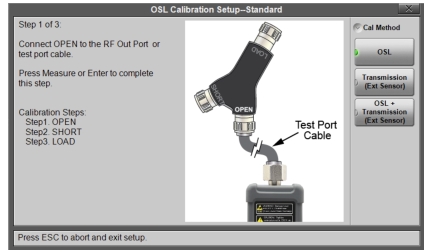
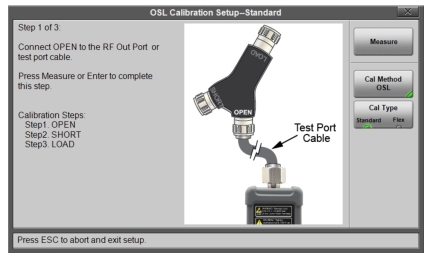
OSL Calibration Setup
1. In the Calibration Setup window, press Cal Type to select either Standard or Flex.
OSL Calibration Setup
2. Follow the on-screen instructions and press Measure at the end of each step.
3. When done, select Apply.
4. When calibration has completed, the User Cal status messages will display as follows:
User Cal OK (RFP1) for Standard Cal iUser Cal OK (RFP1) for Flex Cal CALIBRATION ON for all measurements except Transmission CALIBRATION OFF for Transmission measurement
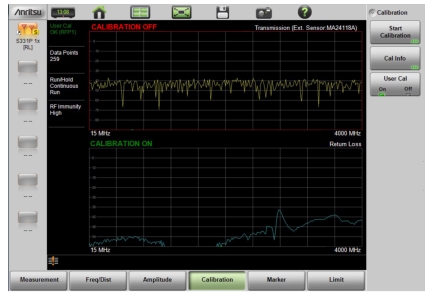
Figure: OSL Calibration, Standard illustrates Return Loss measurement after OSL calibration in Standard Cal. The calibration is not applied to Transmission measurement.
OSL Calibration, Standard
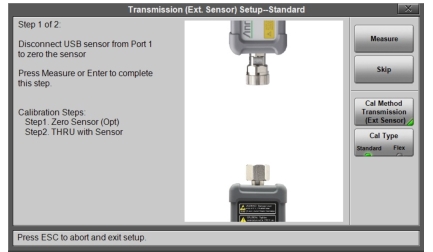
Transmission (Ext Sensor) Setup
1. In the Calibration Setup window, press Cal Type to select either Standard or Flex.
Transmission (Ext Sensor) Setup
2. Follow the on-screen instructions and press Measure at the end of each step.
Note
Before pressing Measure in Setup step 1, make sure the power sensor is connected to a USB port on your PC or laptop, and disconnected from the S331P. However, zeroing the sensor is optional and you may press Skip instead.
In step 2, you can use a through test port cable or adapter to connect the power sensor to the S331P RF test port.
3. When done with the calibration setup, press Apply.
4. When calibration has completed, the User Cal status messages will display as follows:
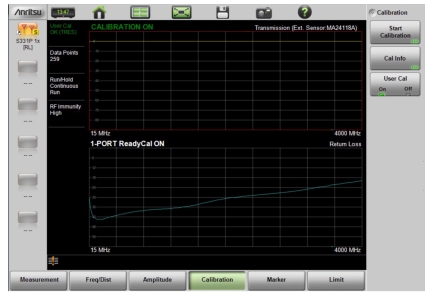
User Cal OK (TRES) for Standard Cal iUser Cal OK (TRES) for Flex Cal CALIBRATION ON for Transmission measurement 1-PORT ReadyCal ON for all measurements except Transmission
Figure: Transmission (Ext Sensor) Calibration, Standard illustrates Transmission measurement after Transmission (Ext Sensor) calibration in Standard Cal. The factory default 1-Port ReadyCal is applied to Return Loss and all measurement types other than Transmission.
Transmission (Ext Sensor) Calibration, Standard
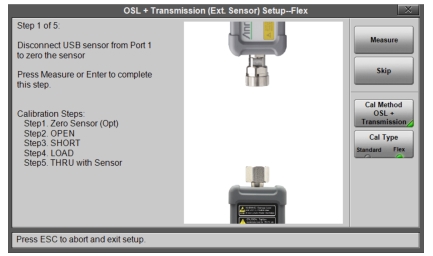
OSL + Transmission (Ext Sensor) Setup
1. In the Calibration Setup window, press Cal Type to select either Standard or Flex.
Transmission (Ext Sensor) Setup
2. Follow the on-screen instructions and press Measure at the end of each step.
Note
Before pressing Measure in Setup step 1, make sure the power sensor is connected to a USB port on your PC or laptop, and disconnected from the S331P. However, zeroing the sensor is optional and you may press Skip instead.
In Setup step 5, you can use a through test port cable or adapter to connect the power sensor to the S331P RF test port.
3. When done with the calibration setup, press Apply.
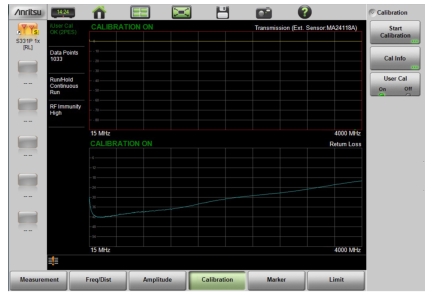
4. When calibration has completed, the User Cal status messages will display as follows:
User Cal OK (2PES) for Standard Cal iUser Cal OK (2PES) for Flex Cal CALIBRATION ON for all measurement types