1. Clear all of the input tables in Vision Database Creator and click New from the toolbar.
2. With the Import target receiver list from file radio button checked, click the button with a folder icon to browse for a file containing a monitor list.
3. Locate the file St Louis GPS_Group.lst in the Example Files sub-folder of the Vision application folder under Program Files (x86).
4. As in the previous section, click the preview button to see that this file has more content than the last.
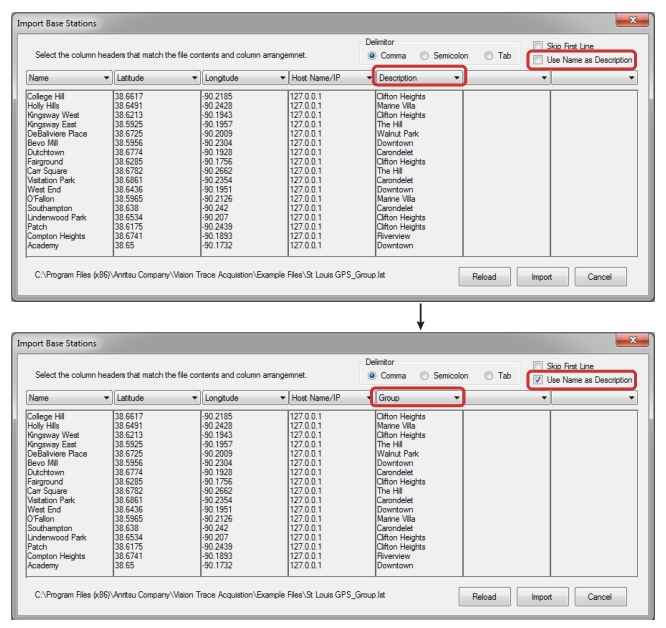
You will now see the Import Base Stations dialog (Figure: Import Base Stations Dialog - Example 2). This dialog lets you specify what each field in the import file corresponds to in the Monitor list. The file we have selected this time has five columns, Name, Latitude, Longitude, IP address, and Group name (under Description). The import dialog will try to determine the field separator (comma, semicolon or tab) and make a best guess at the fields the file contains. In this case it has identified the last column as Description, but that is not what is intended.
7. Click on the down-arrow in the header to the fifth column and change Description to Group.
8. Do not want to leave the Description field blank, so click the check box labeled: Use Name as Description. This will copy the Name field into the Description field in the next step.
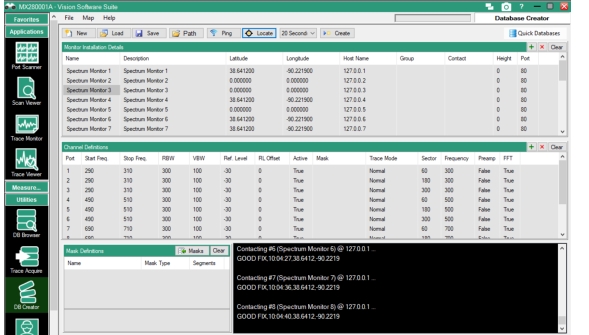
10. Set the output destination (click Path) so that you do not overwrite a database you want to keep, and then click Create. Run Vision Monitor to edit any further sweep parameters or Monitor specific parameters.
Create Database Dialog – Imported Monitor List – Example 2
11. In Vision Monitor, right-click any of the monitors names to open the monitor context menu. (see Base Station Context Menu). You can edit the name, description, location, height, group, contact, etc.
12. On the Monitor context menu you also have options to Add and Remove monitors from the list as well as Enable/Disable Sweep on all channels of a selected monitor.
13. When a new monitor is added, click Enable Sweep on All Channels to activate all channels on the new monitor.
Note
Removing a monitor is permanent. Traces are not deleted but there is no way to access them in Vision Monitor. The first item on the context menu will open a web browser with a live connection. This is the same as Live View in Vision Monitor, but uses an external browser window, so Vision Monitor is not tied-up with Live View.