Icon | Description |
Save Click to save. | |
Import Masks Click to imports a mask from another database into the Limit Line Editor. The Open window displays the Documents Library. Navigate to the desired folder and enter or type a mask file (.msk). Click Open. Import and Export Masks are used for moving the list of masks between databases, and are not required to load or save masks in the current database. | |
Export Masks Click to save the current mask to another database. The Save As window displays the Documents Library. Navigate to the desired folder to save the mask file (.msk). Click Save. | |
Add New Mask Click opens the dialog Create New Mask. Enter a mask name in the entry window. Click OK. It will be added to the list of masks under Mask name and its Segment Mask parameters or Trace Mask parameters listed in the same row with its respective values. Click Import From File button directs the user to the PC directories to locate and import a pre-configured Mask file. 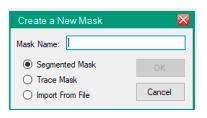 | |
 | Duplicate Masks Click opens the Duplicate Mask dialog box. Enter a name of the duplicated mask. Click OK. 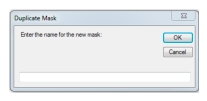 |
Cut (Delete) Masks Highlight Mask and click delete to remove from list. | |
 | Add new segment to current limit line Click opens Vision Segment Editor. Type a new Start Frequency, Stop Frequency and Amplitude in their respective entry boxes. Click the desired Limit Direction; Arrow up indicates above the RF spectrum or arrow down indicates below the RF Spectrum. Then click Ok. Clicking a line segment from the list will also provide the Vision Segment Editor. 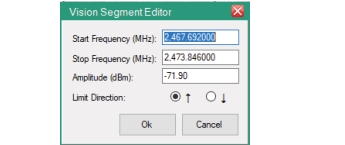 |
Delete the selected segment Highlight the segment on the segment list or in the mask editor. Click to delete. | |
Split selected segment Highlight the segment on the segment list or in the mask editor to be split. Click to split segment into two halves. | |
Join selected segments Hold the down Ctrl button on the keyboard. Click the two or more segments to be joined together. The segments become one. | |
 | Fill all gaps with new segments at set amplitude Click to open a dialog box as shown below. Type the value for the new threshold in dBm. Click OK and the added segment line(s) will fill all gaps in the trace window at selected dBm. Each added segment will also appear in the segment list. 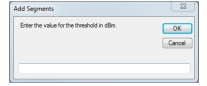 |
Draw a new segment Click on the editor panel and the pencil becomes activated. Draw a segment at the desired location. | |
Edit selected segment Click on a segment in the segment list or in the editor panel. The Vision Segment Editor dialog opens. Change the desired parameter in the dialog. Then click Ok. | |
Max Hold on all traces in reference set Click to activate the Max Hold function. Displays the cumulative maximum value of each point over multiple trace sweeps. A typical application for employing Max Hold is to first set up your Envelope segment lines (see feature immediately below). Then activate the Max Hold feature. You can then scroll through the trace measurements and observe that all traces under consideration would pass. | |
Create mask over current trace data Click repositions segments to trace peaks. | |
Envelope segments Uses the number of segments determined by moving the scroll bar. The number of segments will display in the box at the right of the scroll bar. |