Marker 1 and Marker 2 can be displayed independent of each other. To activate marker 1 and marker 2 on a trace:
Marker 1: Control-click makes marker 1 active. Hold the control key and scroll the mouse wheel to move marker 1.
Marker 2: Shift-click makes marker 2 active. Hold the shift key and scroll the mouse wheel to move marker 2.
Peak Search
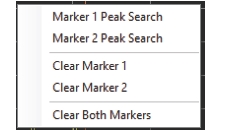
To peak search, right-click over the trace displays the dialog as shown in Figure: Marker Search Dialog. The markers do not have to be already active to use this feature.
Marker Search Dialog
Marker 1 Peak Search
Positions the active Marker 1 over the peak signal. If there is no active Marker 1 active on the trace display, click the Marker 1 Peak Search and an active Marker 1 will become available. The Marker measurement readouts will monitor and display at the bottom of the display screen. If Delta 1 is active, it will track the Marker 1 when Marker 1 Peak Search is selected.
Marker 2 Peak Search
Positions the active Marker 2 over the peak signal. If there is no active Marker 2 active on the trace display, click the Marker 2 Peak Search and an active Marker 2 will become available. The Marker measurement readouts will monitor and display at the bottom of the display screen. If Delta 2 is active, it will track the Marker 2 when Marker 2 Peak Search is selected.
Clear Marker 1
Clears Marker 1 and the Delta 1 Marker.
Clear Marker 2
Clears Marker 2 and the Delta 2 Marker.
Clear Both Markers
Clears all Markers in the display.
Marker Readout
When markers are activated and positioned within a trace display, a markers real-time measurement readout is available below each trace. The readout provides the frequency and power level of the markers position.
Marker Control and Add Delta Markers
Marker activation and control is performed by using the keyboard and mouse. Click and drag the mouse wheel over the Port Scanner screen to display the “To adjust marker position” dialog as shown in Figure: Adjust Marker Dialog.
Adjust Marker Dialog
Click and drag the mouse pointer over the trace display to bring up the red cross position-finder. Continue to move the red cross position-finder to the desired marker location. This can be done for each marker/delta marker when positioning each marker sequence. Once the desired marker position is confirmed, release the mouse “left-click” and then click the following as needed:
Ctrl + Click to add Marker 1
Ctrl + Scroll Mouse Wheel to move Marker 1.
Alt + Control + Click to add Delta 1
(Marker 1 must already be active). Alt + Control + Scroll Mouse Wheel to move Delta 1 Marker.
Shift + Click to add Marker 2
Shift + Scroll Mouse Wheel to move Marker 2.
Shift + Alt + Click to add Delta 2
(Marker 2 must already be active). Shift + Alt + Scroll Mouse Wheel to move Delta 2 Marker.
When moving marker 1 or marker 2, its delta marker will track. The delta marker can be moved independent of the marker and the delta marker readout will provide the delta markers position as it is being moved. Clearing a marker as described from Figure: Marker Search Dialog will remove its corresponding delta marker also.