Coverage Mapping allows for both indoor (no GPS signal) and outdoor (GPS signal required).
• Indoor Mapping: Using a start‑walk‑stop approach, the instrument provides in‑building coverage mapping by overlaying data directly onto the downloaded map. Data is captured at user‑defined time intervals or user‑defined map locations.
• Output Mapping: The instrument logs data automatically based on either time or distance interval. If there is no map available when making the measurements, it is still possible to save all the data to a KML file and then combine the data with a map.
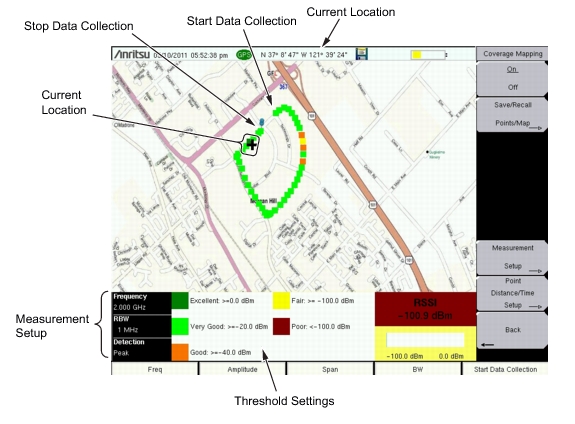
Outdoor Coverage
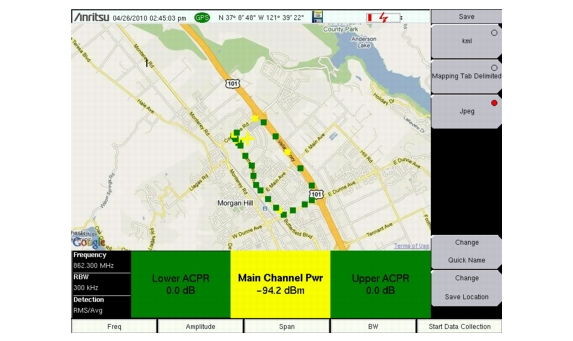
With a valid GPS signal, the instrument will identify the current location on the displayed GeoEmbedded map with a plus sign. Previously saved locations are displayed as squares. Using GPS; latitude, longitude and altitude information is automatically saved for each saved location.
Outdoor Coverage Mapping (GPS On)
Note
The Measurement Setup and Threshold Setting boxes can be used as menu shortcuts on touch screen instruments.
Use the touch screen to select the parameter to edit.
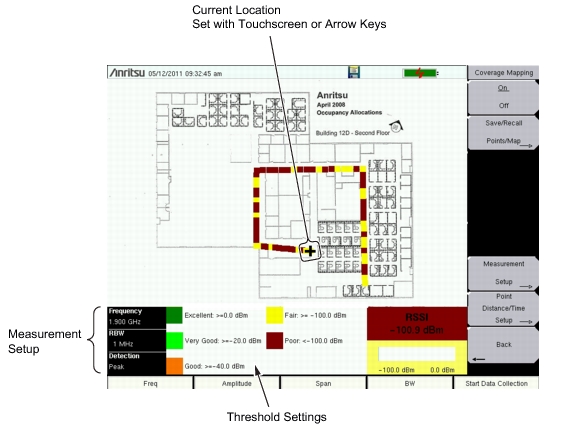
Indoor Coverage
With GPS turned off, and a non‑GeoEmbedded map file the user indicates the current position (+) with the touch screen or arrow keys on instruments that do not have a touch screen. Previously saved locations are displayed as squares.
Anritsu easyMap Tools allows you to capture maps of any location and create Anritsu Map Files. These Anritsu Map Files are used for Coverage Mapping and Interference Mapping (Interference Analyzer (Option 25)).
Anritsu easyMap Tools allows you to capture maps of any location and create Anritsu Map Files. These maps are viewed on the Anritsu instrument during coverage mapping. There are two Anritsu Map Files formats:
• legacy .map map files
• .azm map files (not currently compatible with Coverage Mapping)
The coverage map should extended beyond estimated location of bearing readings and have the general location of the interferer centered in the map.
Outdoor Maps
Type an address in easyMap Tool and capturing the map with GPS data.
Indoor Map
In easyMap Tools open bitmapped image (JPEG, GIF, TIFF, or PNG) of the floor plan for indoor mapping. The image size should be close to 666 pixels x 420 pixels (~1.6:1 ratio).
Note
A USB flash drive is required to transfer maps to the instrument.
Instrument Settings
Setup
1. Create the appropriate map with easyMap Tools. Refer to Anritsu easyMap Tools and the software Help. Outdoor mapping requires a GeoEmbedded map or the default grid.
2. Open up Coverage Mapping by pressing the Menu key and selecting the Spectrum Analyzer icon or press Shift then Mode (9), highlight Spectrum Analyzer and press Enter.
3. Press Shift then Measure (4). Press the Coverage Mapping submenu key. Confirm that coverage mapping is On. On or Off is underlined on the submenu key in the Coverage Mapping menu.
Continue with Step 4 for outdoor coverage mapping only. GPS must be off for indoor mapping.
4. Turn on GPS.
a. Press Shift then System (8).
b. Press the GPS submenu key.
c. Connect a GPS antenna to the SMA connector.
d. Turn on GPS. On should be underlined in the GPS submenu key.
Note
Set the supply voltage to 5 V by pressing the GPS Voltage submenu key and selecting 5.
e. Press GPS info and verify that the information from three or more satellites is captured. Press Esc to close the info box.
It may take several minutes for the GPS receiver to track at least three satellites. When it does, the GPS icon at the top of the screen turns green. Refer to the User Guide for your instrument for additional information about GPS.
Recall a Map (Indoor or Outdoor Coverage)
The instrument allows you to recall a .map file (created with easyMap Tools). With a valid GPS signal, the current location will be displayed on an outdoor map or an arrow will show the direction of the current location if it is outside the map coverage area. With an indoor map, you position the plus sign at the current location by using the touch screen, or by using the arrow keys, and then pressing Enter.
Connect the USB flash drive that has the map file or files created in Anritsu easyMap Tools to the instrument.
1. Press the Coverage Mapping submenu key.
2. Press the Save/Recall Points/Map submenu key.
3. Press Recall a Map and select the appropriate map from the USB flash drive.
4. Use the arrow keys to scroll down to the desired map and press Enter to select.
Step 5 and Step 6 apply for outdoor coverage mapping only.
5. The new map file will be displayed and the current location (if within the GPS boundaries of the displayed map) is shown as a plus sign with outdoor mapping.
6. If the current location is outside the map boundaries, then an arrow indicates the direction of the current location in relation to the displayed map.
Note
If you do not see the USB drive in the Recall menu, then:
1. Press the Refresh Directories key. 2. If the drive is still not visible, then remove and then reconnect the USB flash drive. 3. Reformat the USB flash drive, and copy the map files to the reformatted drive.
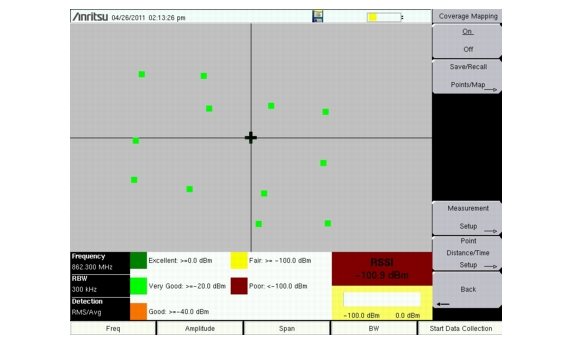
Recall the Default Grid
The instrument is able to make coverage mapping measurements even when an Anritsu easyMap Tools file of the current indoor or outdoor location is not available. In such cases, use the default grid map, save the KML points, and recall them at a later time with a map. Refer to Mapping Save/Recall Menu for additional information on recalling saved maps and .kml data.
Note
When using the default grid the coverage area for outdoor cover mapping is fixed at 10 x 10 miles. For indoor coverage mapping, the grid size would be the indoor map files dimensions (666 pixels by 420 pixels).
1. Press the Coverage Mapping submenu key.
2. Press the Save/Recall Points/Map submenu key.
3. Press the Recall Default Grid submenu key.
Coverage Mapping with the Default Grid.
Map the Signal Strength
Coverage Mapping supports RSSI measurement or ACPR measurement during mapping.
Note
The default settings for coverage mapping sets the internal input attenuator to 0 dB (off) with the preamp on and a bandwidth of 1 MHz. These parameters can be adjusted depending on the power of signal power to be measured. Overdriving the input of the spectrum analyzer can result in ADC Overdrive errors. Adjust the parameter using the Amplitude main menu and BW main menu.
Once data collection begins, parameters such as amplitude, bandwidth or measurement setup cannot be changed.
ACPR
1. Select the Coverage Mapping submenu key.
2. Press the Measurement Setup submenu key.
3. Set the Center Freq, RBW, and Detection type. Refer to Spectrum Analyzer for additional information.
4. Press ACPR once to select and again to open the setup menu.
a. Enter the Main and Adjacent Channel Bandwidths.
b. Enter the Channel Spacing.
c. Enter Good Passing Criteria and the Poor threshold level.
d. The main channel power indicator in the bottom part and the data collection squares will display colors as shown below:
Red Value (Poor) < Yellow Value < Green Value (Good)
5. Press the Start Data Collection main menu key. Data will be collected at the time or distance interval based on the setting in Point Distance/Time Setup Menu. The color of the squares indicate the power level based on the setup.
6. Press the Stop Data Collection main menu key. Save the collected data as a .kml file, a tab‑delimited text file (.mtd) or a .jpg file. Refer to Mapping Save/Recall Menu.
Note
The collected data can be saved in multiple formats.
RSSI
1. Press the Coverage Mapping submenu key.
2. Press the Measurement Setup submenu key.
3. Set the Center Freq, RBW, and Detection type. Refer to Spectrum Analyzer for additional information.
4. Press RSSI once to select and again to open the setup menu.
5. Set the threshold levels: Excellent, Very Good, Good, Fair, and Poor.
6. Press the Start Data Collection main menu key. Data will be collected at the time or distance interval based on the setting in Point Distance/Time Setup Menu. The color of the squares indicate the power level based on the RSSI setup.
7. Press the Stop Data Collection main menu key. Save the collected data as a .kml file, a tab‑delimited text file (.mtd) or a .jpg file. Refer to Mapping Save/Recall Menu.
Note
Frequency, RBW, Detection Type, and Threshold levels can also be changed using the touch screen on supported instruments.
Interior coverage mapping has two options considering that the instrument does not have location or distance information available without GPS.
Option 1: Set the Repeat Type to Time and walk the perimeter of the coverage area. Press the touch screen (or use the arrow keys to set the location and press Enter) at each turn, and the unit will interpolate collected data points based on the Repeat Time setting.
Option 2: Set the Repeat Type to Distance and walk the coverage area. Press the touch screen (or use the arrow keys to set the location and press Enter) at any time that signal power data points are required.
The saved .kml file in either option will not have GPS data, but it will plot on a 666 x 420 grid with RSSI or ACPR data for each captured point.
Press Save/Recall Points/Map then Save KML Points. At the Save menu, press Enter. The following information is saved for the points and vectors that are currently displayed on the screen:
2. Click Download Google Earth and follow the on‑screen instructions.
3. After download, install Google Earth on your computer.
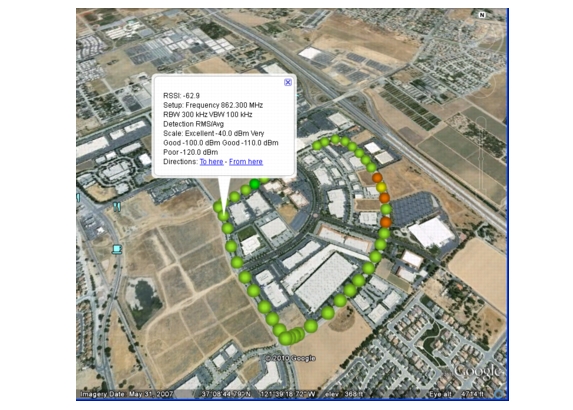
4. Double‑click on the saved .kml file to view the measurements in Google Earth.
After Google Earth is opened, user instructions and several types of help are available from the Help pull‑down menu.
Saved .kml files cannot be viewed directly from the instrument using Google Earth. The files need to be first copied to a USB memory stick.
Coverage Mapping KML File in Google Earth
Note
All files will be stored in the default save location. To change the default location, Press Shift then File (7) to enter File menu. Press Save then Change Save Location. Create a new folder or change the current location on the USB flash drive or in the instrument’s storage memory. Press Set Location to make this the new default location for saving files.
Save Tab Delimited Points
Press Save/Recall Points/Map then Save Tab Delimited Points. At the Save menu, press Enter. A tab delimited text file (.mtd) will be saved to the current location for the coverage mapping data currently displayed on the screen.
Save JPG
Press Save/Recall Points/Map then Save Jpg. At the Save menu, press Enter. A .jpg file of the current screen will be saved.
Time Interval Coverage Mapping Saved as a .jpg File