Signal Power, Spectrum Monitor, and Shoulder Attenuation are measurements in the RF Measurement mode.
Signal Power
1. Press the Measurements main menu key to open the Meas Selection menu.
2. Press the RF Measurements submenu key to open the RF Measurements menu.
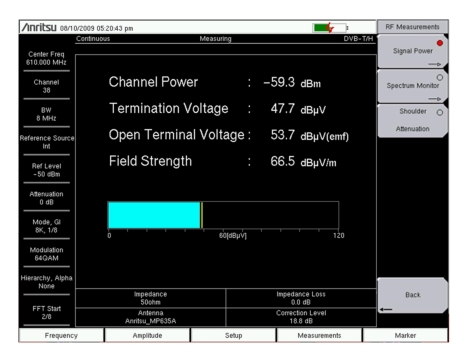
3. Press the Signal Power submenu key to activate the measurement. The sample image in Figure: Signal Power Measurement Screen may differ from the actual screen on your instrument.
4. Press the Signal Power submenu key again to open the Signal Power menu.
5. Press the Antenna (Correction Level) submenu key to open the Select Antenna list box. Scroll with the Up/Down arrow keys or the rotary knob to highlight an antenna, and then select by pressing Enter. Note that pressing the Left/Right arrow keys moves the highlighted selection to the top or bottom of the list for quicker navigation.
Signal Power Measurement Screen
6. Press the Back submenu key to return to the RF Measurements menu.
7. Press the Back submenu key again to return to the Meas Selection menu.
Spectrum Monitor
This measurement displays the frequency response around the desired channel. The variable span supports display of up to 51 channels simultaneously, so that the broadcast service signals can be checked at a glance.
1. Press the Measurements main menu key to open the Meas Selection menu.
2. Press the RF Measurements submenu key to open the RF Measurements menu.
3. Press the Spectrum Monitor submenu key to activate the measurement. The sample image in Figure: Spectrum Monitor Measurement Screen may differ from the actual screen on your instrument.
4. Press the Spectrum Monitor submenu key again to open the Spectrum Monitor menu.
5. From the Spectrum Monitor menu, press the Span submenu key to open the Select Span list box and select the number of channels to span in the measurement display. Choose from: 1CH, 3CH, 5CH, 11CH, 31CH, and 51CH.
a. Use the Left/Right arrow keys to move the green zone marker from channel to channel across the measurement display.
b. Use the Up/Down arrow keys to cycle through the span settings, whereby each press of the Up arrow displays more channels, and each press of the Down arrow displays less channels (in the increments that are described for the Span submenu key in Step 5).
Note
The Up/Down arrow keys provide a zoom‑in and zoom‑out function for displaying the number of channels (similar to using the Span submenu key).
If the green zone marker is marking a channel that is not centered in the sweep window, then using the Up arrow key to zoom out leaves the zone marker on the same channel, but using the Down arrow to zoom in on the number of displayed channels will shift the zone marker to the center of the measurement display when the marked channel goes off‑screen.
6. Press the Zone Position to Center submenu key to move the currently marked channel (within the green zone marker) to the center of the measurement display (the center of the sweep window).
Spectrum Monitor Measurement Screen
A blue diamond‑shaped marker (within the green zone markers) indicates frequency and level information of the peak value within the channel. This is an automatic function that has no user controls.
Shoulder Attenuation
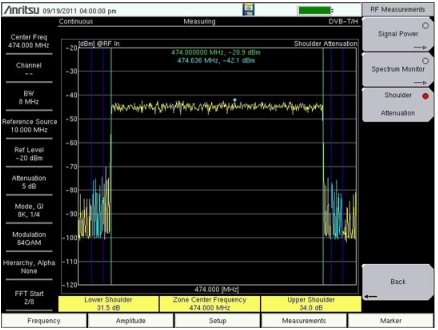
The Shoulder Attenuation measurement can be used to characterise the linearity of an OFDM signal without reference to a spectrum mask. It is performed while directly connected to the output of a transmitter via an attenuator or to a decoupled test point.
Measurement Setup:
1. Press the Measurements main menu key to open the Meas Selection menu.
2. Press the RF Measurements submenu key to open the RF Measurements menu.
3. Press the Shoulder Attenuation submenu key to activate that measurement. The sample image in Figure: Shoulder Attenuation Measurement Screen may differ from the actual screen on your instrument.
Shoulder Attenuation Measurement Screen
4. Press the Back submenu key to return to the RF Measurements menu.
5. Press the Back submenu key again to return to the Meas Selection menu.