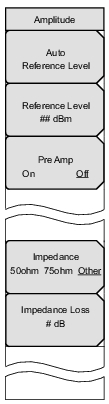
 | Auto Reference Level Press this submenu key to automatically set the reference level to an optimum value. This reference level indicates the signal level input to the instrument. The reference level range for signal input to the instrument is determined by the reference level setting. Immediately after a signal is applied to the instrument, the input attenuator is automatically set according to the reference level. The relationship between the reference level and the input attenuator is fixed. The power levels and offset levels for this relationship are listed in Table: Fixed Relationship of Input Attenuator to Auto Reference Level. Raising the reference level increases attenuation of the input attenuator, enabling the user to handle a high input level. Note that the noise floor rises in proportion to the attenuation of the input attenuator. When applying a signal to the instrument, input a signal level that does not exceed the reference level value. If the signal level exceeds the reference level, raise the reference level. For example, if the signal level is 0.5 dBm with preamplifier off, set the reference level to 5 dBm, not to 0 dBm. If an interfering wave other than the intended signal exists and the power is 15 dB or more higher than the measurement signal level, set the reference level to take the large signal into account. Reference Level Opens the Reference Level Editor dialog box in order to select a signal reference value within the specified range that is displayed in the window. If the Pre Amp submenu key indicates On, then the reference level range is from – 10 dBm to – 50 dBm in 10 dB increments. If the Pre Amp submenu key indicates Off, then the reference level range is from – 25 dBm to 20 dBm in 5 dB increments. Refer to Table: Fixed Relationship of Input Attenuator to Auto Reference Level for the reference level relationship to input attenuation and preamplifier setting. Pre Amp On Off Press this submenu key to turn on or off the low‑noise front‑end preamplifier. To assure accurate measurement results, the largest signal into the instrument input when the preamplifier is turned on should be less than – 40 dBm. Impedance 50 Ohm 75 Ohm Other Press this submenu key to toggle the selection to 50 ohm, 75 ohm, or Other impedance value. Selecting 75 ohm selects the 7.5 dB loss of the Anritsu 12N50‑75B adapter. For other adapters, select “Other” and enter the appropriate loss. Impedance Loss This submenu key is displayed only when the Impedance submenu key is set to Other. Press this submenu key to open the Impedance Loss Editor dialog box and set a dB value. Set the impedance loss in the range of 0.0 dB to 100.0 dB (in 0.1 dB steps) when the impedance is set to Other (which is also 75 ohms). Set 1.9 dB when using the MA1621A impedance transformer as the impedance converter. |