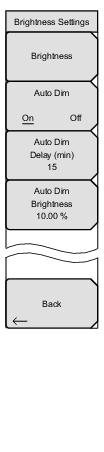
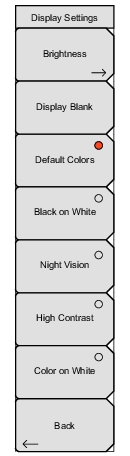
Spectrum Masterâ„¢ MS271xE User Guide : System Operations : System Menu : Display Settings Menu
 
Display Settings Menu
Key Sequence: Shift, System (8) > System Options > Display
Display Settings Menu
Brightness:
Display Blank
Opens the message box illustrated in Figure: Display Blank Message Box. Press Enter to turn off the display, or press Esc to abort. To turn the display back on, press any key (except the Power button) three times in rapid succession. A power cycle also turns the display back on.
Default Colors
Sets the display colors to the factory defaults. Used for normal viewing.
Black on White
Sets the display colors to black on a white background. Used for printing and viewing in broad daylight conditions. See Figure: Spectrum Master Display Color Settings for illustrations of the display color schemes selectable in this submenu.
Night Vision
Sets the display to a red-tinted color on a black background. The front panel keypad is backlighted in red. This setting is optimized for nighttime viewing.
High Contrast:
Increases the black and white contrast of the default display. This setting is used in challenging viewing conditions.
Color on White
Sets the display background to white, the grid to gray, and leaves sweep data in color. This setting is used for printing and viewing in broad daylight conditions.
Back
Press this submenu key to return to the System Options Menu.
Display Blank Message Box
Brightness Settings Menu
Key Sequence: Shift, System (8) > System Options > Display > Brightness
Brightness Settings Menu
The brightness of the display can be adjusted to optimize viewing under a wide variety of lighting conditions.
Brightness:
Press this submenu key to open the Brightness Editor window, where you can adjust the display brightness level from 0 to 100, with 100 being the brightest. See Figure: Brightness Editor Input Box. Use the rotary knob to adjust the value in increments of 5, or press the Up/Down arrow keys to change the value in increments of 25. Press the Left or the Right arrow key to jump to 0 or 100, respectively. Press Enter to accept the change. All display elements on the instrument screen are affected by the Brightness setting.
Auto Dim On/Off
Press this submenu key to toggle the display auto-dimming feature on and off. Enabling auto-dim can extend battery life.
Auto Dim Delay
Press this key to adjust the amount of idle time, from 1 to 15 minutes, before the instrument display goes dim. Use the arrow keys or the rotary knob to adjust the value in increments of 1. You can also use the numeric keypad, then press Enter. Out-of-range values are ignored.
Auto Dim Brightness
Press this submenu key to select the brightness percentage level of the display when it is dimmed. Use the arrow keys or the rotary knob to adjust the value in increments of 5%, from 0% to 25%. You can also use the numeric keypad, then press % or the Enter key. Out-of-range values are ignored.
Back
Press this submenu key to return to the Display Settings Menu.
Brightness Editor Input Box