The LMR Master menu‑driven interface is easy to use and requires little training. The LMR Master uses a touch screen and keypad for data input. The bottom menu keys and submenu keys on the right side are touch screen keys. The menu and submenu keys vary depending upon the selected mode of operation. Refer to Mode Selector Menu.
Numeric keys 1 through 9 are dual purpose, depending upon the current mode of operation. The dual‑purpose keys are labeled with a number on the key itself, and the alternate function is printed in blue above each of the keys. Use the blue Shift key to access the functions that are printed on the panel. The Escape key, used for aborting data entry, is the oval button located above numeric key 9. The rotary knob, the four arrow keys, and the keypad can be used to change the value of an active parameter.
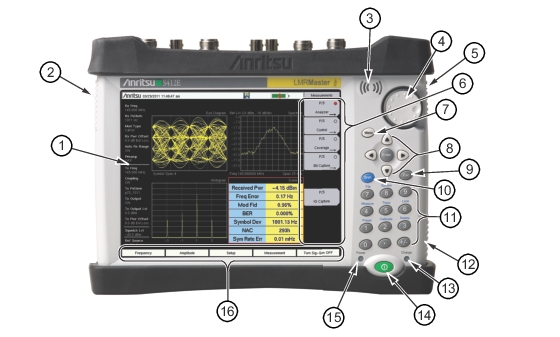
The Menu key provides graphical icons of all of the installed measurement modes and user defined shortcuts (refer to Menu Key). The locations of the keys are shown in Figure: LMR Master Overview.
Note
Keep the fan inlet and exhaust ports clear of obstructions at all times for proper ventilation and cooling of the instrument.
LMR Master Overview
1
Instrument Settings Summary (unique to each trace). Many of displayed settings are used as menu shortcuts. Select a setting using the touch screen to display the menu and set the parameter for editing.
2
Fan Exhaust Port
3
Speaker
4
Rotary Knob
5, 12
Fan Inlet Port
6
Touch Screen Submenu Keys
7
Menu Key
8
Enter Key and Arrow Keys
9
Esc (Escape) Key
10
Shift Key
11
Numeric Keypad and Shift Menu Keys (printed in blue above 1 through 9)