LMR Master™S412E User Guide : System Operations : Application Options Menu
 
Application Options Menu
Key Sequence: Shift, System (8) > Application Options
The display of this menu varies based on the current measurement mode. In addition to the following information, refer to the appropriate Measurement Guide listed in Measurement Guides.
VNA Mode
Application Options Menu (VNA Mode)
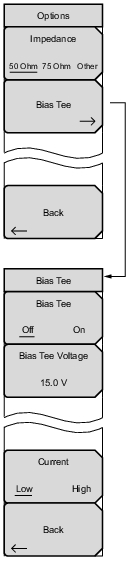
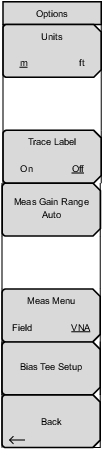
Units
m ft
Press this submenu key to toggle the units setting to metric (meters, or m) or to U.S. (feet, or ft). Press Enter to accept the changes, or press the Esc key to return to normal operation without changing the setting.
Trace Label
On Off
Press this submenu key to toggle the trace labels On or Off.
Auto: Press this submenu key to set the Measurement Gain Range Mode to Auto. In this mode, the instrument adjusts the gain automatically to provide the best overall system performance (dynamic range and high level noise).
Fixed: Press this submenu key to set the Measurement Gain Range Mode to Fixed. In this mode, the gain of the instrument is always set to the low gain setting. For most applications, Auto mode is recommended. For certain types of filter measurements (mostly in the range less than 500 MHz), the instrument may toggle between low gain and high gain modes as the signal level rises from the noise to the pass band of the filter, resulting in extra ripple. Setting the Gain Range to fixed might address that problem.
Meas Menu Field VNA
Press this submenu key to toggle between Field (a simplified subset of the standard VNA menu structure) and VNA (standard menu structure.
Bias Tee Set up
 
Int Voltage P2: Set the internal voltage in the range of 12 to 32 vdc.
Int Current Limit P2: Set the internal current limit from 0 to 450 mA.
Back
Press this submenu key to return to the System Menu.
 
SPA Mode
Key Sequence: Shift, System (8) > Application Options
Application Options Menu (SPA Mode)
Impedance
50 Ohm 75 Ohm Other
Press this submenu key to toggle the impedance setting to 50 ohm, 75 ohm, or Other impedance value. Selecting 75 ohm selects the 7.5 dB loss of the Anritsu 12N50‑75B adapter. For other adapters, select Other and enter the appropriate loss.
Bias Tee (Option 10 required)
Opens the Bias Tee submenu. When turned on, the Bias Tee voltage and current are shown in the upper left corner of the display.
Bias Tee: Toggles On and Off the variable power supply.
Bias Tee Voltage: Use this submenu to set the power supply voltage.
Current: Toggle the current between Low and High.
Back: Press this submenu key to return to the Application Options Menu.
Back
Press this submenu key to return to the System Menu.
DMR Mode
Key Sequence: Shift, System (8) > Application Options
Application Options Menu (DMR Mode)
Load DMR Patterns
Press this submenu key to load additional DMR signal patterns into the instrument. Refer to Updating Signal Generator Patterns before continuing.
 
Back
Press this submenu key to return to the System Menu.
P25 Mode
Key Sequence: Shift, System (8) > Application Options
Application Options Menu (P25 Mode)
Load P25 Patterns
Press this submenu key to load additional P25 signal patterns into the instrument. Refer to Updating Signal Generator Patterns before continuing.
 
Back
Press this submenu key to return to the System Menu.
P25p2 Mode
Key Sequence: Shift, System (8) > Application Options
Application Options Menu (P25p2 Mode)
Load P25p2 Patterns
Press this submenu key to load additional P25p2 signal patterns into the instrument. Refer to Updating Signal Generator Patterns before continuing.
 
Back
Press this submenu key to return to the System Menu.
NXDN Mode
Key Sequence: Shift, System (8) > Application Options
Application Options Menu (NXDN Mode)
Load NXDN Patterns
Press this submenu key to load additional NXDN signal patterns into the instrument. Refer to Updating Signal Generator Patterns before continuing.
 
Back
Press this submenu key to return to the System Menu.
PTC-ITCR Mode
Key Sequence: Shift, System (8) > Application Options
Application Options Menu (PTC-ITCR Mode)
Load PTC Patterns
Press this submenu key to load additional PTC-ITCR signal patterns into the instrument. Refer to Updating Signal Generator Patterns before continuing.
 
Back
Press this submenu key to return to the System Menu.
PTC-ACSES Mode
Key Sequence: Shift, System (8) > Application Options
Application Options Menu (PTC-ACSES Mode)
Load PTC Patterns
Press this submenu key to load additional PTC-ACSES signal patterns into the instrument. Refer to Updating Signal Generator Patterns before continuing.
 
Back
Press this submenu key to return to the System Menu.
TETRA Mode
Key Sequence: Shift, System (8) > Application Options
Application Options Menu (TETRA Mode)
Load TETRA Patterns
Press this submenu key to load additional TETRA signal patterns into the instrument. Refer to Updating Signal Generator Patterns before continuing.
 
Back
Press this submenu key to return to the System Menu.
Updating Signal Generator Patterns
Note 
This procedure requires firmware (Package Version) V1.14 or greater.
Updating the patterns could take up to an hour to complete.
For some applications, downloading the patterns makes the unit busy for as long as 15 minutes, but the process does not have to be closely monitored.
Prepare the USB Memory Device
1. The USB memory device must be formatted in a single partition as either FAT or FAT32 file system.
2. The USB memory device should have at least 1 GB of free space.
3. Copy the tx folder containing all of the patterns to the top-level directory of the USB device.
Update the LMR Master Patterns
Note 
This process needs to be repeated for each LMR analysis mode where patterns need to be updated (i.e., P25, P25p2, NXDN, DMR, TETRA, PTC-ITCR and PTC-ACSES, etc.).
1. Power on the LMR Master and insert the USB memory device into one of the USB ports on the LMR Master.
2. Enter the desired analysis mode for the patterns being loaded. For example NXDN, PTC-ITCR, PTC-ACSES, P25, P25p2, TETRA, or DMR mode.
3. Execute the following sequence:
a. Access the System Menu by pressing the Shift key, then press the 8 key on the keypad.
b. In the System menu, select Application Options > Load Patterns, then press Enter when ready to start loading patterns.
Load Patterns Dialog
c. Wait for the unit to end the loading process (this can take several minutes), press Enter as directed, and the patterns will be loaded.
d. Press the Esc key when done.
4. Repeat Step 2 and Step 3 for each analysis mode for which an update is desired.