Spectrum Analyzer Measurement Guide : Interference Analyzer (Option 25) : Freq (Frequency) Menu
 
Freq (Frequency) Menu
Freq 1/2 (Frequency Menu without Offset)
Key Sequence: Freq
The tuning frequency range can be entered in several different ways depending upon what makes the most sense for the user or for the application. The center frequency and span can be specified, the start and stop frequencies can be entered, or a signal standard and channel number can be selected from the built‑in list.
IA Frequency Menu 1/2 (Part 1 of 2)
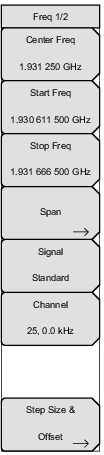
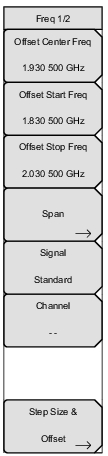
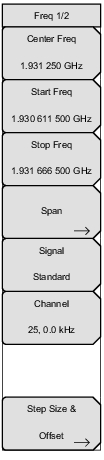
Center Freq
Press the Freq main menu key followed by the Center Freq submenu key and enter the desired frequency using the keypad, the arrow keys, or the rotary knob. If entering a frequency using the keypad, the submenu key labels change to GHz, MHz, kHz, and Hz. Press the appropriate units key. Pressing the Enter key has the same effect as the MHz submenu key.
Note: When using the up and down arrows, the frequency moves in steps defined by the value entered using the Freq Step submenu key. When using the left or right arrow keys, the frequency of the active parameter moves by 10% of the current frequency span. If the instrument is in zero span, the left and right arrows do nothing. Turning the rotary knob changes the active frequency parameter in increments of one display point for each click of the knob. There are 551 display points across the screen.
Start Freq
Press the Freq main menu key followed by the Start Freq submenu key and enter the desired frequency using the keypad, the arrow keys, or the rotary knob. If a start frequency higher than the current stop frequency is entered, the stop frequency will be changed to yield a 10 Hz span.
Stop Freq
Press the Freq main menu key followed by the Stop Freq submenu key and enter the desired frequency using the keypad, the arrow keys, or the rotary knob. If a stop frequency lower than the current start frequency is entered, the start frequency will be changed to yield a 10 Hz span.
Span
Press the Freq main menu key followed by the Span submenu key and enter the desired span. The Span menu is used to set the frequency range over which the instrument will sweep. The span can be set from 10 Hz to the maximum frequency range the product will support. See the product specifications for the maximum frequency. Span can also be set to zero span.
The submenu key shows the current value for span in units of GHz, MHz, kHz, or Hz. When the Span button is pressed, span becomes the active parameter and may be changed. Use the keypad, the directional arrow keys, or the rotary knob to increase or decrease the span frequency. If the span is changed using the arrow keys, the span changes in 1‑2‑5 steps for each key press. See Span Menu.
 
IA Frequency Menu 1/2 (Part 2 of 2)
Signal Standard
Use the up or down arrow keys or the rotary knob to highlight a signal standard and press Enter to select.
When a signal standard is selected, the center frequency and span for the first channel of the last segment of the particular standard is automatically tuned. Other settings, such as channel spacing and integration bandwidth, are also automatically entered.
Channel #
Use the up or down arrow keys, the keypad, or the rotary knob to select a channel number for the selected signal standard. The center of the channel is tuned to the center of the spectrum analyzer display. The frequency value is the amount by which the center frequency differs from the center of the channel.
Step Size & Offset
Opens the Freq 2/2 Menu. If Freq Offset is any value other than 0 Hz, then the Frequency menu shows “Offset” on the submenu keys for setting frequencies.
 
Freq 1/2 (Frequency Menu with Offset Function
Key Sequence: Freq
The tuning frequency range can be entered in several different ways depending upon what makes the most sense for the user or for the application. The center frequency and span can be specified, the start and stop frequencies can be entered, or a signal standard and channel number can be selected from the built‑in list. A user defined frequency offset, either positive or negative, can be entered to adjust the frequency that is displayed on the instrument from the actual swept frequency. When enabled, Offset will be displayed at the bottom of the screen (Figure: 200 MHz Frequency Offset Example) and the Center Freq, Start Freq, and Stop Freq keys will indicate that a frequency offset has been turned on. Set the Freq Offset to 0 Hz to remove the frequency offset.
Note 
The Freq Offset will affect the displayed values of Frequencies, Markers and Limits. The current frequency offset value is displayed in the Freq 2/2 Menu.
IA Freq 1/2 with Offset Function Menu
Offset Center Freq
Press the Freq main menu key followed by the Offset Center Freq submenu key and enter the desired frequency using the keypad, the arrow keys, or the rotary knob. If entering a frequency using the keypad, the submenu key labels change to GHz, MHz, kHz, and Hz. Press the appropriate units key. Pressing the Enter key has the same effect as the MHz submenu key.
Offset Start Freq
Press the Freq main menu key followed by the Offset Start Freq submenu key and enter the desired frequency using the keypad, the arrow keys, or the rotary knob. If a start frequency higher than the current stop frequency is entered, the stop frequency will be changed to yield a 10 Hz span.
Offset Stop Freq
Press the Freq main menu key followed by the Offset Stop Freq submenu key and enter the desired frequency using the keypad, the arrow keys, or the rotary knob. If a stop frequency lower than the current start frequency is entered, the start frequency will be changed to yield a 10 Hz span.
Span
Press the Freq main menu key followed by the Span submenu key and enter the desired span. See Span Menu.
Signal Standard
Use the up or down arrow keys or the rotary knob to highlight a signal standard and press Enter to select.
When a signal standard is selected, the center frequency and span for the first channel of the last segment of the particular standard is automatically tuned. Other settings, such as channel spacing and integration bandwidth, are also automatically entered.
Channel #
Use the up or down arrow keys, the keypad, or the rotary knob to select a channel number for the selected signal standard. The center of the channel is tuned to the center of the spectrum analyzer display. The frequency value is the amount by which the center frequency differs from the center of the channel.
Step Size & Offset
Opens the Freq 2/2 Menu.
Freq 2/2 Menu
Key Sequence: Freq > Step Size & Offset
IA Freq 2/2 Menu
Freq Step
Press the Freq main menu key followed by the Freq Step submenu key to enter the desired frequency step size. The frequency step specifies the amount by which a frequency will change when the up or down arrow keys are pressed. The center frequency, start frequency, and stop frequency values can be changed using Freq Step. The active parameter will be changed by the frequency step when the up or down arrow keys are pressed. The frequency step size can be any value from 1 Hz to upper limit of the instrument with a resolution of 1 Hz. The frequency step value can be used to change start frequency, stop frequency, center frequency, and the frequency step size.
Use the keypad or the rotary knob to change the Frequency Step size.
Channel Increment
Sets the increment value for the Channel # submenu key.
Freq Offset
Enter the desired offset (positive or negative) using the keypad, the arrow keys, or the rotary knob. If entering a frequency using the keypad, the submenu key labels change to GHz, MHz, kHz, and Hz. Press the appropriate units key. Pressing the Enter key has the same effect as the MHz submenu key.
Offset Step Size
Enter the desired frequency offset step size. The offset frequency step specifies the amount by which the offset frequency will change when the up or down arrow keys are pressed.
Use the keypad or the rotary knob to change the Offset Step Size.
Back
Frequency Offset Example
200 MHz Frequency Offset Example