Vector Network Analyzer Measurement Guide : VNA View Menus : Calibration Menus
 
Calibration Menus
Calibration Menus Group
 
Calibration Menu
Key Sequence: Shift, Calibrate (2)
Calibration Menu
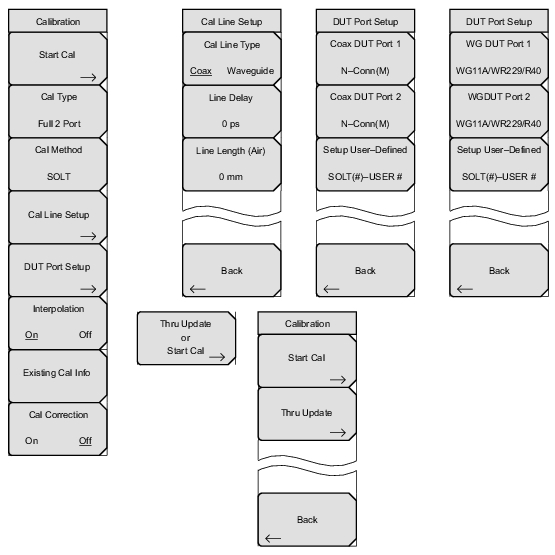
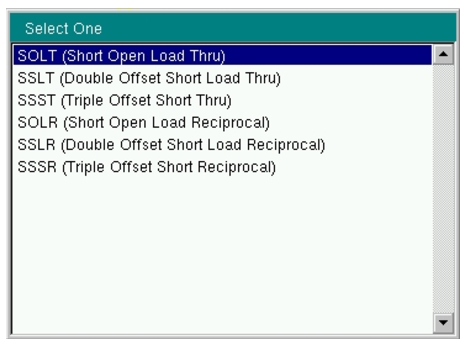
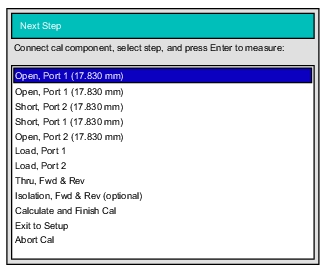
Start Cal
Press this soft key to open the “Next Step” List Box, which contains the instructions: “Connect cal component, select step, and press Enter to measure:” See Figure: Start Cal, Next Step Dialog Box for examples. Only for MS20xxC instruments, this key changes to Thru Update or Start Cal when a completed calibration includes a Thru measurement. See the soft key image at the bottom of this list.
Cal Type
Press this soft key to open the selection list box, then select a calibration type. A soft key offers a toggled selection of Flex or Standard. Refer to Cal Type Menu. Also refer to Section Calibration Types. See Figure: Calibration Type List for Cal Type examples.
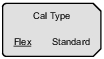
Cal Method
Press this soft key to open the selection list box, then select a calibration method. See Figure: Calibration Method List for examples. This soft key is displayed only for MS20xxC instruments..
Cal Line Setup
Press this soft key to open the Calibration Line Setup Menu. A soft key (Cal Line Type) in the Calibration Line Setup Menu offers a toggled selection of Coax or Waveguide. This soft key is displayed only for MS20xxC instruments.
DUT Port Setup
Press this soft key to open the DUT Port Setup Menu (Coax) or the DUT Port Setup Menu (Waveguide) if the Cal Line Type is set to Waveguide..
Interpolation
On Off
Press this soft key to toggle interpolation On or Off. In Cal Type Flex mode, Interpolation is always On. After performing a Standard calibration, you can turn Interpolation On and then change the frequency range (smaller) or reduce the number of data points. Refer to Interpolation.
Existing Cal Info
Press this soft key to open the “Existing Calibration Information” List Box. Press Enter or Esc to close the list box.
Cal Correction
On Off
Press this soft key to toggle calibration correction On and Off.
Thru Update or Start Cal
This soft key is displayed in place of the Start Cal soft key when a completed calibration includes a Thru measurement. Pressing this key opens the Calibration Menu with Thru Update, which offers a Thru update or a new calibration. This soft key is displayed only for MS20xxC instruments.
 
Cal Type Menu
This menu offers a choice between Standard, which is the default type, and Flex. When you choose Flex, the instrument performs a calibration over the entire frequency range of the instrument. You can then set any frequency range or any number of points (or both), and the instrument interpolates the calibration coefficients and applies the calibration to the new range or points (or both).
Example of Calibration Steps for S11:
Open, Port 1 (17.830 mm)
Short, Port 1 (17.830 mm)
Load, Port 1
Calculate and Finish Cal
Exit to Setup
Abort Cal
Examples of Calibration Types:
Full 2 Port – (S11, S21, S12, S22)
Full S11 – Port 1 (S11)
Response S11 & S22 – Refl Resp – Both Ports (S11, S22)
1P2P S11, S21 – 1 Path 2 Port Forward Path (S11, S21)
1P2P S22, S12 – 1 Path 2 Port Reverse Path (S22, S12)
Calibration Types
Calibration Type List
 
Interpolation
This feature is used by all Anritsu VNA Masters and by the S412E LMR Master.
You can set your instrument to interpolate the calibration coefficients of a Standard mode calibration. After performing a Standard calibration, you can turn Interpolation On and then change the frequency range (smaller and anywhere within the calibrated range) or increase the number of data points. You cannot increase the frequency range beyond the range that was used during calibration. The soft key is Interpolation On Off.
In the example shown in Figure: Calibration at 5 kHz to 20 GHz Using 4001 Points, a calibration was performed from 5 kHz to 20 GHz using 4001 points. With Interpolation On, a measurement was made by zooming in on a desired frequency range (410 MHz to 435 MHz), as shown in Figure: Interpolation Allows 410 MHz to 435 MHz with All 4001 Points. The trace in Figure: Interpolation Allows 410 MHz to 435 MHz with All 4001 Points shows the use of the full 4001 points within this much narrower frequency range. With Interpolation Off, the instrument would use only the number of points that were calibrated within this frequency band, which would be a much smaller number of points.
In Cal Type Flex mode, interpolation is always on. In this mode, the calibration uses the full frequency range and the maximum number of points that are available in the instrument. This provides the maximum flexibility for measurements without requiring another calibration.
Calibration at 5 kHz to 20 GHz Using 4001 Points
 
Interpolation Allows 410 MHz to 435 MHz with All 4001 Points
 
 
Calibration Methods
Calibration Method List
The Reciprocal is also known as an Unknown Thru. If you do not know the length of the Thru in your setup, and if it is a reciprocal device, then you can choose one of the bottom three calibration methods shown in Figure: Calibration Method List. Set the Line Length to zero, and the vector network analyzer will automatically measure (calculate) the length of the Thru.
 
 
Calibration Menu with Thru Update
Key Sequence: Shift, Calibrate (2) > Thru Update or Start Cal
Calibration Menu with Thru Update
 
 
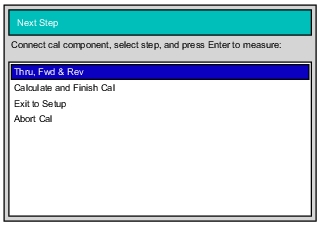
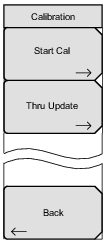
Start Cal
Press this soft key to open the “Next Step” List Box (see Figure: Start Cal, Next Step Dialog Box), which contains the instructions: “Connect cal component, select step, and press Enter to measure:”
Thru Update
Press this soft key to open the selection list box (see Figure: Thru Update, Next Step Dialog Box), then select a calibration type. Refer to Section Calibration Types.


Back
This soft key to return to the Calibration Menu.
Start Cal, Next Step Dialog Box
 
Thru Update, Next Step Dialog Box
 
Calibration Line Setup Menu
Key Sequence: Shift, Calibrate (2) > Cal Line Setup
Calibration Menu
 
 
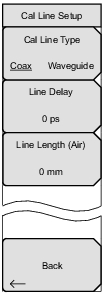
Cal Line Type
Coax Waveguide
Press this soft key to toggle the line type between Coax and Waveguide.
Line Delay
Press this soft key to set the line delay in seconds. If you use the number keypad, then a Time units menu is displayed with soft keys for s, ms, µs, ns, and ps. The maximum is 100 ms.
Line Length (Air)
Press this soft key to set the line length in meters. If you use the number keypad, then a Meters units menu is displayed with soft keys for m, cm, and mm. The maximum is 100 m.


Back
Press this soft key to return to the Calibration Menu.
Line Delay and Line Length
These two settings are for the same parameter, one in distance, and the other in equivalent time. They represent the length of the Thru device that is used during the calibration. Because the length of the Thru device is not always zero, these soft keys allow you to set any additional length that the Thru uses during the calibration that it will not be using during the actual measurement. When you are using a reciprocal calibration method, setting the Line Length or Line Delay to zero prompts the instrument to calculate this length.
 
 
Existing Calibration Information List Box
The Existing Calibration Information list box shows the various sweep setting types for the active calibration and compares this information to the current sweep settings. It also displays the Cal Status information and the associated level of accuracy. Interpolation is available in all Anritsu VNA Masters and in the S412E LMR Master, but Flex calibration is available only in the MS20xxC models.
 
Additional Calibration Considerations
In Vector Network Analyzer mode, refer to section Calibration Considerations. In Vector Voltmeter mode, refer to Calibration Correction.
 
DUT Port Setup Menu (Coax)
Key Sequence: Shift, Calibrate (2) > DUT Port Setup
DUT Port Setup Menu
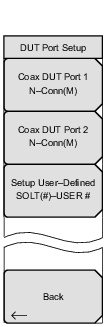
Coax DUT Port 1
Press this soft key to open the “DUT Connector Selector” List Box for Port 1. Choose the connector type that matches the calibration components that are to be used on Port 1. The standard calibration coefficients are displayed for the calibration kit that is associated with the selected connector type.
Examples:
 
N‑Conn(M)
N‑Conn(F)
K‑Conn(M)
TNC(F)
SMA(M)
SSST(1) – USER 1
SSST(4) – USER 4
Coax DUT Port 2
Press this soft key to open the “DUT Connector Selector” List Box for Port 2. Choose the connector type that matches the calibration components that are to be used on Port 2. The calibration coefficients are displayed for the calibration kit that is associated with the selected connector type.
Setup User-Defined
Press this soft key to open the “User‑Defined Cal Kit Selector” List Box (Figure: DUT Connector Selector List Box for Cable). Format: SSST(#) – USER #.
Selecting a user‑defined cal displays the cal kit definition menu (see Figure: Cal Kit Definition Menus for Coax). In this menu, you can enter the calibration coefficients for the specific calibration kit.
Back
Press this soft key to return to the Calibration Menu.