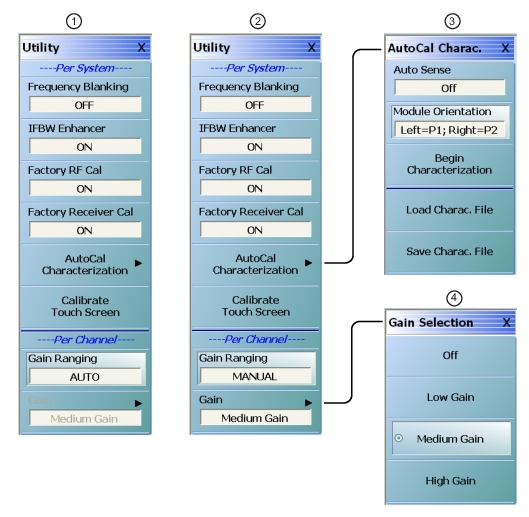
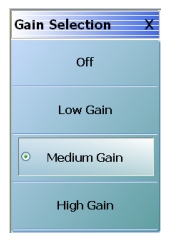
1. Utility menu with Gain Ranging set to Auto (Gain Selection sub-menu disabled)
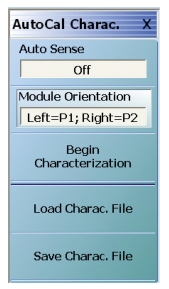
2. Utility menu with Gain Ranging set to Manual (Gain Selection sub-menu enabled)
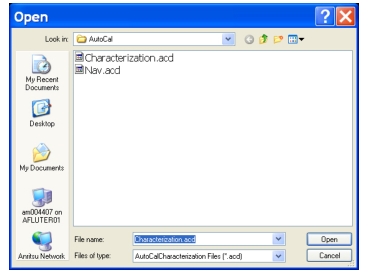
3. AutoCal Charac. menu
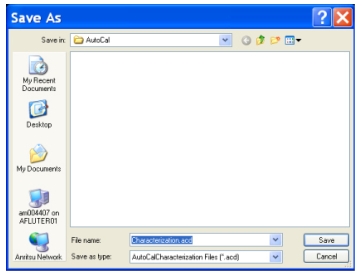
4. Gain Selection menu (available only with Gain Ranging set to MANUAL)
Per-System Utility Options
These settings are on a per-system basis.
Frequency Blanking (Off/On)
The default state is OFF where frequency values are displayed on the main display and on all menus, buttons, and dialogs. Select changes the button state to ON, and replaces all frequency displays with “Xs” as “XXXX” which includes all frequency displays on all buttons, menus, and dialogs such as all MARKER [1] menu frequency displays. To return all frequency displays, do one of the following:
• MENU BAR | Utilities | Preset
• Preset Key
IFBW Enhancer (Off/On)
Select toggles the IFBW enhancer function OFF and ON.
If the IFBW enhancer function is ON:
• The system automatically reduces the IFBW below 3 MHz to compensate for the lower system frequency.
• The system limits the maximum IFBW allowed so that it is less than or equal to the received frequency divided by 300.
• For example, if the received frequency is set to 300 kHz, the IFBW is equal to 300 kHz divided by 300 or 1 kHz.
Factory RF Cal (Off/On)
Select toggles the factory RF calibration OFF and ON.
Factory Receiver Cal
Select toggles the factory receiver calibration OFF and ON.
AutoCal Characterization
Select displays the AutoCal Characterization menu.
The best practice recommendation is to return the AutoCal module to Anritsu annually for an in-factory characterization. If a factory re-characterization is not possible, you can use this menu to re-characterize the module. Note that the re-characterization will be only as good as the prior instrument manual full calibration procedure. The recommended manual calibration is a Full Two Port calibration (12 Term Cal). For more information, contact Anritsu Customer Service.
Full Name
Automatic Calibrator (AutoCal) Characterization
AUTOCAL CHARAC. Menu Button Availability
The availability of the Module Orientation button depends on the setting of the Auto Sense (Off/On) button.
• If Auto Sense is off (shown at left), the Module Orientation button is available.
• If Auto Sense is on, the Module Orientation button is unavailable.
• MAIN | System | SYSTEM | Utility | UTILITY | AutoCal Characterization | AUTOCAL CHARAC.
AUTOCAL CHARAC. (AUTOCAL CHARACTERIZATION) Menu
Auto Sense (Off/On)
If Auto Sense is on, the Module Orientation toggle button below is unavailable and during an auto-calibration run, the instrument will automatically detect the left and right port assignments.
If Auto Sense is off, the Module Orientation toggle button below is available allowing user definition of left/right port assignments. This is useful for test setups where the ports are reversed from the perspective of the user.
Module Orientation
This button is unavailable if the Auto Sense button above is ON and available if the Auto Sense button is OFF.
If available, use the orientation selection to define left/right port assignments from the point of view of the operator.
Select toggles between Left=P1;Right=P2 or Right=P1;Left=P2.
Begin Characterization
Select starts the characterization process. Note that the instrument must have completed a Full Two Port calibration (12 Term Cal) before starting this calibration step. During the characterization run, dialogs appear instructing the user for the each configuration action.
If a 12 Term Calibration is not applied, a warning message appears. Click OK to clear the warning message and apply the 12 Term Calibration before proceeding.
Load Charac. File
Selecting the Load Characterization File button displays the OPEN (AUTOCAL CHARACTERIZATION ACD FILE) dialog box.
• MAIN | System | SYSTEM | Utility | UTILITY | AutoCal Characterization | AUTOCAL CHARAC. | Load Charac. File | OPEN (AUTOCAL CHARACTERIZATION ACD FILE) Dialog Box
OPEN (AUTOCAL CHARACTERIZATION ACD FILE) Dialog Box
Instructions
The OPEN (AUTOCAL CHARACTERIZATION ACD FILE) dialog box displays available ACD files. Navigate to and select the required ACD file and click Open to apply. Click Cancel to abort.
SAVE AS (AUTOCAL CHARACTERIZATION ACD FILE) Dialog Box
• MAIN | System | SYSTEM | Utility | UTILITY | AutoCal Characterization | AUTOCAL CHARAC. | Save Charac. File | SAVE AS (AUTO CAL CHARACTERIZATION ACD FILE) Dialog Box
SAVE AS (AUTOCAL CHARACTERIZATION ACD FILE) Dialog Box
Instructions
Displays the Save As (AUTO CAL CHARACTERIZATION ACD FILE) dialog box. Navigate to the required folder and click Save to save the file. Click Cancel to abort.
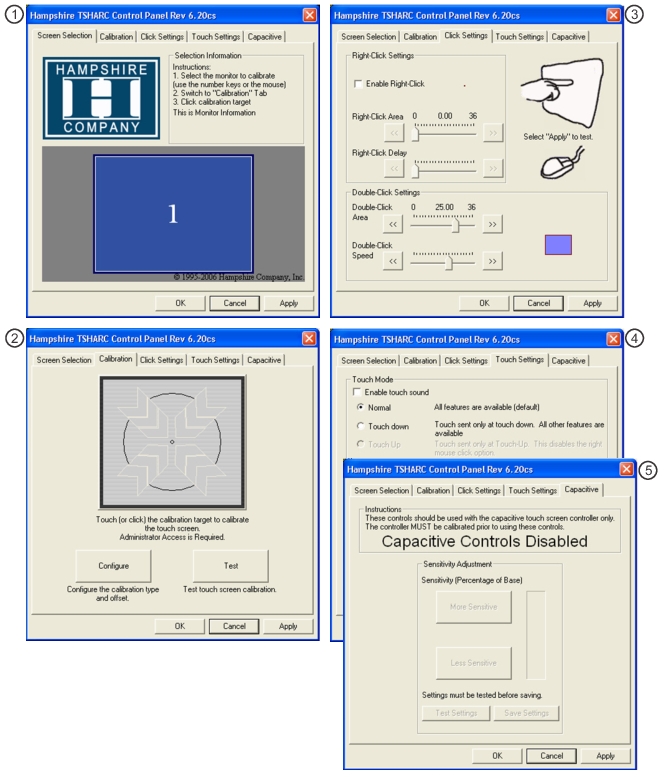
HAMPSHIRE TSHARC (TOUCHSCREEN) CONTROL PANEL Dialog Box
The HAMPSHIRE™ TSHARC™ (TOUCH SCREEN) CONTROL PANEL dialog box has five (5) tabs for control of Screen Selection, Calibration, Click, Touch, and Capacitive settings. Each screen and its recommended parameters are defined below.
Note
When using the touch screen, a recommended best practice is to use a positive hard press to make sure the required setting in input into the system. A light touch may not change the instrument setting as required.
To recalibrate the touch screen, navigate to the CALIBRATE TOUCH SCREEN dialog box located at MAIN | System | SYSTEM | Utility | UTILITY | Calibrate Touch Screen | TOUCH SCREEN CONTROL PANEL dialog box. The procedure is described in System Menus in HAMPSHIRE TSHARC (TOUCHSCREEN) CONTROL PANEL Dialog Box below.
A more detailed touch screen calibration and adjustment procedure is described in the VectorStar MS464xB Series VNA Maintenance Manual – 10410-00320.