Follow the instructions in this section to connect the Video Inspection Probe, set the Site Master to VIP Mode, and select the VIP test settings. You can change these settings anytime via the Setup menu.
Connect the VIP
The Anritsu G0306A Video Inspection Probe comes with seven changeable probe tips: four standard tips (SC, LC, and FC) and three universal tips (1.25 mm and 2.5 mm). See Table: Probe Tip Types. The standard tips are compatible with common types of bulkhead adapters. The universal tips are typically used for inspecting patch cords.
Probe Tip Types
Tip Type
Description
SC_APC_F
SC Angled Physical Contact, Female
SC_PC_F
SC Physical Contact, Female
LC_PC_F
LC Physical Contact, Female
FC_PC_F
FC Physical Contact, Female
2.5APC_M
Universal 2.5 mm Angled Physical Contact, Male
2.5PC_M
Universal 2.5 mm Physical Contact, Male
1.25PC_M
Universal 1.25 mm Physical Contact, Male
1. Depending on the connector type you wish to test, attach the appropriate probe tip to the Video Inspection Probe.
2. Connect the probe to the bulkhead or patch cord to be tested.
3. Insert the USB connector at the end of the coiled cord into the S820E USB port.
Launch the VIP Application
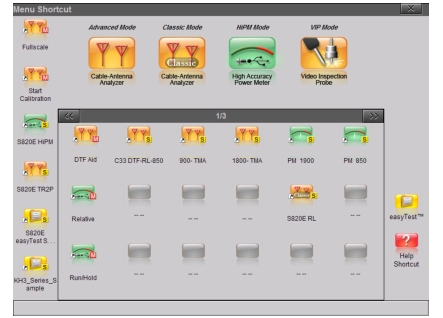
If the S820E is currently running a different application, or measurement mode, press the Menu key, then press the VIP Mode application icon. See Figure: Menu Screen.
Menu Screen
VIP Test Settings
To access the VIP test settings, press the Setup main menu key. Refer to Setup Menu for a description of the submenu keys.
1. The Probe Model submenu key shows the currently selected VIP model. The Site Master currently supports only the Anritsu Model G0306A probe.
2. Press the Tip Type submenu key to display the selection box. Use the rotary knob or the Up/Down arrow keys to highlight the appropriate probe tip, then press Enter to save the setting. Table: Probe Tip Types lists the available tip types.
To close the Tip Type dialog without making a change, press the Esc key.
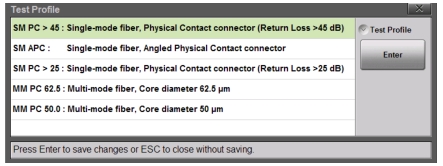
3. Press the Test Profile key to open the selection box. Use the rotary knob or the Up/Down arrow keys to highlight the desired profile, then press Enter to save the setting.
VIP Test Profile Selection Box
4. If needed, press the Auto Analyze key to set it On or Off. When On, the VIP image is immediately analyzed when captured. Auto analysis is not performed if the setting is Off.
5. The Auto Filename key determines if a file name is automatically generated when saving a measurement or image to file. When this setting is On, the saved file name and location are taken from the auto filename settings.
6. Press the Auto Filename Settings submenu key to open the dialog box shown in Figure: Auto Filename Settings Dialog. Press the Location bar to change the save location. To edit the file prefix or the starting number, press the appropriate text box. You may also include the current date.