The touch screen and keypad are used for data entry. The sweep window and surrounding screen areas provide measurement information (see Figure: Front Panel Overview).
Graphical User Interface (GUI)
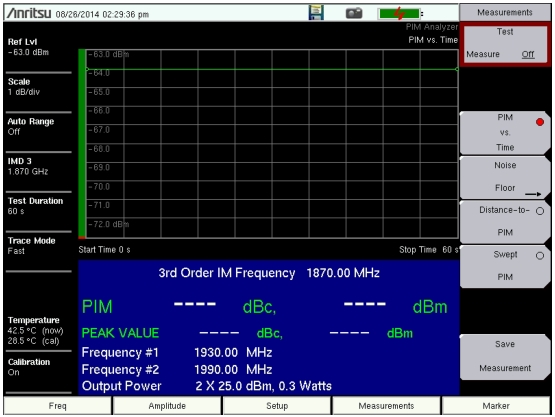
The measurement display, or sweep window, provides measurement trace data. Above the grid and trace data, additional measurement data are displayed, and the analyzer mode is shown in the top‑right corner. The lower area of the grid may be reduced in size to display an optional data window, such as a table of measurement data or marker data. To the left of the grid and trace data is the instrument settings summary; below the grid are the five main menu touch keys; to the right are the submenu touch keys. For a list of the main menu keys in different instrument modes, refer to Main Menu Keys.
The five main menu touch keys and (up to) eight submenu touch keys are available in all analyzer Modes, providing control of measurement settings. In addition, you can touch other areas of the display screen to perform tasks that are also available from the menu keys.
For example:
• If you touch the Scale setting on the left side of the display (Instrument Settings Summary), then the Amplitude menu is displayed, and the Scale submenu key is active. Scale is displayed in PIM vs. Time and Swept PIM measurements.
• If you touch Data Points (Instrument Settings Summary), then the DTP Parameters setup window is displayed, and the Data Points parameter is selected (Distance‑to‑PIM measurements.
• If you touch Cable (Instrument Settings Summary), then the Cable List is displayed (Distance‑to‑PIM measurements).
• If you place a marker on the screen, then you can touch the measurement trace to relocate the marker.
• If you touch the file type list box in one of the file management dialog boxes, then you can open the Filetype drop‑down list to select a file type.
Main Menu Touch Screen Keys
The main menu key functions change to match specific instrument Mode settings. The main menu keys generate function-specific submenus. The measurement modes are selected by pressing the Shift key and then the Mode (9) key. For more details about the Mode menu, refer to Mode Selector Menu.
Submenu Touch Screen Keys
The submenu touch keys are located in the active function block (submenu key labels) along the right edge of the display. The submenu labels change as instrument measurement and parameter settings change. The current submenu title is shown at the top of the submenu key block. An example of the keys is shown in Figure: Front Panel Layout with PIM vs. Time Display. Additional details are described in Measurement Display Overview.
Touch Screen Calibration
The Calibrate Touch Screen submenu key is in the System Menu. When pressed, the touch screen calibration message box is displayed with instructions for calibration. Calibration optimizes the response of touch input. You touch targets in sequence as they are displayed on the touch screen. This requires less than one minute.
Calibration is recommended if your touch inputs do not correspond to the appropriate locations on the screen. After the information box is displayed, press Enter to begin calibration, or press Esc to cancel.
You can also press 1 to use arrow navigation.
Calibrate Touch Screen Shortcut
You can access touch screen calibration by pressing Shift then Touch (0). This displays the touch screen calibration message box. Press Enter to begin calibration, or press Esc to cancel. This shortcut can be used if your touch inputs do not correspond to the appropriate locations on the screen to such an extent that you cannot access the Calibrate Touch Screen submenu key.
Arrow Navigation
If the touch screen is not functioning, you can use Arrow Navigation to simulate pressing the touch screen main menu keys and submenu keys. From the touch screen calibration message box, press 1 to use arrow navigation. This displays the arrow navigation message box. Press 1 again to enter the arrow navigation mode, or press Esc to cancel. Note that entering arrow navigation mode disables the touch function of the touch screen.
In arrow navigation mode, a red selection box surrounds a key (see Figure: Arrow Navigation Mode in which the Carrier F1 submenu key is selected). To move the red selection box, use the Arrow keys above the number keypad (see Figure: Keypad and Secondary Function Menus). Then press the Menu key to activate the selected touch screen key. Note that only the main menu keys and submenu keys can be activated by using Arrow Navigation. When using the File management menus for Copy, Recall, and Delete, however, you can press the +/– key to change focus of the arrow navigation from the menu keys to the lists in the dialog box and back to the menu keys. Arrow navigation places a green selection box around the Source or Destination file group (depending on the selection toggled in the Scroll submenu key). You can then use the arrow keys to navigate and select files. This feature does not move the arrow navigation selection box into any other areas of the touch screen.
To save a measurement in arrow navigation mode, press Shift then File (7). Use the Arrow keys to move the red selection box to the Save Measurement As submenu key. This submenu key must be used because the arrow navigation mode cannot be used to change data in popup windows in the measurement display. Filenames are determined by the current setting of the Save Measurement As submenu key. Refer to Save Measurement As.
You can save a JPEG image of the current display screen by pressing three keys, Shift, then Decimal, then +/–. The JEPG image shows screen data, but does not contain the additional measurement information that accompanies a saved measurement in a *.pim measurement file.
To return to normal touch entry mode, reboot the instrument (turn power Off and then On). If your touch screen has been damaged, then refer to Instrument Description.