Site Master™ S331P : Cable and Antenna Measurements : Limit Menu
 
Limit Menu
Limit lines can be used for visual reference only or for pass/fail criteria using the limit alarm and Pass/Fail Message keys.
Key Sequence: Limit (6) or Limit
Limit Menu
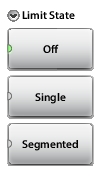
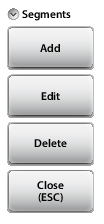
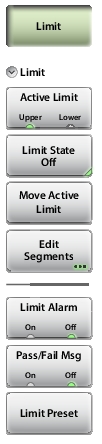
Limit
Active Limit (Upper Lower)
This key toggles the active limit line settings to the upper or lower limit.
Limit State (Off Single Segmented)
This key sets the limit line state to off, single, or segmented. See Figure: Limit Line State Menu. Limit line amplitude is stored even when turned off.
Note: Both the upper and lower limit lines for a trace must be of the same type: either both are single, or both are segmented.
Move Active Limit
Press this key to change the amplitude of the limit line (upper or lower). Use the virtual keypad to enter an amplitude value in the edit box, then press the dB key or Enter to apply the new power level and close the edit box.
To exit without making a change, press Esc to cancel the entry, and Esc again to close the edit box.
Edit Segments
Press this key to display the Segments menu and a table of limit line segments. Tap a segment (upper or lower), then choose a function from Figure: Limit Line Segments Menu.
Limit Alarm (On Off)
When turned on, the Limit Alarm sounds a repeating beep at the controller device (tablet or PC) when the trace touches the limit line.
Pass/Fail Msg (On Off)
When turned on, a Pass or Fail message is displayed to indicate whether the trace touches or exceeds the limit line (Fail).
Limit Preset
Turns both upper and lower limit lines off and clears limit amplitude settings. The next time a limit line is turned on, it will be displayed at its default amplitude level.
 
Key Sequence: Limit > Limit State
Limit Line State Menu
Limit State
Off
Turns off the currently active limit line (upper or lower).
Single
Turns on a single limit line.
Segmented
Turns on a segmented limit line.
Both upper and lower limit lines must be of the same type: single or segmented. If there is a mismatch, press the appropriate button in the message box that appears to make your selection.
Key Sequence: Limit > Edit Segments
This function is available only with segmented limit lines. A message box is displayed if the current Limit State is Single, prompting you to press OK if you wish to change the existing limit line to segmented.
Limit Line Segments Menu
Edit Segments
Add
Press this key to add a segment. A dialog box is displayed allowing selection of Upper or Lower limit lines and settings for Start and Stop x‑axis values and y‑axis values. Press Enter to save changes, or press ESC to close without saving. See Figure: Table of Limit Lines (or Segments) through Figure: Moving Limit Line Segments.
Edit
Press this key to edit the highlighted segment. A dialog box is displayed allowing selection of Upper or Lower limit lines and settings for Start and Stop x‑axis values and y‑axis values. Press Enter to save changes, or press ESC to close without saving.
Delete
Press this key to delete the selected limit segment or segments.
Close (ESC): Press this key to close the Segments menu and return to the Limit menu.