Spectrum Analyzer Measurements : Setting Frequency Parameters
 
Setting Frequency Parameters
Frequency-related parameters are set using the FREQ / SPAN Menu. The tuning frequency range can be entered in several different ways depending upon what makes the most sense, either for the user or for the measurement. The center frequency and span can be specified, the start and stop frequencies can be entered.
Entering Start and Stop Frequencies
The frequency settings are displayed along the bottom of the spectrum or spectrogram graph. These parameters can be accessed directly or via the FREQ SPAN menu.
1. Press FREQ SPAN on the main menu.
2. Press START FREQUENCY to open the start frequency parameter entry keypad.
3. Enter the desired start frequency. When entering a frequency with the keypad, available frequency units (GHz, MHz, kHz, and Hz) will be displayed along the left edge of the menu.
4. Press the appropriate frequency unit to terminate the entry or press ACCEPT to terminate the entry with the current frequency unit.
5. Press STOP FREQUENCY to open the stop frequency parameter entry keypad.
6. Enter the desired stop frequency. When entering a frequency with the keypad, available frequency units (GHz, MHz, kHz, and Hz) will be displayed along the left edge of the menu.
7. Press the appropriate frequency unit to terminate the entry or press ACCEPT to terminate the entry with the current frequency unit.
Note 
To quickly move the start or stop frequency value up or down, press the + or – slider controls to increment the frequency by the set FREQUENCY STEP. You can also drag the frequency using the slider.
The center frequency will be set to exactly the middle of the start and stop frequencies. The current settings are shown along the bottom of the spectrum or spectrogram graph (see Figure: GUI Overview (sample display elements)).
Entering a Center Frequency
1. Press FREQ SPAN on the main menu.
2. Press CENTER FREQUENCY to open the center frequency parameter entry keypad.
3. Enter the desired center frequency. When entering a frequency with the keypad, available frequency units (GHz, MHz, kHz, and Hz) will be displayed along the left edge of the menu.
4. Press the appropriate frequency unit to terminate the entry or press ACCEPT to terminate the entry with the current frequency unit.
Note 
To quickly move the center frequency value up or down, press the + or - slider controls to increment the center frequency by the set FREQUENCY STEP. You can also drag the center frequency using the slider or by dragging the trace directly.
The current settings are shown along the bottom of the spectrum or spectrogram graph (see Figure: GUI Overview (sample display elements)).
Using Offset Frequency
A user‑defined frequency offset can be entered to adjust the frequency that is displayed on the instrument from the actual swept frequency. For example, if the DUT is an antenna system receiving signals in the 10 GHz range and offsetting the signals to the 1 GHz range, you can set a frequency offset in the spectrum analyzer in order to display the actual received antenna frequency in the sweep window.
Both positive and negative offset values are allowed. Negative offsets can be useful for seeing differences from expected values. Enter a negative offset of the expected value, and the received antenna frequency should display in the 0 Hz range.
When enabled, the offset value is displayed at the left of the screen in the status panel (see Status Panel). To remove a frequency offset, open the FREQ SPAN menu and set FREQUENCY OFFSET to 0 Hz. You can also access this parameter directly from the left side status panel.
Note 
Offset frequency apply to start, stop, center, and marker frequencies.
Setting the Span
1. Press FREQ SPAN on the main menu.
2. Press SPAN to open the span frequency parameter entry keypad.
3. Enter the desired span frequency. When entering a frequency with the keypad, available frequency units (GHz, MHz, kHz, and Hz) will be displayed along the left edge of the menu.
4. Press the appropriate frequency unit to terminate the entry or press ACCEPT to terminate the entry with the current frequency unit.
5. To select full span, press the FULL SPAN. Selecting full span overrides any previously set start and stop frequencies.
Note 
To quickly move the span value up or down, press the + or - slider controls to increment the span in a 1:2:5 sequence. You can also drag the span using the slider or by pinching the trace in or out.
FREQ / SPAN Menu
 
FREQ / SPAN Menu
-
 
CENTER FREQUENCY
Sets the center frequency of the sweep range. The current span setting will remain constant or will be adjusted to accommodate the start and stop frequency range of the instrument.
SPAN
Sets the sweep frequency range. The current center frequency will remain constant and the start and stop frequencies will be adjusted to accommodate the new range. Pressing the plus (+) or minus (–) control increments the span value in a 1:2:5 sequence. The span can also be changed by pinching the trace in or out.
FULL SPAN
Pressing this button sets the span to cover the entire tunable spectrum of the instrument. This button also restores Start and Stop frequency buttons and the Gestures button.
LAST SPAN
Pressing this button returns the span to the previously set span value. If the previous span was set with Zero Span, then the appropriate buttons are removed.
ZERO SPAN
Pressing this button sets Sets zero span mode. In this mode, the display shows amplitude changes at a single frequency vs. time on the X-axis. This function is frequently used to allow easy monitoring of power variations over time. In zero span, the low side sweep will be automatically selected, unless IMAGE REJECT is set to Upper Only (refer to “IMAGE REJECT” on page 3-10 for more information).
START FREQUENCY
Sets the start frequency of the sweep range. The center frequency and span will be adjusted to accommodate the new start and current stop frequencies. Pressing the plus (+) or minus (–) control moves the start frequency in steps defined by the FREQUENCY STEP value.
STOP FREQUENCY
Sets the stop frequency of the sweep range. The center frequency and span will be adjusted to accommodate the current start and new stop frequencies. Pressing the plus (+) or minus (–) control moves the start frequency in steps defined by the FREQUENCY STEP value (set lower in this menu).
FREQUENCY STEP
Sets the frequency step value used for the plus (+) or minus (–) control.
FREQUENCY OFFSET
The frequency offset value accounts for frequency conversions outside of the analyzer. The offset frequency value is added to the start, stop, center, fixed marker, and normal marker frequencies. Pressing the plus (+) or minus (–) control moves the offset frequency in steps defined by the FREQUENCY STEP value.
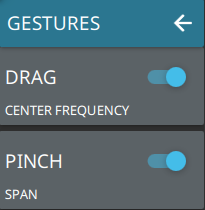
GESTURES: Opens the GESTURES submenu.
GESTURES Submenu
-
 
 
DRAG: Toggles the touchscreen drag feature on or off. When off, the center frequency will not change when dragging the spectrum display. This can be useful when dragging markers.
PINCH: Toggles the touchscreen pinch feature on or off. When toggled off, the span frequency will not change when pinching the spectrum display. This can be useful when dragging markers.
Note, that the Drag and Pinch features can also be toggled on/off by touching the locks under the display.