Cable and Antenna Analyzer Measurement Guide : Calibration : CALIBRATION Menu
 
CALIBRATION Menu
Select CALIBRATION menu from the main menu to choose many options such as start/cancel calibration,
cal setup, calibration methods, Mode and so on.
 
CALIBRATION Menu
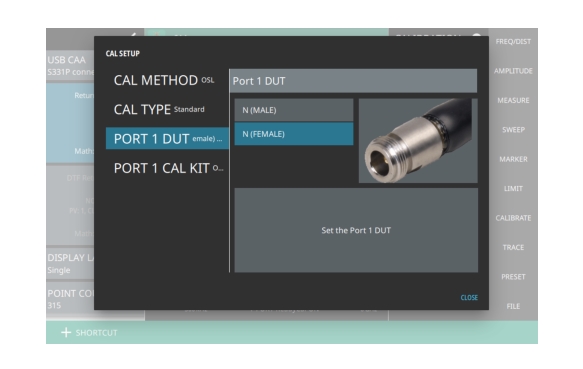
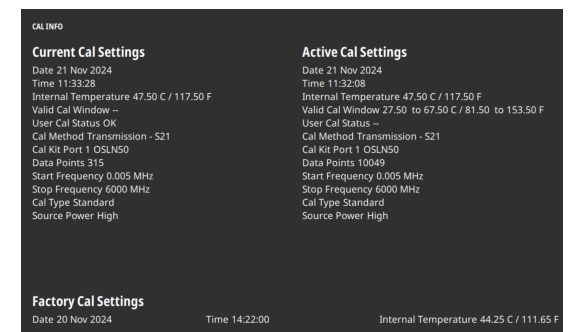
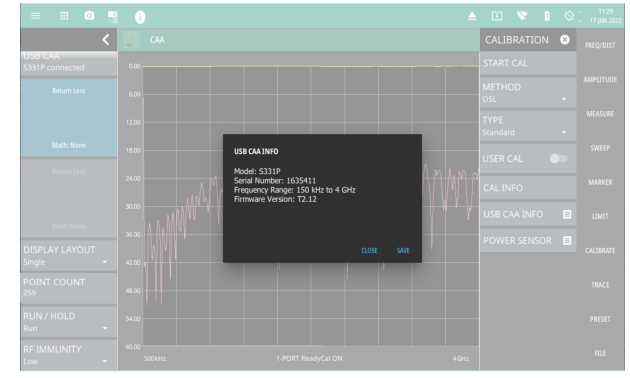
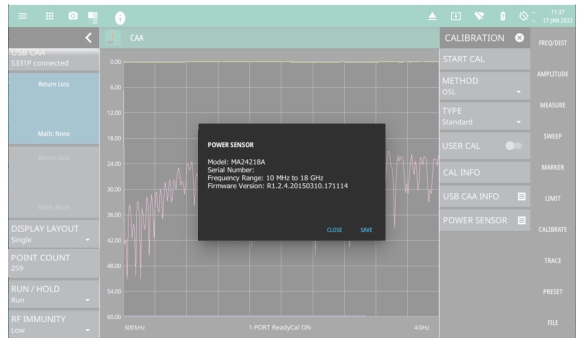
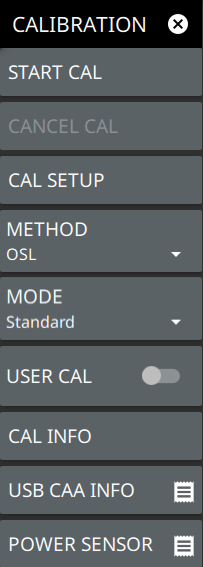
START CAL
Starts a manual measurement calibration. The CAL WIZARD window will open and provide on-screen instructions. Refer to . The basic calibration sequence is as follows:
Measure: Performs a measurement at each calibration step, after making the connections as instructed by the CAL WIZARD.
Previous: Goes back to the previous calibration step.
Skip: Present only in calibration step 1 when the calibration method is
OSL + Trans (USB Sen). This step (zero the sensor) is optional and may be skipped.
Apply: Displayed only in the final calibration step, applies the calibration and closes the CAL WIZARD.
Cancel: Aborts the calibration and closes the CAL Wizard dialog.
CANCEL CAL
Cancels the active calibration.
CAL SETUP
Provides the predefined set of parameters needed to start calibration.
METHOD
The Cable and Antenna Analyzer supports various calibration methods. Refer to CALIBRATION METHODS.
MODE
Selects either Standard calibration or Flex calibration. Refer to Calibration Mode.
USER CAL
Toggles whether the active cal settings are applied to the current measurement. With User Cal off, the factory default calibration (1-Port ReadyCal) is applied to all measurements except Transmission. Turning User Cal on restores the active cal settings, including frequency range. See the Note in CAL INFO.
CAL INFO
Displays the active cal settings and current instrument settings. Refer to CAL INFO.
USB CAA INFO
Displays the cable antenna analyzer settings such as serial number, frequency range, etc. Refer to USB CAA Info (Field Master Series Only). Note that this option does not apply to Site Master instruments.
POWER SENSOR
Displays the power sensor settings. Refer to Power Sensor.
CALIBRATION SETUP
From the main menu select CALIBRATE > CAL SETUP to choose predefined calibration parameters. The cal setup menu consists of all the essential parameters to start an active calibration. You can choose the desired calibration method, MODE, DUT and cal kit. The list of cal kit components tend to differ based on the selected DUT.
 
Cal Setup Menu
CAL INFO
From the CALIBRATION main menu, press CAL INFO to view the active calibration settings and a summary of the current instrument settings (see Figure: Cal Info Window). Active calibration settings are the settings saved following the last completed calibration. Current settings are values currently set on the instrument.
Cal Info Window
The calibration factor can be toggled off with the USER CAL button. The calibration coefficients are saved and can be reapplied, along with the active calibration settings, by toggling USER CAL back on.
Note 
Toggling USER CAL on and off only impacts measurement types associated with the calibration method in the active settings. For example, if the instrument has been calibrated for OSL, calibration will remain off for Transmission (USB Sensor) measurements, whether USER CAL is on or off. Conversely, if the instrument is calibrated using Transmission (USB Sensor) method, the default 1-Port ReadyCal is applied to all measurement types other than Transmission, independently of USER CAL being toggled on or off.
USB CAA Info (Field Master Series Only)
From the CALIBRATION main menu, press USB CAA INFO to view the S331P cable antenna analyzer details. This pop-up menu displays CAA model number, serial number, frequency range and firmware version. Note that USB CAA Info option only applies to instruments with CAAUSB application.
 
USB CAA Information
Power Sensor
From the CALIBRATION main menu, press POWER SENSOR to view the details of the power sensor connected to the instrument.
Power Sensor Information
Temperature Window
Anritsu recommends allowing the instrument to warm up for approximately 10 minutes to typical operating temperature before performing a user calibration.
During operation, if the internal temperature moves outside the valid cal window, any applied user calibration factor will automatically be toggled off – and the factory default 1‑Port ReadyCal applied, when applicable. In this case, the instrument will display: 1‑PORT ReadyCal (↕ °C) to indicate that the USER CAL has been toggled off due to a temperature change.
The USER CAL toggles back on automatically if the internal temperature moves back into the valid cal window. Alternatively, you can perform a new user calibration, which will then have a new cal temperature window based on the current ambient temperature ±10 °C.
Save and Recall Calibration Coefficients
Calibration information is included when a setup (.stp) or trace (.fmcaausb) file is saved (even when USER CAL is off). The calibration information is also recalled with these file types and can be toggled on if the current internal instrument temperature is within the saved cal window. Calibration information is not included when other file types are saved.