Frequency-related parameters are set using the FREQUENCY Menu. The tuning frequency range can be entered in several different ways depending upon what makes the most sense, either for the user or for the measurement. The center frequency and span can be specified, the start and stop frequencies can be entered.
Entering Start and Stop Frequencies
The frequency settings are displayed along the bottom of the VNA graph. These parameters can be accessed directly by touching the values displayed or via the FREQUENCY menu. To enter start and stop frequency follow the steps below:
1. Touch FREQUENCY on the main menu.
2. Select START FREQUENCY to open the start frequency parameter entry keypad.
3. Enter the desired start frequency and choose an appropriate unit from the list of available frequency units (Hz, kHz, MHz, and GHz) displayed along the right edge of the keypad.
4. Touch ACCEPT to set the start frequency or cancel the entry by pressing CANCEL.
5. Select STOP FREQUENCY to open the stop frequency parameter entry keypad.
6. Enter the desired stop frequency and choose an appropriate unit from the list of available frequency units (Hz, kHz, MHz, and GHz) displayed along the right edge of the keypad.
7. Touch ACCEPT to set the stop frequency or cancel the entry by pressing CANCEL.
Note
To quickly move the start or stop frequency value up or down, press + or – buttons to increment or decrement the frequency, respectively. You can also change the frequency by sliding the slider to the left or right. Refer to your instrument’s user guide for detailed information about operating the touch screen.
The current settings are shown along the bottom of the VNA graph.
Entering Center Frequency
1. Touch FREQUENCY on the main menu.
2. Select CENTER FREQUENCY to open the center frequency parameter entry keypad.
3. Enter the desired center frequency and choose an appropriate unit from the list of available frequency units (Hz, kHz, MHz, and GHz) displayed along the right edge of the keypad.
4. Touch ACCEPT to set the center frequency or cancel the entry by pressing CANCEL.
Note
To quickly move the start or stop frequency value up or down, press the + or – buttons to increment or decrement the frequency, respectively. You can also change the frequency by sliding the slider to the left or right. Refer to your instrument’s user guide for detailed information about operating the touch screen.
The center frequency will be set to exactly the middle of the start and stop frequencies. The current settings are shown along the bottom of the VNA graph.
Setting the Span
1. Select FREQUENCY on the main menu.
2. Select SPAN to open the span frequency parameter entry keypad.
3. Enter the desired span frequency and choose an appropriate unit from the list of available frequency units (Hz, kHz, MHz, and GHz) displayed along the right edge of the keypad.
4. Touch ACCEPT to set the span frequency or cancel the entry by pressing CANCEL.
5. To select full span, press the FULL SPAN. Selecting full span overrides any previously set start and stop frequencies.
6. Select ZERO SPAN to set the span frequency to zero.
Note
To quickly move the span value up or down, press the + or - buttons to increment the span. You can also drag the span using the slider or by pinching the trace in or out. Refer to your instrument’s user guide for detailed information about operating the touch screen.
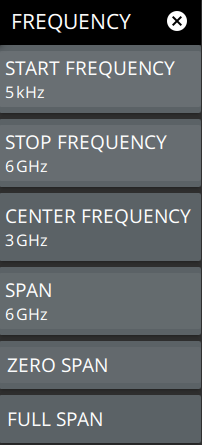
FREQUENCY Menu
FREQUENCY Menu
-
START FREQUENCY
Sets the start frequency in units of Hz, kHz, MHz, or GHz. If you enter a start frequency that is higher than the currently-set stop frequency, and if CAL = On, then the start frequency is set to the same value as the stop frequency. If you enter a start frequency that is higher than the currently-set stop frequency, and if CAL = Off, then both start and stop frequency are set to the new frequency.
STOP FREQUENCY
Sets the stop frequency in units of Hz, kHz, MHz, or GHz. If you enter a stop frequency that is lower than the currently-set start frequency, and if CAL = On, then the stop frequency is set to the same value as the start frequency. If you enter a stop frequency that is lower than the currently-set start frequency, and if CAL = Off, then both stop and start frequency are set to the new frequency.
CENTER FREQUENCY
Sets the center frequency of the sweep range. The current span setting will remain constant or will be adjusted to accommodate the start and stop frequency range of the instrument. The center frequency can also be dragged on the display when DRAG/PINCH toggle is on.
SPAN
Sets the sweep frequency range. The current center frequency will remain constant and the start and stop frequencies will be adjusted to accommodate the new range. Selecting the plus (+) or minus (–) control increments or decrements the span value.
ZERO SPAN
Sets the instrument start and stop frequency to the center frequency. The span will be set to zero.
FULL SPAN
Sets the instrument to a full span that sweeps the instrument from 5 kHz to maximum frequency range depending on the frequency option purchased.