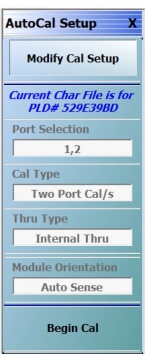
• MAIN | Calibration | CALIBRATION | Calibrate | CALIBRATE | AutoCal | AUTOCAL PORT | 2-Port Cal | AUTOCAL SETUP
AUTOCAL 2-PORT CAL SETUP Menu – 2-Port VNAs
Modify Cal Setup
Select displays the MODIFY 2-PORT AUTOCAL SETUP dialog box. The dialog box provides control settings for Auto Sense Module Orientation, Select Cal Type, Through Setup, Adapter Removal Port, and links to the THRU INFO and AIR EQUIVALENT LENGTH CONVERSION dialog boxes.
Displays the Ports selected for the AutoCal procedure. The settings are determined in the MODIFY 2-PORT AUTOCAL SETUP dialog box.
Cal Type (Read Only)
Displays the Cal Type selected for the AutoCal procedure. The settings are determined in the MODIFY 2-PORT AUTOCAL SETUP dialog box.
Thru Type (Read Only)
Displays the Thru Type selected for the AutoCal procedure as Internal Thru, Internal Reciprocal, True Thru, or True Reciprocal. The settings are determined in the MODIFY 2-PORT AUTOCAL SETUP dialog box.
Module Orientation (Read Only)
Displays the left/right VNA Port orientation and assignment for the AutoCal procedure. Options are either:
• Left=P1, Right=P2
• Left=P2, Right=P1
The settings are determined in the MODIFY 2-PORT AUTOCAL SETUP dialog box.
Begin Cal (AutoCal 2-Port Cal) (2-Port VNAs)
Starts the AutoCal procedure. On-screen dialogs and prompts provide user instructions for the selected calibration procedure. When the calibration is complete, the display returns to the CALIBRATION [TR] menu where the Cal Status button is enabled and set to ON.
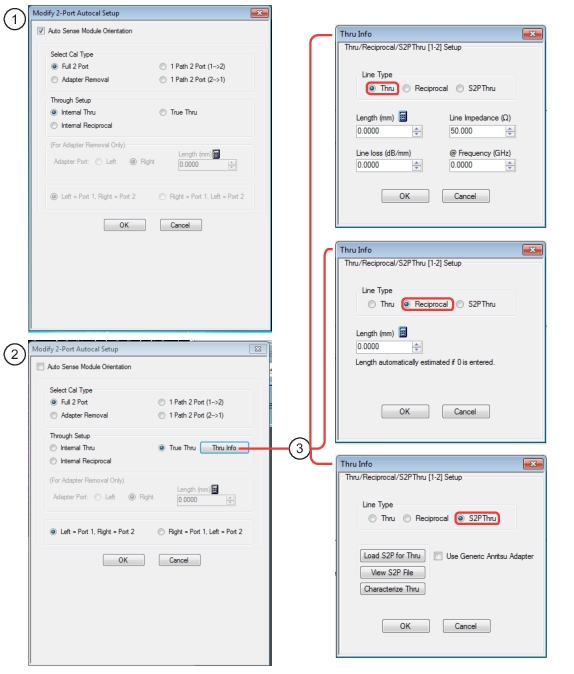
Use the MODIFY 2-PORT AUTOCAL SETUP dialog box to change the calibration parameters prior to an AutoCal calibration procedure. Options include the calibration and thru types to be used. If required, an adapter removal calibration can be configured. For production installations, the left/right port sense can be automatically or manually configured.
Thru selected allows user entries for length, line impedance, line loss, and frequency. Reciprocal selected allows user entry for length. S2P Thru selected provides buttons for loading, viewing, and characterization (to generate S2P files).
• When selected, the Thru Select area becomes available and, if True Thru is selected, the Thru Info button appears.
• Select the Thru Info button to display the THRU INFO dialog box. See Callout #3.
• When selected, the For Adapter Removal Only area becomes available.
• Select the Calculator icon to display the AIR EQUIVALENT LENGTH CONVERSION dialog box. Use the calculator to convert length in ps to air equivalent length in mm.
• With this choice, the internal transmissive path within the AutoCal module is employed, but it is treated as a reciprocal (i.e., the S-parameters from the characterization file are not used).
• If selected, the AutoCal module will prompt the user to remove the module and connect the ports with a through line.
• If selected, the Thru Info button becomes available. When clicked, the THRU INFO dialog box appears and allows input of values for Thru Length, Thru Line Impedance, Thru Line Loss, and Thru Frequency Setting.
• In the Thru Line Length field, enter the line length in mm. For example, enter a value of 30 mm.
• In the Line Impedance field, enter the impedance in ohms. For example, use the default value of 50 ohms.
• In the Line Loss field, enter the loss as dB per mm. For example, enter a value of 0.1 dB/mm.
• In the @ Frequency field, enter the working frequency in GHz. For example, enter a value of 45 GHz.
• When all entries are complete, click OK to return to the Modify 2-Port AutoCal Setup dialog box.
This area is only available if Adapter Removal button was selected in the Select Cal Type area above. The adapter removal controls are:
Adapter Port Select Radio Buttons
• Left
• Right.
Adapter Length (mm) Field
Available as either a direct entry field or using the dialog box below to calculate the parameters.
• To use the calculator dialog, click the Calculator icon.
• The AIR EQUIVALENT LENGTH CONVERSION dialog box appears. Entries can be typed in or incremented by clicking the field up/down arrows, or by pressing the keyboard up/down arrow keys.
• Enter the adapter length in ps. For example, enter a length of 100 ps.
• Enter the adapter dielectric constant. For example, enter a dielectric constant for polyethylene of 2.26.
• Click the Calculate Air Equivalent Length button.
• The air equivalent length in mm is: 9.9778515... or 9.9779.
• Click OK and the result appears in the For Adapter Removal Only Length field.
This area is only available if the Auto Sense Module Orientation check box at the top of the dialog box is deselected.
• If the Auto Sense check box is selected, the Left/Right buttons at the bottom of the dialog box are unavailable. The instrument identifies the left/right ports, and directs the user to the appropriate port.
• If the Auto Sense check box is deselected, the Left/Right buttons at the bottom of the dialog box are available. The user defines which port is “Left” and which port is “Right”. This is especially useful if the instrument is oriented differently from the work environment. Options are: