In Cable and Antenna Analyzer Mode, calibration is required when the “Cal Status Off” or “Cal Status --” message is displayed, or when the test port cable or adapters have been changed. The following sections describe how to perform calibrations.
Note
If a Test Port Extension Cable is to be used (this is recommended), then it must be connected to the Site Master before calibration.
Calibration Procedure
1. Press the Freq/Dist main menu key and enter the appropriate frequency range.
2. Press the Calibration main menu key, then press Start Calibration.
3. Press Cal Setup to make changes to the setup as needed (refer to Calibration Setup).
5. Verify that the calibration has been completed by confirming that the Cal Status message is now displaying “Cal Status OK (xxxx)”, where “xxxx” indicates the Cal Type. The calibration correction factor will now be applied to the measurements.
6. The calibration factors can be turned Off with the Cal Correction button. The calibration coefficients are saved and can be reapplied by setting Cal Correction back to On.
Thru Update
When measuring the transmission (or insertion loss) response of a DUT, the calibration requires a Thru measurement to be performed. This requires at least one external cable to be introduced into the calibration. The additional cable component is the most susceptible to changes from environmental conditions, such as temperature changes and mechanical flexing. The Thru Update button (see Figure: Calibrate Menu) allows you to quickly eliminate the effects of temperature changes or of changes caused by mechanical flexing of the cable without having to repeat the entire calibration process. The Thru update is particularly useful when viewing DUT transmission responses with small scale resolution (0.5 dB/division or less).
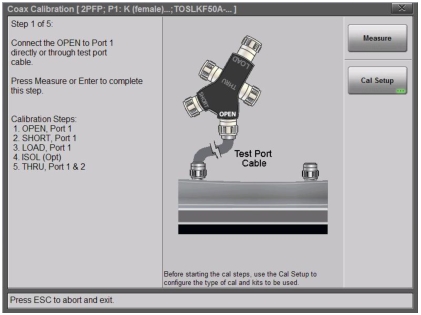
Figure: Calibration Dialog Box for Coax shows the Calibration dialog box showing calibration setup and calibration steps. On‑screen instructions are given for each step.
Calibration Dialog Box for Coax
Temperature Window
For accurate results, the instrument must be calibrated at the ambient temperature after allowing for warm‑up time (approximately 10 minutes) and before making any measurements. The S820E must be re-calibrated whenever the internal instrument temperature exceeds the calibration temperature window (±10 ºC) or when the test port extension cables or adapters are removed or replaced. The instrument must also be re-calibrated every time the frequency range changes.
To ensure that you consistently obtain accurate measurements, the Site Master continuously monitors its internal temperature and compares that to the actual calibration temperature that was recorded when the last calibration was performed. If these 2 values differ by ±10 degrees or more, then the Site Master displays , indicating that the current temperature has exceeded the calibration temperature window. Anritsu recommends that you perform a new calibration after this occurs in order to continue making accurate measurements. Alternatively, if the instrument temperature comes back into the valid calibration temperature window, then you may reactivate the existing calibration by turning it back on in the Calibration Menu.
If you turn off the correction by using the Cal Correction button, then the Site Master displays . In this case, you can re‑enable the calibration by simply setting the Cal Correction back to On (as long as the valid calibration temperature window has not been exceeded).
Save and Recall Calibration Coefficients
Calibration information is included when a setup (.stp) file is saved (even if the Cal Correction is Off). The calibration information is recalled with a setup file and can be applied if the current internal instrument temperature is within the saved calibration window.
Calibration information is not included when a measurement (.dat) file is saved.
Interpolation
If Interpolation is set to Off and the current Cal Correction is On and valid, you cannot modify the frequency range or the source power level, or increase the number of points above 1033 points (assuming the calibration was performed with 1033 points or less). Any of these changes will require the active calibration to be turned Off and a new calibration to be performed. You can, however, adjust the number of points from 130 to 1033 without forcing the calibration to become invalid. To use 2065 points, the number of points must be set to 2065 before the calibration is started.
If your current Cal Correction is On and you turn Interpolation On, you can then change the frequency range (smaller and anywhere within the calibrated range) or modify the number of points to be higher than 1033 without invalidating the calibration. In that case, the calibration coefficients are regenerated (interpolated) to match the new settings. You cannot increase the frequency range, however, beyond the range that was used during calibration.
For example, you could perform a calibration from 1 MHz to 20 GHz using 2065 points. With Interpolation On, you could then make a measurement by zooming in on a desired frequency range, 410 MHz to 435 MHz, for example. The trace in your measurement would use the full 2065 points within this much narrower frequency range.