Set as Ethernet or PCIe data streaming. Setting the streaming port depends on the speed of transfer required. Ethernet can be set for all model types, but for steaming files larger that 1 GHz, set to PCIe.
Using Ethernet
The supported analyzers have Gigabit Ethernet ports. This will provide gapless streaming up to about 40 MHz at 8-bits, 20 MHz at 16-bits, or 10 MHz at 32-bits capture bandwidth. However, if any element in the Ethernet chain runs at a lower speed, such as at 100 Megabits, then performance will be seriously degraded. IQ Acquisition Tool cannot detect this, but it will be evident in data throughput. For best performance, a direct connection is recommended, using a single Gigabit Ethernet hub or switch.
Using PCIe
PCIe capability is provided as a Streaming Port only for MS2090A, MS27200A and MS27201A and is used for very large data transfers as with large IQ captures. Note that MS2080A and MS2089A do not support PCIe due to the absence of PCIe port.
Recommendations for installing a PCIe card are:
• If total capture size is less than 1 GB, PCIe is not required.
• If total capture size is greater than 1 GB then:
a. For 8-bit capture, use PCIe if capture bandwidth is greater than 25 MHz.
b. For 16-bit capture, use PCIe if capture bandwidth is greater than 12 MHz.
c. For 32-bit capture, use PCIe if capture bandwidth is greater than 6 MHz.
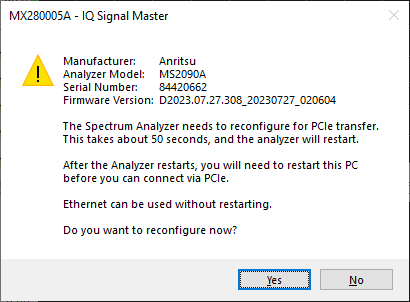
When PCIe is set, but there is no PCIe connection to the PC, a context menu is displayed as shown in Figure: PCIe Context Menu.
PCIe Context Menu
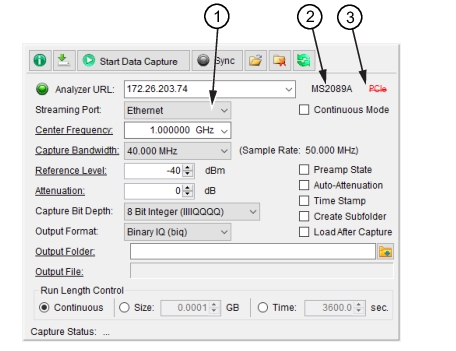
Connection Type
The connected spectrum analyzer model is displayed to the right of the URL field. PCIe is only shown when a compatible analyzer (MS2090A or MS27102A) and PCIe hardware is detected. When the model displayed is detected as having PCIe compatibility, then the Streaming Port provides PCIe as a Streaming Port and the PCIe connection status is displayed as:
• PCIe: The PCIe interface is connected.
• PCIe: The spectrum analyzer requires PCIe interface support. For instructions on installing a PCIe card into the PC and interfacing with the MX280005A software, see Installing PCIe Kit.
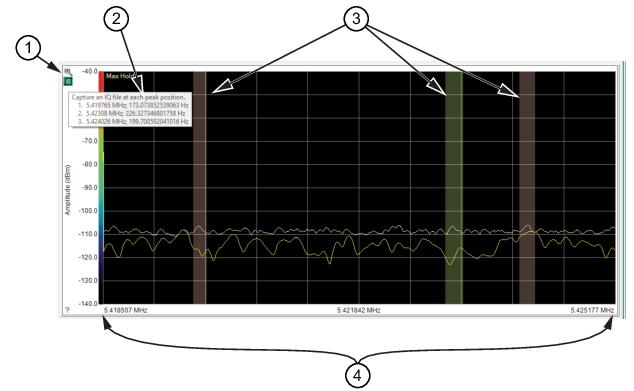
The peak detection window shows the captured IQ data and peak detection tools.
Peak Detection
1. IQ Detect Icons
2. Capture an IQ file at each peak position
3. Peaks detected
4. Center Frequency and bandwidth set. The settings are entered as shown in Capture Menu.
Use the Capture menu peak-detect icons to locate the peaks of the IQ data signal.
Peak Detect Icons
Auto Peak Search: Click to initiate a peak search of the IQ data stream. Each click sequences 1 through 10 sensitivity search where 1 is the most sensitive. Shift-click to reverse sequence the count as 10 through 1. Press keyboard Shift Up/Down also sequences the sensitivity.
Press keyboard Esc removes the peak indicators from the screen. Shift restores them. Press keyboard Shift Up/Down also sequences the sensitivity
Display Peak Details: Click to display the peak center frequency and bandwidth of the peak signals identified from the Auto Peak Search. This capture tool uses the current settings set in the IQ Acquisition Parameters setting window. See IQ Acquisition Parameters Settings.