This chapter provides information for the APPLICATION menu with controls for the PulseView™ application.Use of this feature requires installation of Option 42 (PulseView) and Option 35 (IF Digitizer).
Other Application Menu Chapters
The other chapters in this manual on the APPLICATION menu with specific application feature focus are:
Primary Application Menus and PulseView Dialogs and Menus
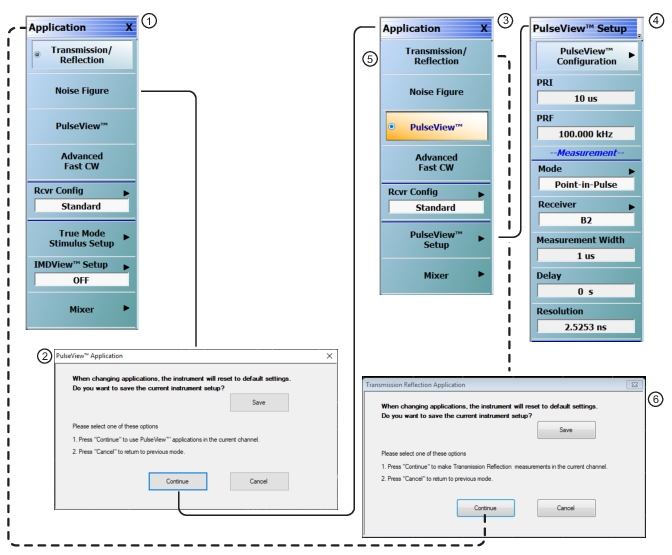
The primary menu and dialog set for PulseView measurement on the APPLICATION menu, the PULSEVIEW SETUP menu, and the related dialog boxes is shown below. After clearing the entry PULSEVIEW APPLICATION dialog box, the PULSEVIEW SETUP menu appears. When changing from PulseView to another application, a similar exit dialog box appears, and when cleared, resolves into the APPLICATION menu in new application mode.
APPLICATION Menu and PULSEVIEW Menu and Dialog Set
1. APPLICATION Menu –Typical APPLICATION menu variant with Option 42 equipped on VNA.
2. PULSEVIEW APPLICATION Mode Change Dialog Box – Provides options for canceling or saving setup and proceeding by selecting Continue.
3. APPLICATION Menu – PulseView mode selected.
4. PULSEVIEW SETUP Menu – After APPLICATION menu PulseView Setup button is selected.
5. To exit PulseView Mode, select another application on the top of the APPLICATION menu.
6. New Application Dialog Box.
Changing to Mode to PulseView Mode
When the APPLICATION menu is set to a non-PulseView application mode and PulseView mode is selected, the PULSEVIEW MEASUREMENT dialog box appears. The dialog provides opportunities to:
• Save the current instrument setup as an Active Channel Setup and Calibration .CHX file and then either Cancel or Continue.
• Cancel out of the change to PulseView application mode, and remain in the current application mode.
• Continue into PulseView application mode.
Changing From Noise Figure Mode to AnotherApplicationMode
Similarly, when the APPLICATION menu is set to PulseView application mode, and another application mode is selected, the new application dialog box appears. The dialog provides the opportunities to:
• Save the current instrument setup as an Active Channel Setup and Calibration .CHX file and then either Cancel or Continue.
• Cancel out of the change to another application mode and remain in PulseView application mode.