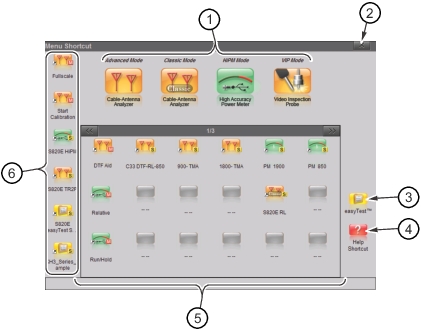
Press the Menu key to open the Menu screen. Select the desired operating mode by touching one of the large mode icons in the top row or by touching one of the user‑created shortcuts below. User‑created shortcuts may include measurement setups, submenu key, or easyTest Tools scripts. Shortcuts can be added, deleted, or moved as described below.
Measurement mode icons are pre‑installed and cannot be moved or deleted. The smaller shortcut icons are easily created or deleted by the user.
Help for the Menu Shortcut screen is available by pressing the Help Shortcut icon in the lower‑right corner of the display when the menu screen is active.
The shortcut icons on the left of the Menu screen are available for direct access in all modes except Classic. When in classic mode, shortcuts are available only by pressing the Menu key.
Create a Menu Shortcut for a Submenu Key
Press and hold down any submenu key to add a shortcut to the Menu screen. After a few seconds the Menu screen is automatically displayed showing the available locations for the shortcut. Select an unused location to store the new shortcut.
Create a Menu Shortcut for a Setup File
Press File (7) then the Recall submenu key to display saved files. Locate the desired setup file (.stp) to shortcut and then, using the touchscreen, press and hold on the file name until the Menu screen is displayed. Select an unused location to save the setup file shortcut icon.
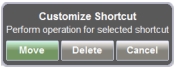
User‑defined shortcuts stay in memory until deleted. To delete or move a shortcut button, press the Menu key, then press and hold the shortcut until the Customize Shortcut dialog box (Figure: Customize Shortcut) appears. This dialog box provides options to delete or move the shortcut. If Move is selected, then a green rectangle outlines the shortcut button. Touch the new location where the button is to be placed. If the location is empty, then the outlined button moves there. If the location contains a button already, then the two buttons swap locations.
Customize Shortcut
If a file (with an assigned shortcut) is moved or deleted, then that shortcut icon becomes nonfunctional and must be removed manually. If a nonfunctional shortcut is pressed, then a message is displayed: “Error Recalling File...”
Installed Setup and Menu Shortcuts (Screen 1 of 3)
6.
Shortcuts Displayed in All Menus (not available in Classic Mode)
Note
Shortcuts for both menu buttons and setup files can be deleted as a group under the Preset Menu > Reset submenu. Select Delete Custom Files, then select the Menu Shortcuts checkbox. Press the Delete Custom Files button.
Press this key to cancel any setting that is currently being made or to close the currently dialog box.
Enter Key
Press this key to finalize data input or select a highlighted item from a list.
Shift Key
During file management functions the shift button toggles the on-screen keyboard between upper case and lower case characters. It may also be used for saving screen shots. To save a screen shot, press and hold the Shift while then pressing (one at a time) the period (.) key, then the +/– key. Refer also to Screen Shot Capture.
Arrow Keys
The four arrow keys (around the Enter key) are used to scroll up, down, left, or right. The Up/Down arrow keys can often be used to change a value or to change a selection from a list. This function is similar to the function of the rotary knob. The Left/Right arrow keys can be used to move markers and the Up/Down arrow keys can also be used to move limit lines.
In Video Inspection Probe (VIP) mode, use the arrow keys to pan a captured image. Refer to Video Inspection Probe (VIP).
Number Keypad
The Number keypad has two functions: The primary function is number entry. The secondary function of the number keypad is to list various menus. See Keypad Menu Keys (1 to 9) below.
Rotary Knob
Turning the rotary knob changes numerical values, scrolls through selectable items from a list, and moves markers or limit lines. In VIP mode, use the rotary knob to zoom in and out on a captured image.